Shading Light and Form – Basics
This lesson has a premium version with extra content. Get it now!
1.4M views
lesson video
Shading Light and Form – Basics
courseFigure Drawing FundamentalsFull course (57 lessons)
-20%
$120
$150
You save $30
assignments 46 submissions
@hiflow
Took some liberty and did the assignment digitally.
LESSON NOTES

You should watch my previous video in which I cover some basic elements featuring shape, value, color and edge.

The first thing you need to understand when starting to shade is how light affects the appearance of form and how to properly capture 3 dimensional form based on the characteristics of the light in the scene.

In some of my previous videos I talked about things like shapes, values and edges. How do we know what shape, value or edge to draw? What exactly are we looking for? Well, we’re looking at Light and how it illuminates the objects in our picture. Light is the reason we see anything and the characteristics of light can completely change the appearance of the things it illuminates. So, I like to analyze the light in the scene and try to capture it, so the viewer can FEEL the light. Form looking 3-dimensional is a byproduct of correctly capturing the light on the form.Ok, so I hope I’ve convinced you that studying light on form is important. Now let’s take a look at all the elements. For this I’m gonna need an egg.

Ok, so I hope I’ve convinced you that studying light on form is important. Now let’s take a look at all the elements. For this I’m gonna need an egg.

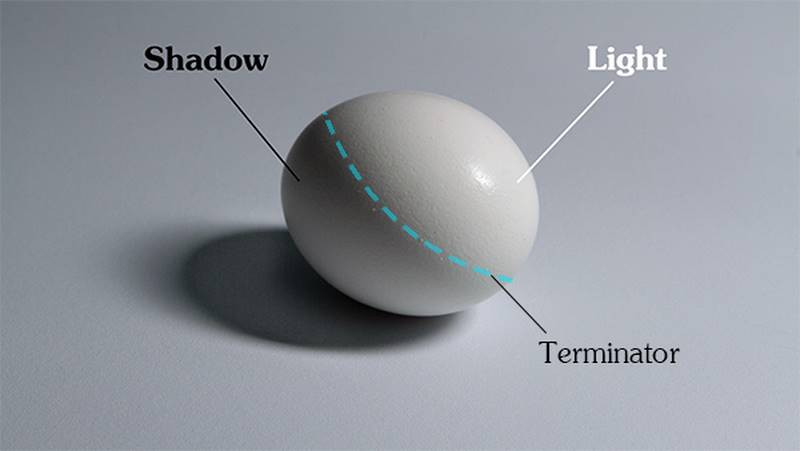
There are two main zones. Light and shadow. The edge where the form transitions from light to shadow is the terminator. It’s located at the tangent between the light source and the form. In other words, just before the planes start to face away from the light.

shadow light terminator

Shadows

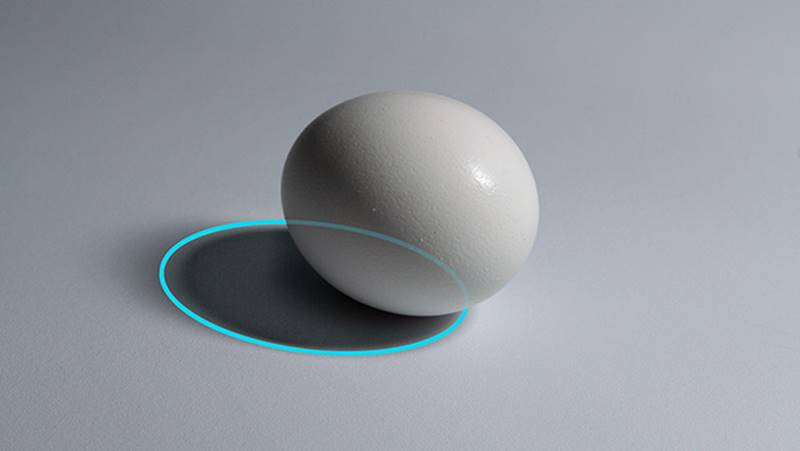
There are two types of shadows. Form shadow is a shadow caused by the planes turning away from the light source. A cast shadow is caused by one form blocking the light from hitting another form.
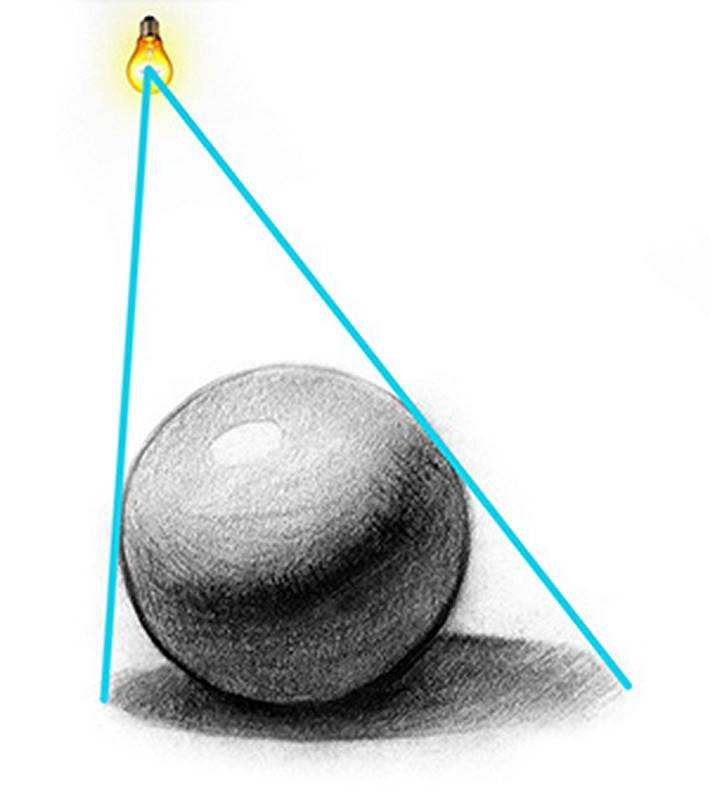
cast shadow

light source

This egg is blocking the light from reaching this part of the table. You can find this shape by projecting lines from the light source to the termination of the first form, and continuing those lines to the obstructed form.

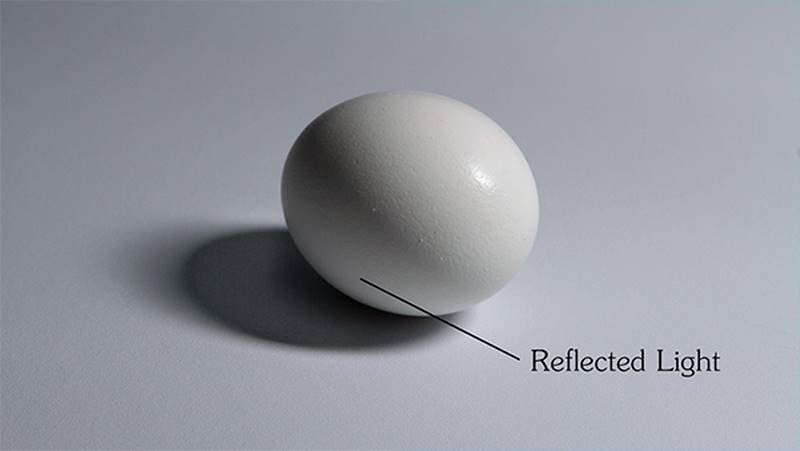
Shadows will rarely be completely black. Light bounces off objects in the environment and is reflected back into the shadows.

This is called reflected light. In this case the light will bounce off the paper and into the shadow on the egg.

Along the terminator, sometimes you will see a core shadow. It’s a darker plane that defines the edge of the shadow. The thickness and softness of the core shadow can vary quite a bit. It depends on the thickness of the form, how sharp the edge is between the planes of light and dark, or the angle and position of the reflecting light source.

reflected light

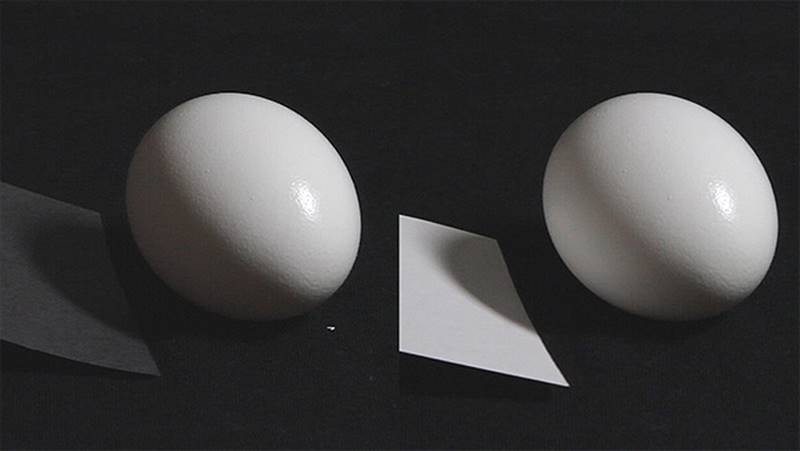
Sometimes you won’t see the core shadow at all. Only if there is something on the shadow side, to reflect back enough light to create a visible difference in value. This dark piece of paper reflects less light than the white paper. You can see a drastic difference in the value of the reflected light.

Also, regarding the visibility of a core shadow, the reflection has to come from the right angle. If it’s directly behind the shadow side, it will create a nice core shadow. If we move the reflection source closer to the angle of the main light source, it will illuminate the area where the core shadow would have been.

black and white paper reflected light

If you don’t see a distinct core shadow, many artists choose to cheat one in because it can add to the 3-dimensionality of the form.

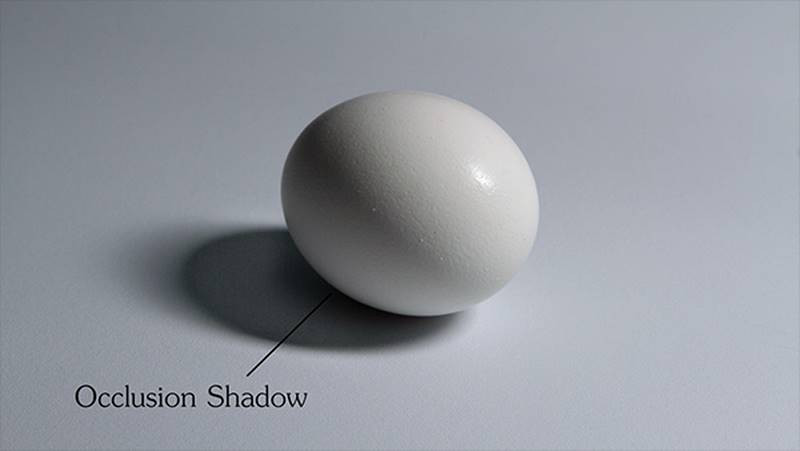
Reflected light doesn’t just affect form shadows. It also affects cast shadows. Less light can bounce into this deep crevice where the egg and table meet, and so that area gets darker as it goes deeper. This is called an Occlusion shadow

occlusion shadow

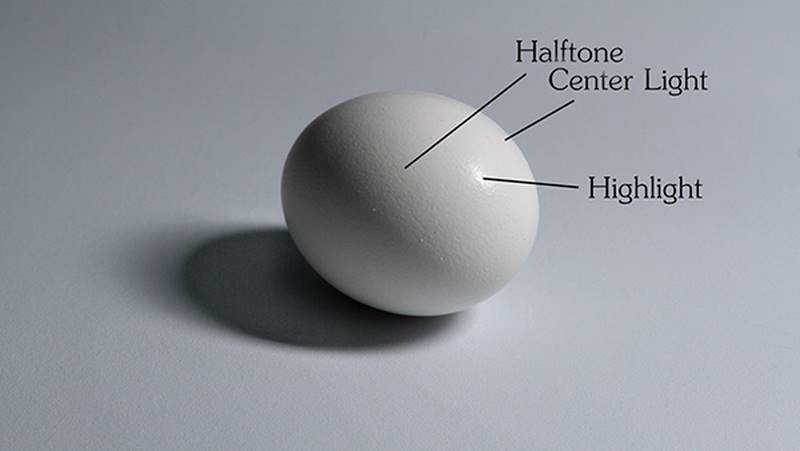
Moving on to the light zone, immediately after the terminator, is the halftone. These are planes of the form that are partially hit by the direct light. As the planes get closer and closer to facing the light, they will get lighter. And the point where the form points directly at the light is called the center light.

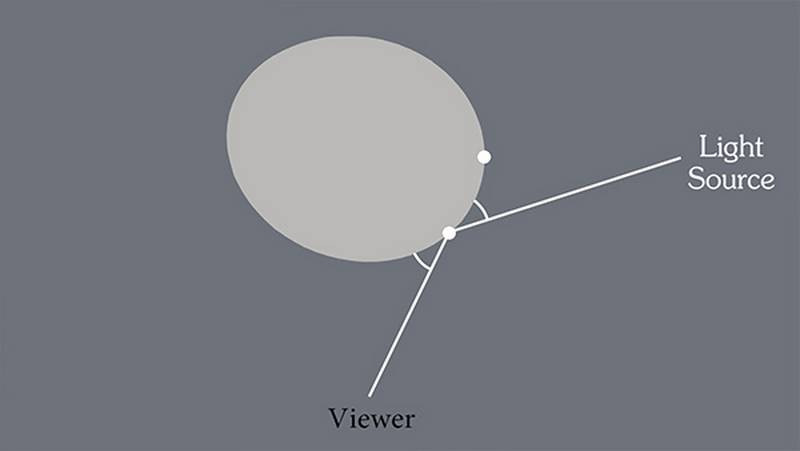
The center light shouldn’t get confused with the highlight. The difference between the two is that the center light is the plane facing the light source, whereas the highlight is a reflection of the light source. A reflection will move depending on where the viewer is. So let’s say this is the egg. The viewer, or camera is down here, and the light source is over here. The center light will be here facing the light source. The highlight, however, will need to be at the point where the light can bounce off the surface of the egg and reach the viewer’s eyes.

center light highlight halftone

These two angles need to be equal. If you’ve played billiards, this is very similar.

To test this concept let’s mark the point of the highlight, and mark another point for the center light. Now let’s move the camera and see what happens. Ok, you can see here that the highlight moved to a different spot, following the camera. The center of light hasn’t changed.

viewer and the light source

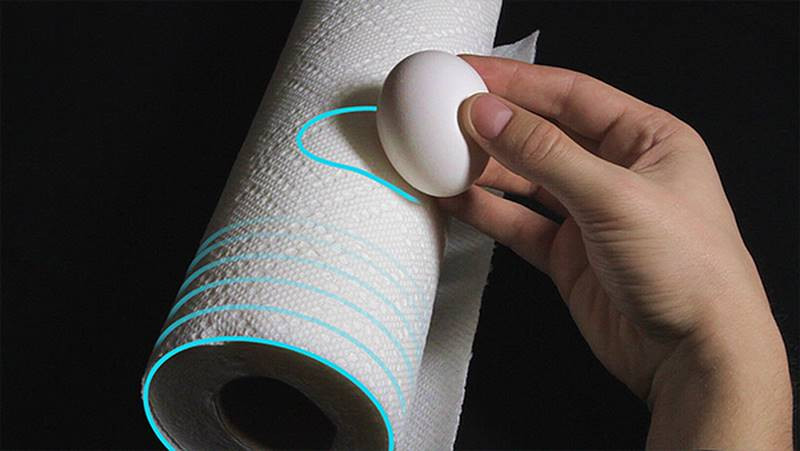
Don’t let the math of all this confuse you. Highlights, and also cast shadows which we discussed earlier, can be changed and they can still look believable. People are not going to call you on a highlight being in the wrong spot. I can take the highlight on this egg, move it to a different spot, and change the shape. And it still looks believable… I’ll often change the shape of a cast shadow to better describe the form it is being cast onto. For example if I have an object that casts a shadow appearing to go against the form. The form of this paper towel roll is a cylinder and to show that I would change the cast shadow from the egg to wrap around the cylinder. I usually try to describe the form that the shadow is casting on to, rather than the form casting the shadow.

egg cast shadow on paper towel roll

So, give yourself artistic license. Learn the rules, and then learn how you can break the rules to improve your drawing.

Want to learn more? Check out the next lesson on how to Shade a Drawing!

DOWNLOADS
txt
shading-light-and-form-basics-transcript.txt
6 kB
mp4
Shading Light and Form - Basics.mp4
276 MB
ASSIGNMENTS

Shade an Egg

Take an egg out of your fridge and place it on a piece of white paper. Light it with a direct lightsource (desk lamp, flashlight, etc…) Shade the egg using what you learned from this lesson. Identify a clear shadow shape with the core shadow and cast shadow. When you fill in the values, separate the lights and dark and keep that separation and you add the halftones and occlusion shadows. Change the light angle and draw it again!

Newest
Amortquio Flores
Had a hard time doing shadows with a ballpoint pen. It's not that good but I did it. Any tips?
Richard W
2mo
For this work, I've changed from usual printer paper to Ingres Pastel coloured paper...
Tommy Pinedo
Im not happy with this attempt because I believe I messed up on the shading. I was trying my best to make it look smooth with graphite pencils, a blending stump, kneaded eraser and even my finger lol.
Melanie Scearce
I think this looks great @Tommy Pinedo! Sometimes less is more. Try being conservative with the tools and see what you can get with just the pencil first. Overworking something can undo a lot of good work.
@usernamegobrrr
Hi, here's my attempts at shading some vaguely egg-like circles. (Not sure if it makes a significant difference in clarity, but I included photos with and without lamp light.)
@hmedhat96
1yr
Martha Muniz
Very lovely! You have already a great description of form, the only thing I would recommend is further pushing the definition a bit with some contrast. You could even achieve this by only adding a bit of darker value in the current darkest areas, making it really pop and read more clearly. Great work nonetheless! :)
@lazy0
2yr
Another Batch of shading studies, could someone give me honest feedback of these? I'm having trouble with the bounce light also having trouble with placing the cast shadows to look somewhat accurate to the reference, Honest feedback needed please thank you.
Camellito
2yr
Well, if I had to give you some advice, it would just be to darken the shadow values ​​a little more. But everything else is fine. It shows that you understand the concept of light shadow. Keep it up!
Rachel Dawn Owens
These are perfect!
@lazy0
2yr
These where done digitally, I know the cast shadows are a bit wonky and out of shape, but I need some help with seeing more mistakes in these shading studies. Also the proportions are off in the second and third one, but I cant find any more mistakes, Please critique and don't hold back I want everyone's honest feedback.
@lazy0
2yr
Okay thank you
Rachel Dawn Owens
Spot on! The values are excellent and I see no issues with proportion. You could try to add that bit of reflected light from the ball on the tables. Light can bounce all over the place. Bounce light makes a form feel more real. Overall these are rendered very nicely. Good work!
Sofi
2yr
Hello, here are my shaded eggs. Feedback would be greatly appreciated.
hArtMann
2yr
Had a lot of fun with this assignment. For some reason I didn't get highlights.
carla toms
2yr
super fun to look at! the form light, half tones, and bounce light look great to my eye, particularly on images 3,and 4. On image 1, the egg on the left, and on image 2 there is a little more half tone on the pointy part of the egg than my eye is expecting and i'm wondering if lightening it a little would improve the image but i'm not sure. now, consistently, there's a darker cast shadow and a lighter cast shadow. are these the ambient occlusion shadow and the cast shadow or the cast shadow and the penumbra? i can't be sure from looking. i'm wondering if it would improve the image to darken the ambient occlusion shadow and blur the penumbra. what do you think?
Donald Nichols
these look amazing
@atv
2yr
Hi, these are my attempts for the egg shading. I have problems with the reflected light.
@bettkevin
2yr
@bettkevin
2yr
these were my first attempts where l faced quite a challenge with value. Despite the challenge l noticed that in some instances the cast shadow could be casted on the form shadow and l wondered of the drawing approach towards that.
@bettkevin
2yr
Martha Muniz
Hi Kevin! It looks pretty nice, I would just recommend fading out the core shadow more into the light, not too much where the light becomes dark, but enough where it's a softer transition. Right now there's a bit of a sharp divide between the dark and light sides so fading it a touch can help.
@bettkevin
2yr
My name is Kevin, and this was my take on the assignment. Gladly pass on any critique on how l could further improve my pencil renderings
Samuel Sanjaya
Did a simple (traditional, charcoal) and a more complicated shapes value study(digital). Is charcoal supposed to be this texturely ? I saw on youtube people seems to be able to shade with charcoal evenly.  Anyway, any feedback/critiques on the value study will be greatly appreciated..
Martha Muniz
Hi Samuel! Great Asaro head study! Something for the simples shapes studies is that I'd recommend starting by placing the terminator line, then the shadow group, then layering on top to add the halftones and darkening the darkest areas of the shadows. Being able to break down any subject into just light and dark groups is key to rendering and shading. Also, as for charcoal, it can be rather textural depending on what type you are using and on what type of paper. In my experience, charcoal paper has given me more texture, so I opted for smoother drawing paper, but I didn't experiment much beyond that. I would recommend just trying different kinds to see what you like best personally or looking at reviews. Also, as you are practicing, try out newsprint if you can--it's very cheap so you can get a lot of mileage practicing without worry, it's good with charcoal, and ateliers tend to use it.
Samuel Sanjaya
attempting the egg again, I hope i can get some feedbacks..
Martha Muniz
Hi there! Remember to keep the shadows darker than the lights. While it's great you're taking into account the reflected light, the effect it has on the egg would be much softer, so the value would remain darker than even the darkest light area. Hope this helps, keep up the good work :)
Samuel Sanjaya
I could swear that I shade the halftones much darker than that. I guess my eyes still need more practices.
Eveline Rupenko
Hi! Here are few sketches I've made for this assigment!
faye zhang
3yr
I put a lot of effort into drawing these eggs. I even enjoyed doing them, compared to years ago when I wasn’t willing to spend sufficient time on them. I also watched Dorian Iten’s video on how to shade an egg.
@elkad
3yr
Here are some eggs! (In charcoal + 1 graphite. Might have a go at digital later). I haven't had much practice with charcoal or the overhand grip so these came out a little rough. Plus I think the paper was too textured or maybe the sandpaper I used was too coarse cause the lines ended up being roughly textured. One thing I could work on is hatching. I tried following the contours to some degree but ends up looking a little sparodic. Any other critiques are appreciated!
@kotka
3yr
I had the same problems, my paper was wave as if previously moist and dried, and there were some weird scratchy bits in the charcoal! Still looking for the perfect paper that I can get a hold of in Europe/Scandinavia without luck...
@elkad
3yr
Tasty digital eggs :)
@opaqueapple
Hi everyone, I did some shading on eggs as the exercise for this section; The first page i initially ended up taking the pictures for which i used as reference. the order which they are uploaded by should go by order of the number on the page. As for the second page, i unfortunately didnt take any reference photos. Any Critiques would be much appreciated!
Jesper Axelsson
Hi @opaqueapple, nice studies! I think the core shadows are really nice! - I think the values in the shadow are getting to close to the values in the light, which diminishes the feeling of form.  As a rule of thumb 'the lightest dark should be darker than the darkest light'. You might appreciate this video Mind-Blowing Realistic Shading Tricks. If you want to learn more about values, you can access the How to Organize Values lesson for free through the Proko Course Sampler. Hope this helps :)
@emmahubner
I did my practice studies digitally. Learning the different terms for the shadows and light was useful. Any feedback would be appreciated. Thanks!
Help!
Browse the FAQs or our more detailed Documentation. If you still need help or to contact us for any reason, drop us a line and we’ll get back to you as soon as possible!