How to Draw the Head from Extreme Angles
This lesson has a premium version with extra content. Get it now!
2M views
lesson video
How to Draw the Head from Extreme Angles
coursePortrait Drawing FundamentalsFull course (35 lessons)
-20%
$52
$65
You save $13
assignments 63 submissions
Roland Karafa
From 1 to 23 i used photos for reference,from 24 i made them from imagination 34 was an attemt to draw a baby. Your feedbacks are appreciated.
LESSON NOTES

A great way to learn is to teach someone else. Explaining something forces you to organize the information in your mind and helps you remember it.


***

In this lesson, we go EXTREME!

Extreme angles are usually very challenging and frequently ignored by most artists even some advanced. Studying the extreme angles will make you better at the more common angles because you’ll have a better understanding of the method.

The Z-AXIS

Let’s start by talking about rotation along the z-axis, or leaning the head to the side. This has a few important effects. First, the center line and brow line will be at an angle. Second, the side plane will go down to reveal more of the top of the head or up to reveal more of the bottom.

And the ellipse of the side plane will be angled perpendicular to the brow line. This is caused by the ellipse being in perspective.

To get the proper angles on the front and side planes, remember that the head can be simplified into a box to visualize the perspective.

The third effect a twist has is on the gesture of the neck. Look for the curve. No lollipop necks, please.

The concept of stretch and pinch applies here too.
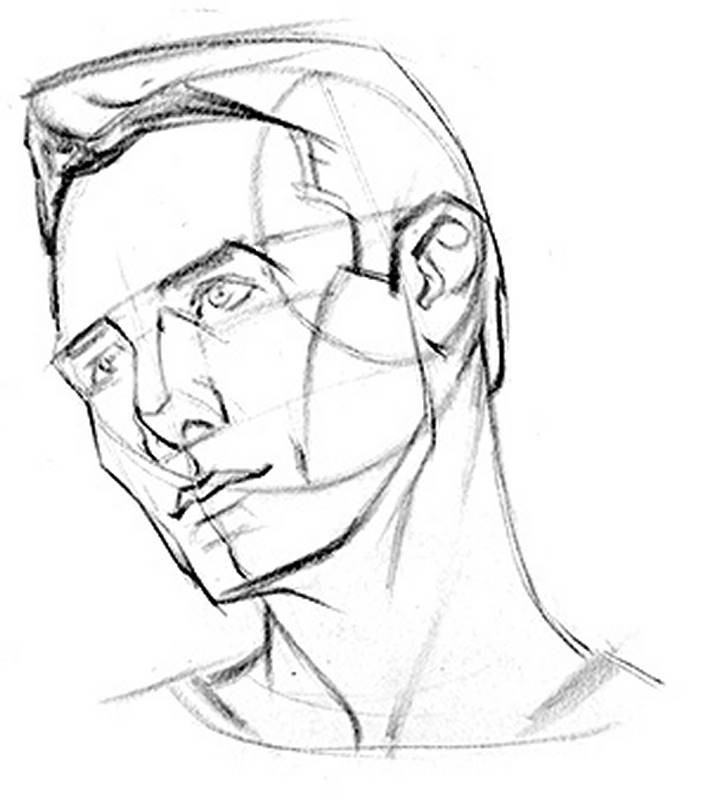
loomis head twisting x axis

The X-AXIS

Now, let’s take a look at extreme up and down tilts along the x-axis. I always look for the degree of the tilt by observing the angle from ear to brow. Find the angle of the brows and then the thirds. Remember what we learned in part 2 of this series about foreshortening.

The thirds will get smaller as they recede from us. So, in an up tilt, the bottom third will be about the same size as half of the side plane, and the forehead will be fairly small. And the opposite in a down tilt.
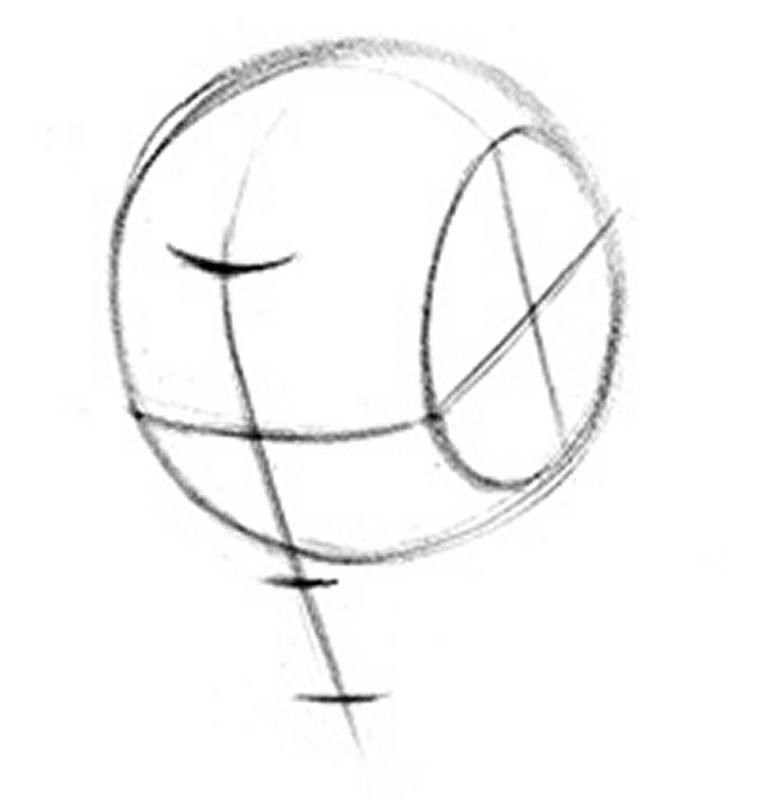
loomis head looking down

A confusing area for most people is the shape of the jaw as the head rotates up and down. During this rotation, the relationship of the corners of the jaw and bottom of the chin will change. As a person looks up, the chin will come up and at one point be in line with the jaw, creating a boxy shape. If you keep going the shape actually inverts and you get the opposite triangle. In an up tilt you’re also seeing the bottom plane of the jaw, which wraps around the cylindrical neck. As a person looks down, the jaw shape becomes more triangular.
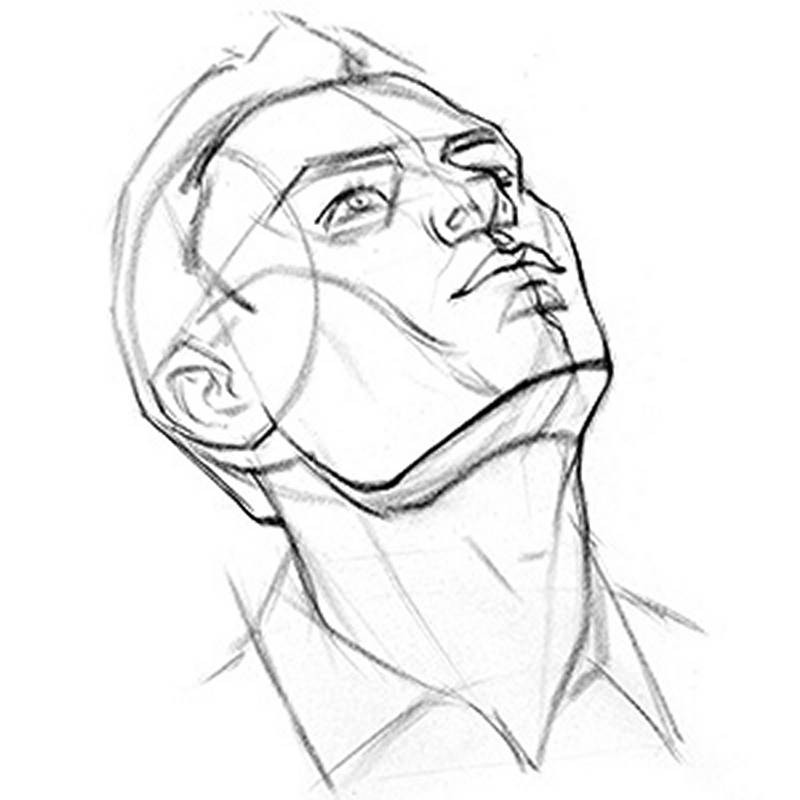
loomis head drawing uptilt

Another common area of frustration is the tip of the nose. In an extreme up tilt, the tip will be unusually close to the eyes. It’s so unusual that most of us will feel like we need to move it down to lengthen the nose. Observe the shape of the bottom plane of the nose and compare it to the length of the middle third.

It’s important to remember that the eyes and lips are not flat on the face. They are rounded in their simplest forms. So, observe the curvature of these features as they wrap around those forms.

The Camera

We’ve covered the extreme rotations along the 3 axes, the only thing left is the effect of moving the camera, or vantage point of the viewer, above or below the head. When this happens, the side plane rises or drops, similar to the twist, but this time without changing the angle of the center-line. The neck will be mostly covered by the head, and we just see shoulders.

Like what you learned? Check out the next lesson on how to draw eyes!
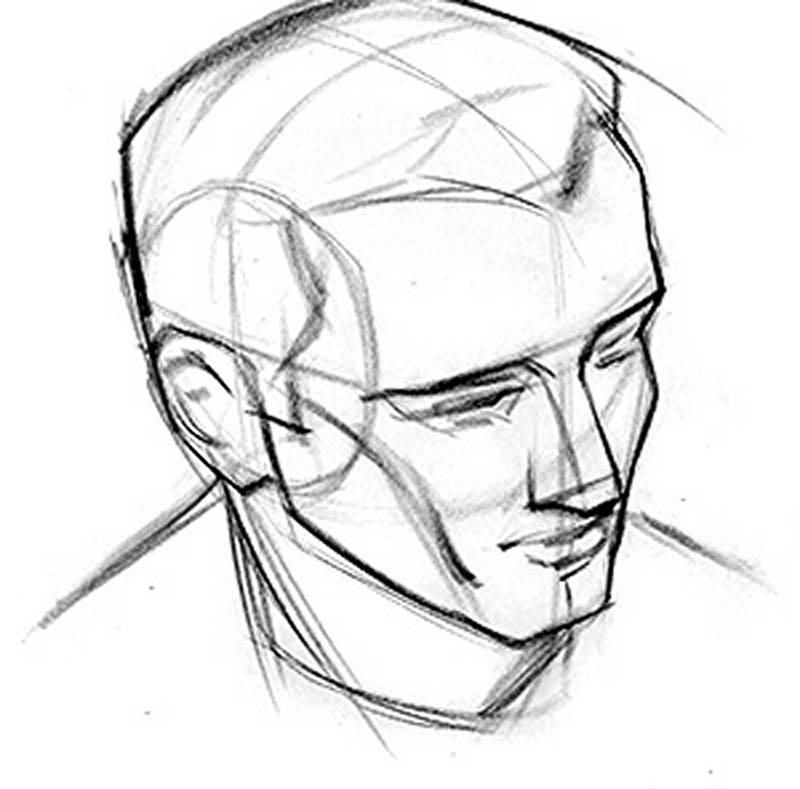
head drawing camera tilt
DOWNLOADS
txt
how-to-draw-the-head-from-extreme-angles-transcript.txt
4 kB
mp4
How to Draw the Head from Extreme Angles.mp4
431 MB
ASSIGNMENTS

Draw the Loomis Head - Extreme Angles

Now you can draw the head from ANY angle. Start by drawing some extreme head angles from imagination. Test yourself to see if you fully understand the loomis head forms. Then check your work with the 3D Loomis Head model. Practice drawing a few more angles by placing the model in angles you are having trouble with. The goal is to challenge yourself and overcome your weaknesses.

Newest
Christopher Corbell
I did this batch of drawings starting with boxes in perspective. I think I have a pretty good handle on drawing odd angles from reference but when trying to draw from imagination the main challenge I have is intuiting how much to foreshorten the face proportions when the head is angled up or down. I'll keep experimenting in this way, and maybe 'box up' some drawings from reference too as perspective/foreshortening studies.
Amani Noor
1yr
I had a some trouble with the eyes on the side tilt. Any advice on that would be appreciated!
@artcart
11mo
Amu, very nice drawings! Regarding the eyes on the side tilt, I think it may be an alignment issue. If I hold up a straight edge such as a pencil to the line of the lips and the line under the. nose and then carry up to the eyes, that is where I see the eyes are not in total alignment. For example, I think the indentation by the left eye may be too low and the left brow lower than the right. Try it and you might see what I mean.
Brandon
1yr
line quality is good as always, for eyes in different angles, I think u can imagine the eyes as an oval with different degree(we learnt that in basic course) when u re doing head studies. Although I don't see any issues in the side tilt, except for the neck(stretching side) could be less curvier to emphasize it's stretching, you can do a tracing, focus on the eyes for the side tilt to find the oval. Hope that helps.
faye zhang
1yr
I tried my best and my inadequate perspective knowledge might be the problem, but can someone tell me if these are okay? I have no clue where the edges of the circle should be in these pics. I try to draw a circle, and sometimes parts of the head or the face don’t fit in it. I.e. in the pic where Stan is looking down, I had to draw the circle lower, but then the top of the head isn’t included anymore.
Melanie Scearce
I think the issue could be that you aren't covering the entirety of the head with your boxes/loomis head. Remember that the center point of the side plane is also the mid point of the entire head. Hope this helps!
WS R
1yr
great
Vera Robson
I understand how having some sort of scaffolding helps with drawing portraits, but when I try to fit a real person into a Loomis head, every time I feel like I am cheating. Maybe I should have done imaginary heads in this section, but I don't have enough experience to draw heads from imagination.
Gannon Beck
As Glenn Vilppu says: "No rules--only tools." You can't cheat if there are no rules, so horde these drawing tools with abandon! Very nice drawing here. I'm looking forward to seeing your continued progress.
Rachel Dawn Owens
Beautiful drawing!
Vera Robson
I have realised that I was struggling with these heads because I misunderstood the construction of orthogonal slices on the sphere. I used up half a sketchbook trying to understand why my construction lines don't meet 🤦🏼‍♀️ I so much look forward to the new perspective course!
@sharpjab
1yr
So I tried sketching heads from extreme angle from reference. I realised I don’t know how to handle areas in shadow without going into shading and details especially for extreme angles. So I tried to create heads from less extreme angles from imagination. I can see when I draw out of imagination I don’t face the shadow area problem because I’m not drawing considering any particular source of light.
@ollieb137
2yr
CAMERA ANGLE Am I right in saying that as we change the view of the loomis head 3D model, it isn't actually the 3d model that's rotating but the camera's position that's changing? As Stan mentions in this video, if the head tilts up or down the centre line will be at an angle (more noticeable from a slight side view), however, if it is the camera that's changing position - above or below the head - the centre line will remain vertical. As you rotate the model, the centreline remains vertical (sometimes slightly angled due to foreshortening). Please correct me if I'm wrong!! I'm still learning :)
@colinml
2yr
I don't know if this is the answer to your question, but I have been confused by the 3d model because you can't position it in the pose that Stan often uses in these videos. Your question lead me to realize that the reason is that, in Stan's examples, he is, indeed, tilting the center line off of vertical, while the model cannot do this (it remains vertical, or nearly so, no matter the position). The screen captures show a grab from the video in this lesson, and a grab from the model in as close a position as I could get it to other grab. Note the difference in tilt of center line.
Jack Mills
2yr
Extreme Angle sketches.
@dcordes
2yr
Pretty difficult exercise. Heads themselves were not too difficult, but their attachment to the neck could use greater instruction.
@grugrugru
2yr
First and third page from imagination went better than expected. Real life reference was harder than I thought. The ones with circled numbers I had more trouble with. Critique or advice is appreciated :) challenging exercise this one.
Jesper Axelsson
Nice! It might help to pay more attention to the overall shape of the head. In #16 you've drawn the shape less compressed than it is in the photo. What's your art goal? Drawing like animators might help a lot if you want to draw from imagination. In these drawings https://photos1.blogger.com/blogger/508/2740/1600/ariel04.jpg by Glenn Keane, the character is built with large shapes. Starting with that, the major shape that you then break down, working outside in, is something I've found to work better when drawing from imagination than working inside out, arriving at the shape through a construction method. You might appreciate this lesson video How Animators Use Basic Shapes with Aaron Blaise Cheers!
@ern1s
2yr
Hi guys, sorry for bad quality pic, its the best i could get from my scanner. I struggle to understand where to position and what size i should draw cranium. Hit and miss every time for me.. any suggestions?
Martha Muniz
Hi there! Since we start drawing the head with the cranium, it's more of the surrounding shapes we add that influence whether it feels in proportion, and we can use the cranium as a base for those measurements. You seem to have good proportions already though, so the only thing to work on would be the alignment/placement of the landmarks together. It helps to think about the shape of the head as whole simplified into a box, with each side of the box representing a side of the head. You can practice starting out with a box, then drawing in the head, or just using a box to check your work. Boxing things up helps find and correct perspective mistakes, which is key to making a drawing appear believably three-dimensional. Below is a quick drawover and an image from the first head drawing lesson. Hope this helps!
S R
2yr
Nine from imagination and nine referring to the 3D model. Low angles are very difficult, I think I might be drawing the front of the face too long.
*Reworking Profile* From The Game.
20/8/2023 How about more?
*Reworking Profile* From The Game.
20/8/2023 Some More.
*Reworking Profile* From The Game.
20/8/2023 And more.
*Reworking Profile* From The Game.
20/8/2023 Posting some left extra angles I didn’t know I had.
@nightfall
2yr
extreme angles, i dont have enough time to draw today so this looks messy
Marco Sordi
2023/8/15. Good afternoon everybody. Just having fun with some extreme angles head study. The last one is the worst case to me: almost front view but upward looking face. What’s your worst case? I’d like to know😉 Thanks and have a good evening.
*Reworking Profile* From The Game.
13/8/2023 Final Set of Angles. (This week)
*Reworking Profile* From The Game.
13/8/2023 Third Set of Angles.
Help!
Browse the FAQs or our more detailed Documentation. If you still need help or to contact us for any reason, drop us a line and we’ll get back to you as soon as possible!