How to Draw an Eye – Step by Step
This lesson has a premium version with extra content. Get it now!
2.1M views
lesson video
How to Draw an Eye – Step by Step
coursePortrait Drawing FundamentalsFull course (35 lessons)
$65
assignments 107 submissions
Daniel Lykke
I struggle a bit to find the right proportions and ankles of the plans of the eyes, and I am not sure if I put enough darkness in my shadows 😅 maybe I just have to Measure some more, do any of you guys have some feedback for me, i’m really enjoying the course and the learning a lot😊
LESSON NOTES

Direct light terminology explained

***

In this drawing lesson I will show you the step by step method of how I draw an eye. Before you attempt this yourself I recommend you watch my previous video in which I cover the structure of each individual part of the eye.

Step 1 - LAY-IN

So, every drawing starts with a layin. This phase is usually linear and is focused on proportions and shape design. You want to make sure the the major shapes are the right size and in the right place BEFORE you start adding details.

Most of the time, my layin process involves starting with the biggest shapes and then breaking it up into smaller and smaller shapes. So for an eye, the largest shape, is the eye socket. Start with the angles of the eye brow, side of the nose to bottom of the lid and back around to the side of the socket.

I like to group the lids, sclera and iris into one shape at first. I feel that it’s easier to get this shape accurately placed inside the socket, instead of drawing all the pieces individually. I make sure to observe all the angles of the plane changes.

drawing the eye layin

Then, I can break down this group into it’s smaller pieces. When you’re drawing the lids, make sure you include the bottom plane of the top lid and top plane of the bottom lid. This will show the thickness of the lids.

This eye is looking directly at us, so it will be a perfect circle. Usually the top lid will cover more of the iris than the bottom lid.

Don’t forget about the thickness of the eyebrow and make sure the distance from the brow to the top lid is correct.

Step 2 - TWO-VALUES

The 2 value stage is very important. Most people want to jump ahead and start rendering details. If you’re advanced, you can do whatever you want, otherwise, I suggest simplifying the process. The 2 value stage involves separating the areas that are directly lit from areas that are in shadow. To clarify, halftones are considered part of the lights, and reflected light is considered part of the shadow. If this terminology isn’t familiar to click on the link at the top of this post.

drawing the eye two values

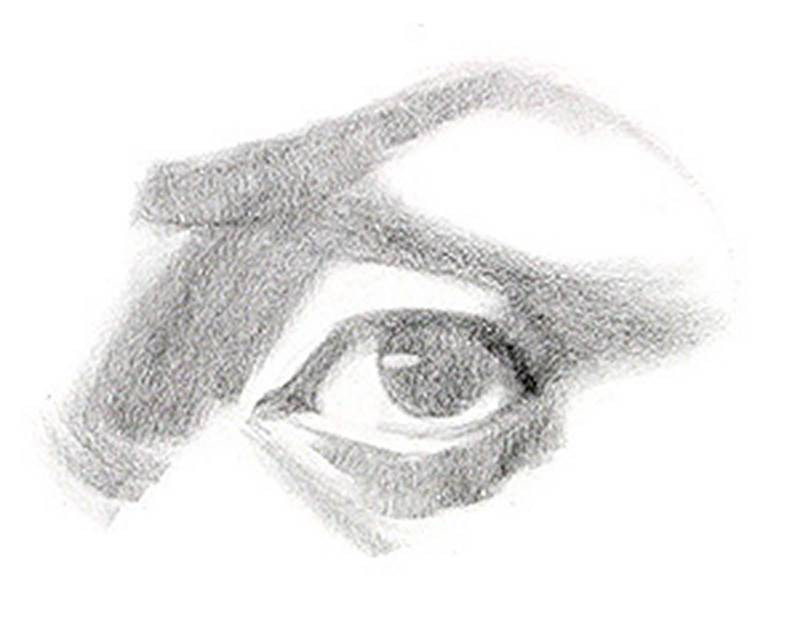
So, I’m observing the light pattern and trying to design those shapes. This stage should look clean and graphic. You should only have 1 value for the lights and 1 value for the shadows. My shadow value is usually around a 4 on the value scale.

Step 3 - FULL VALUE / DARK ACCENTS

Now I’ll put in the darkest areas of the drawing. I do this to establish my value range. Meaning, I have the darkest and lightest values in my drawing. You’ll typically find the dark accents in core shadows, deep creases, like on the top lid, and areas that have a darker local value, like the hair of the eyebrow.

drawing the eye full calues and dark accents

After putting in the dark accents, you start to see the reflected light in your drawing. Notice that I didn’t erase the reflected lights to make them lighter, I just darkened around them.

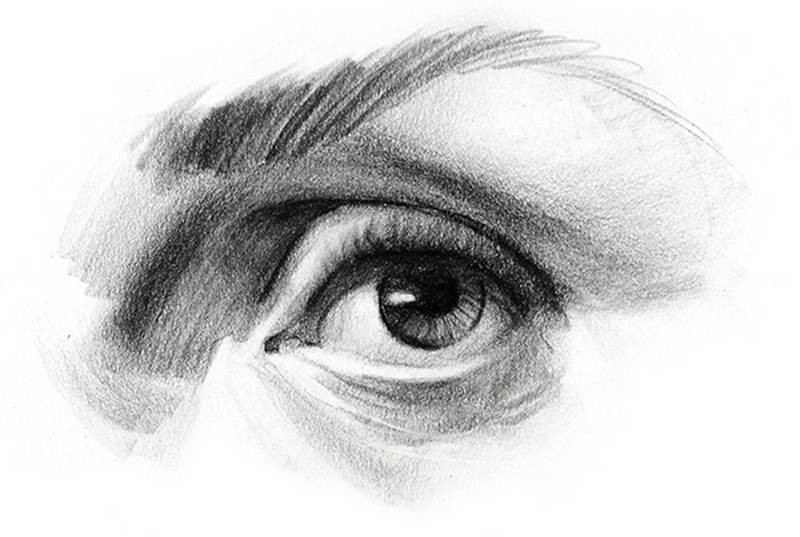
Step 4 - HALFTONES and HIGHLIGHTS

At this point, I switch to the lit areas of the drawing and I focus on the gradations and plane changes to make the forms read a little bit more 3-dimensionally. If you find the highlights, then you’ll know that everything around them just needs to be a little bit darker as the planes turn away from the light source.

half tones and highlights

Step 5 - CLEAN UP EDGES AND SHAPES

Finally, I’ll go through the whole drawing one more time and clean up anything that I think can make the forms read better. I’ll sharpen some edges, clean up shapes, and maybe add some more details.

So, for example I want to sharpen this cast shadow from the top lid and make sure that it’s shape wraps around the eyeball.

I’ll add some fuzzy eyelashes… and finished!

how to draw eyes finished

Want to learn more? Check out the next lesson on !

DOWNLOADS
txt
how-to-draw-eyes-step-by-step-transcript.txt
5 kB
mp4
How to Draw an Eye - Step by Step.mp4
642 MB
ASSIGNMENTS

Draw the Eyes

Take a picture of your own eye or find some good photos online (get some with clear light and shadows). Follow my step-by-step lesson to complete the drawing. Rewatch the lesson to review all the anatomical details. Those take a few times to understand.

Knighty Shiny
Yayyy im proud of myself critique wanted and welcomed
@bfoxart
1mo
A few eyes
@beezyo
2mo
Drew my first eye, how does it look?
@pierreyves
Here the first of a long series I think. Love this course, short and concise explanations, easy to implement. Thanks Stan!
Christopher Corbell
Here's my assignment submission. It's my wife's left eye.
Melanie Scearce
Beautiful!
Richard W
7mo
My own eyes... any comment is welcome
Büşra
8mo
Shynnel Cumming
Top photo is on my own, bottom photo is after/while watching the video.
Rachel Dawn Owens
Great improvement! You’re already focusing more on lines, forms and shapes rather than detail.
Allen Gordon
Definitely got to practice more but I can already the difference this will make in my art
Amani Noor
1yr
This was a super helpful lesson and I had fun drawing eyes from different angles! I had some trouble with drawing #3. My reference was lit very softly but I didn’t really know how to place the halftones. Any advice on that would be appreciated.
Ethan Burke
First attempt while following along.
Lisanne
1yr
I drew along with the video, next I'm going to use my own references and draw different angles. Advice? I felt the paper was kind of working against me. Is smooth paper required for working with charcoal? I'm using 'Derwent' charcoal pencils and just a simple cheap sketchbook with a coarse grain. I think I'm gonna switch back to a regular pencil for the next couple of drawings to be able to create a more smooth look.
Rivelle
1yr
The Proko eye and my own studies.
S. Fox
15d
these are dazzling mate. how did you make them hyper realistic? what is your technic? I love to learn it. cheers
Rachel Dawn Owens
Nice eyes!
froppy green
Martha Muniz
Fantastic work!
froppy green
refs
Account deleted
Nov 11,2024 Eye Drawings
@purpleava
1yr
I've been practicing drawing eyes based on reference pics and capturing a likeness. The most difficult part for me is the shading and it doesn't look as 3d as I'd like.
Melanie Scearce
Try doing some structural drawings of the eye to help you understand the anatomy! This is a great way to warm up as well. Start with a circle for the shape of the eyeball and practice building the eyelids off of it in different positions. Having a good foundation in anatomy will help you create that 3D look.
Nicole Guz
2yr
Melanie Scearce
Nice work!
Artur Tyrański
Martha Muniz
Great work!
Vera Robson
OK, after a few frustrating attempts the eyes begin to look three-dimensional.
Maxime Scheder
Here is my first attempt for this assignment. I'm also trying to work on my shading technique so any critique on that is very welcomed !
@draft_al
2yr
Greetings @omegaduck . These are awesome. The only feedback I see here is the shape of the retina on the upper left eye. If you're drawing from a front view, the iris is more of a circle, if it's from a 3/4 view or profile then it's a bit more elliptical due to perspective. When it comes to shading, you may want to look into the different types of edges (soft edge, hard edge etc.) it will give you a chance to establish your shadows and lights. You can check Proko's take of those types of edges, or you can check Watts take on it as well. I hope it helps.
Help!
Browse the FAQs or our more detailed Documentation. If you still need help or to contact us for any reason, drop us a line and we’ll get back to you as soon as possible!