How to Draw the Head from Any Angle
This lesson has a premium version with extra content. Get it now!
11M views
lesson video
How to Draw the Head from Any Angle
coursePortrait Drawing FundamentalsFull course (35 lessons)
$65
assignments 872 submissions
Roberto C
Wanted to spice things up and make sure I maintained the volumes by animating a short turn. Done in procreate.
LESSON NOTES

Check out the Premium Portrait course to support the lessons and get access to every portrait video.

Drawing the Head

In this first lesson I’m going to attempt to summarize and simplify Andrew Loomis’ approach to drawing the head. Here we go.

If we take the head and remove the eyes, nose, lips, and ears we are left with 2 simple masses. A ball for the cranium and a boxy shape for the jaw.
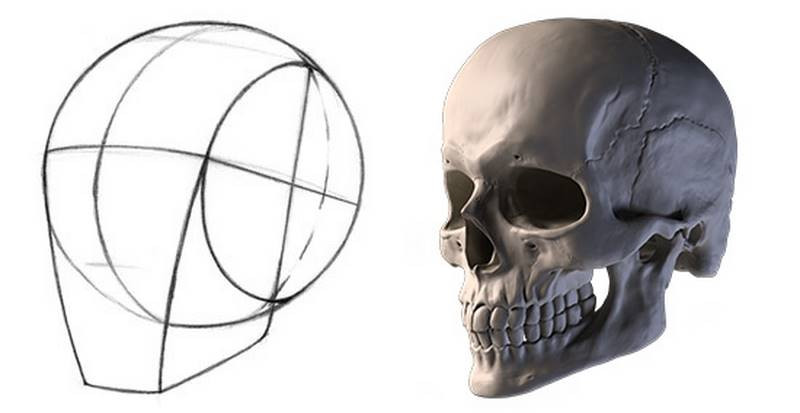
loomis head and skeleton

The cranium is spherical, but with flattened sides. So, chopping off a slice from both sides gets us a very close representation of the cranial mass.

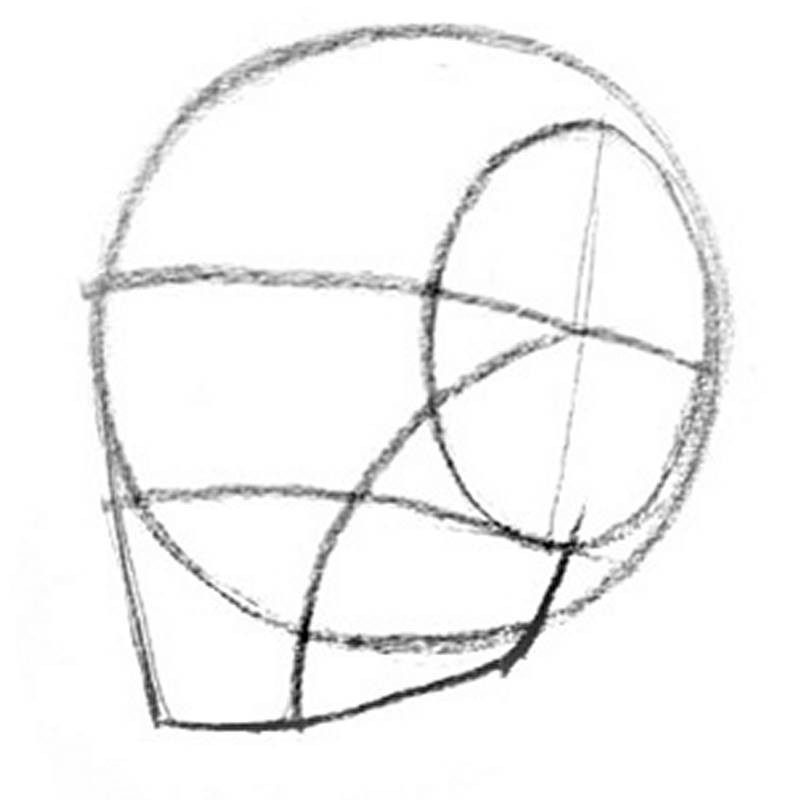
When drawing the head, I’ll start with a ball and draw an oval to indicate the flat side plane. The sizes are important here. Make sure the ball is a perfect circle. Don’t be sloppy. The oval is a bit more tricky. The height will always be the same, no matter what angle you’re drawing the head from. It’s ⅔ of the height of the circle. From the center and top of the circle, divide that area into thirds, and this will give you the top of the oval. Do the same at the bottom.

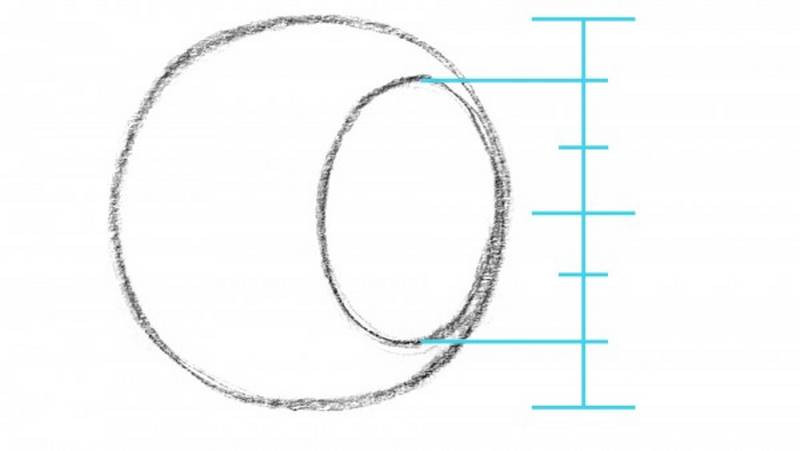
slices of the cranium
angle of the head circle measurements

Finding the Left and Right turn: The width of the oval will depend on the direction the person is looking. Compare the size of the front plane to the size of the side plane. The top portion of the oval falls on the corner of the forehead, where the front plane meets the side plane. This area is usually rounded and so it’s open to the artist’s interpretation. I've found that it usually lies near the end of the eyebrow.  The line on the front plane represents the brow so pay attention to the angle from one brow to the other.
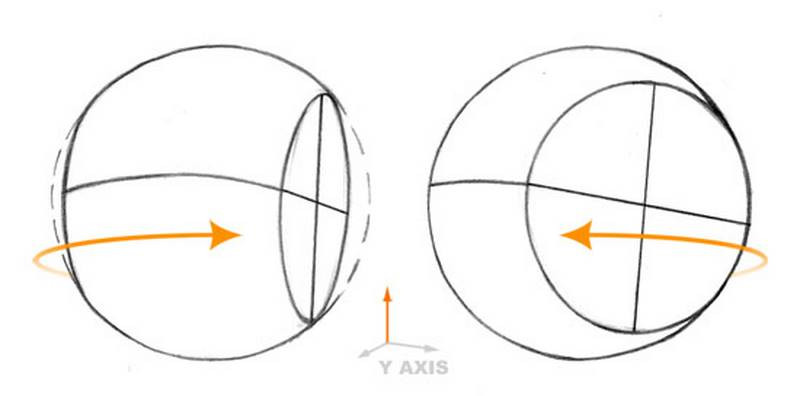
cranium side to side angles

Finding the Up and Down tilt: The vertical tilt is indicated by an angle along the side plane. If the head is tilted up, the angle will point up and if the head is tilted down, the angle will point down. The degree of the tilt will determine how steep to make this line. I like to use the angle from the ear to the brow.
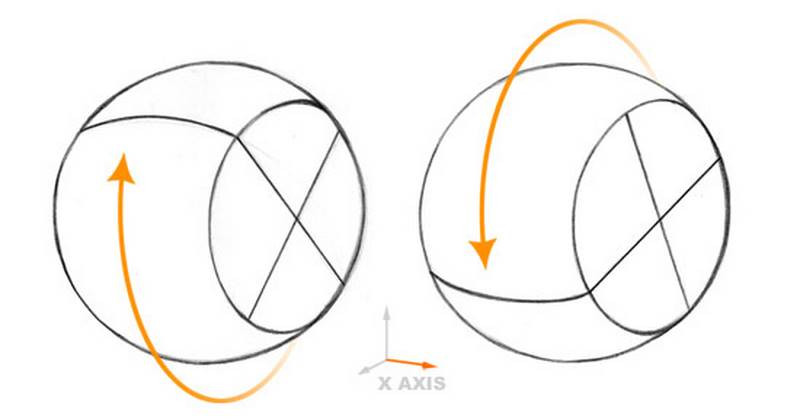
cranium tilt up and down

Then, at the base of the vertical line, draw a curve identical the the brow line. This represents the bottom of the nose. Drawing the same line again from the top of the oval brings you to the hairline.

The face can be broken down into nearly perfect thirds, chin, nose, brow, and hair.
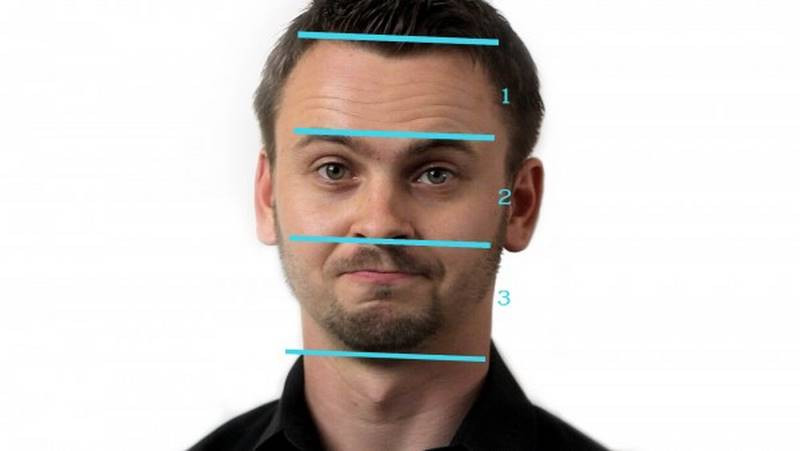
angle of the head

We can use the measurements we’ve already found to find the where the chin should be.
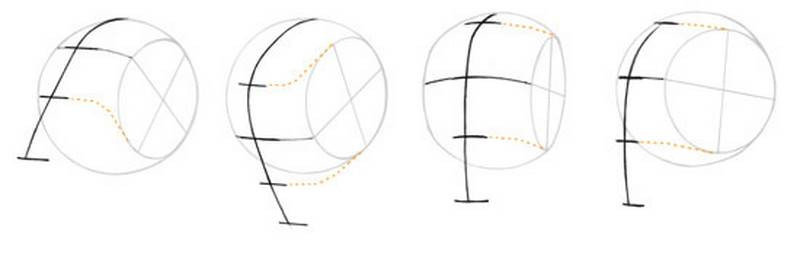
drawing chin on head

Observe the general shape of the jaw and draw in the major angles starting from the brow and ending at the side plane of the head. It’s usually about halfway into the oval, or a little bit farther back.
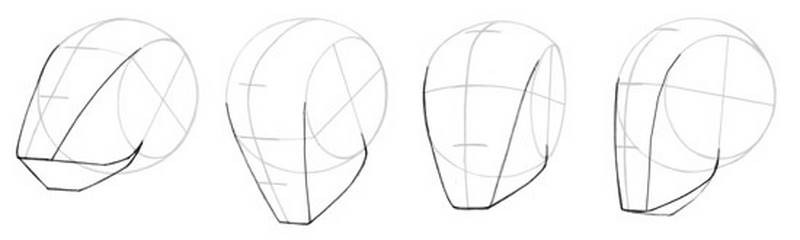
how to draw the jaw

Now that we have the foundation of the head established, we can finish it by putting in all the features! Don’t worry, I’ll explain this step in more detail next time. Each feature deserves it’s own lesson.
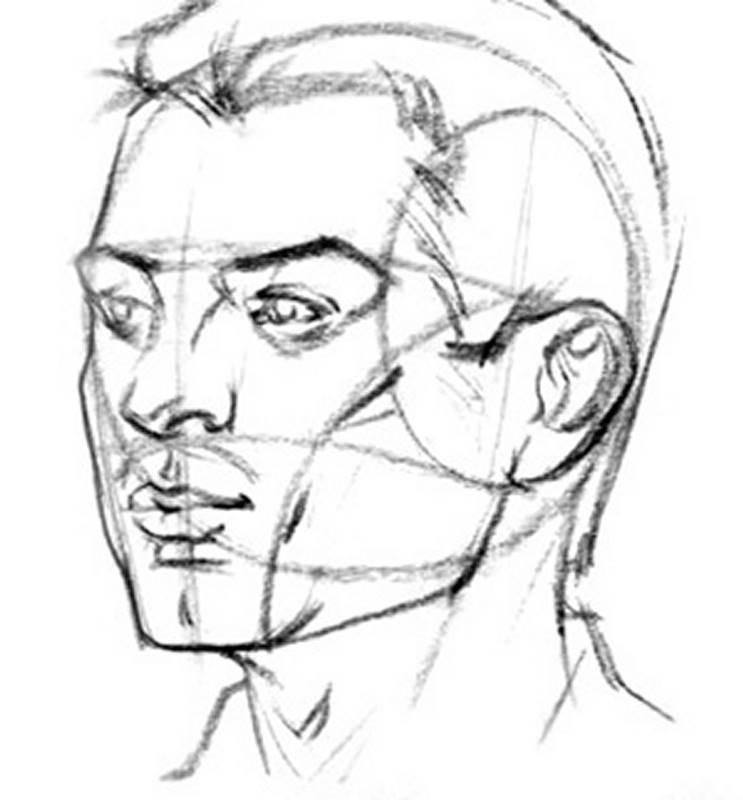
angles of the head
Let’s go through that one more time.
  1. Start with a circle for the cranium
  2. Oval for the side of the head
  3. Angle to show the person looking up or down. I’ll go with a subtle down tilt.
  4. Draw an identical curve to find the nose
  5. Double that distance to find the chin
  6. Attach the jaw
angles of the loomis head

Now you have a 3D representation of the head ready for the features. This approach is really good to establish the perspective of the head. A good exercise is to try to think about the head as a simple elongated box.
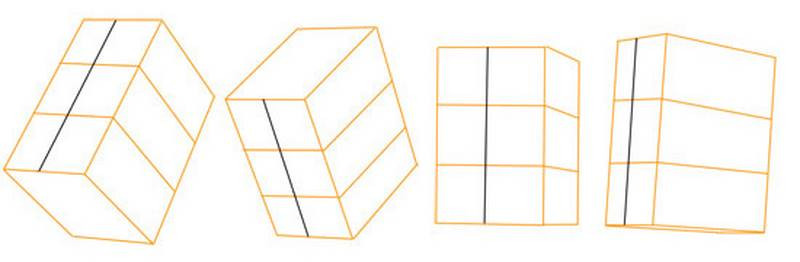
simplify the head into box

The angles on the front plane of the face such as hair line, brow line, nostrils, lips, and chin will be the same as the angles on the front plane of the box. The angle from brow line to ear is the same as the angle on side plane of the box.

These angles are really important because they establish the head as a 3-d form in space.
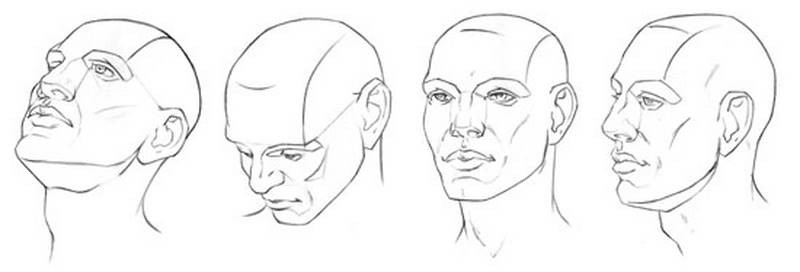
draw the head from any angle

This may seem overly technical with so many details to remember but with practice it actually becomes very easy so get that sketchbook out and practice it a hundred times with a variety of angles! You’ll find you improve much quicker than you think.
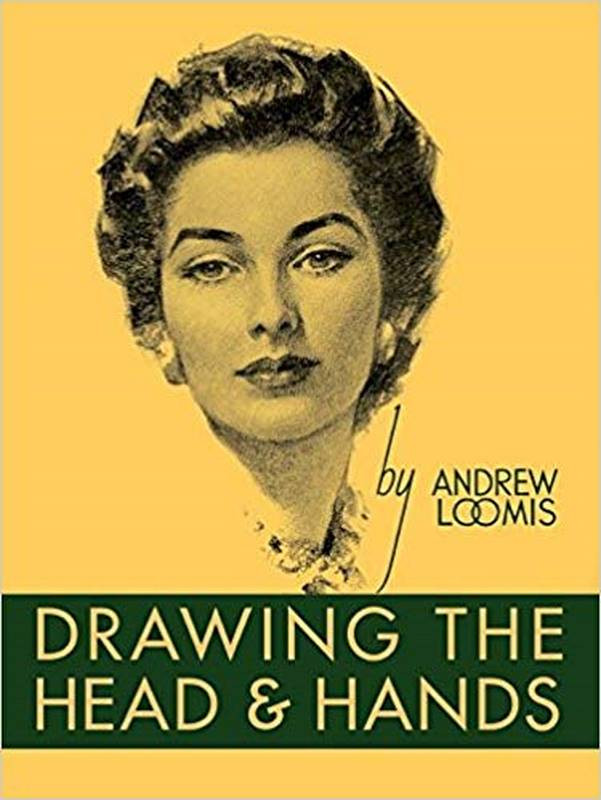
drawing the head and hands andrew loomis

Drawing the Head and Hands - by Andrew Loomis

This video summarizes this book. The full version is a great resource.

Like what you learned? Check out the next lesson How to Draw the Head from Side View!

DOWNLOADS
txt
how-to-draw-the-head-from-any-angle-transcript.txt
5 kB
mp4
Drawing the Head From Any Angle.mp4
512 MB
ASSIGNMENTS

Draw the Loomis Head

Take a bunch of pictures of either yourself or someone else and then use them to construct the head using the Loomis method. Focus on getting the up and down tilt correct. Make sure to make careful measurements that I mentioned in this video and keep your lines clean. Remember that every person has individual proportions that will be different from the average loomis head. At this point, just draw the average proportions. Once you’re comfortable with that, you can try to capture the distinct characteristics of the person you’re drawing.

If you’re having trouble drawing the circle or oval of the head, spend some at the beginning of each day warming up your hand with a lot of circles and oval.

Anna Gorny
5yr
Hi there, just started this course yesterday. I really hope, it helps me to improve my portrait drawing. I did this exercise on my pen display and tried to draw the head with clean lines. They still are a little shaky. But I am happy to already see a little improvement in the two sheets I drew today. Still a long way to go. I hope, I can keep up the motivation :)
Katundra Stewart
Great job!
Sam
5yr
Recently finished the anatomy course so now it is time to form the head!
João Bogo
5yr
Very good, Sam. The only thing I think you can improve is lining up better the line of the chin and the line of the brow. In the last one the chin is a little too big and crooked. Always be mindful of the perspective. Best regards
Vincent Duncombe
Hey @Jesper Axelsson @Luigi Manese @Liandro just letting you all know that I have started the portrait course (likely anatomy next). Starting to get the hang of this a bit. Will be reaching out for assistance as I go through the course if that’s okay. Thanks!
Liandro
5yr
Awesome work, @Vincent Duncombe! I've got two things to highlight: 1) The bottom plane of the jaw: try to think of it as the bottom plane of a box. I'll emphasize what Jesper already said: draw the "hidden" lines! That should help you track the perspective and the construction with more accuracy. 2) In extreme angles, the visual effects of perspective can usually get intense, then things will start to look smaller pretty fast. That's what I'd suggest for number 67: even though we know the sections of the face should be the same length so we can get correct proportions, making the farther one (nose to chin) slightly smaller will enhance how much of an extreme perspective this is. Counter-intuitively, distorting the so-called correct measurements can make the head feel visually correct when it's in such a dynamic perspective. Draw-overs attached. Hope this helps!
Luigi Manese
That's great to hear @Vincent Duncombe! These studies look very solid and very well constructed, so you're off to a good start. Looking forward to see your future ones!
Jesper Axelsson
Hi @Vincent Duncombe Looking great! Succesful overall, especially how you placed the circle on the side of the head! I´ve got nothing to critique, just a tip: When you get into tough angles it´s really helpful to draw the invisible side of the head too, especially when drawing the jaw. If you can Identify the circle on the other side of the head, you can find important construction points of the jaw by travelling along perspective lines. (I attached an image from a critique to another student). Drawing through can also improve the structure overall. I hope this helps :)
BRUNNO LOPES
PLEASE IF YOU CAN. ALSO INCLUDE PORTUGUESE SUBTITLES, IT WOULD HELP A LOT.
Liandro
5yr
Hey @BRUNNO LOPES, if you watch it on Youtube, you can activate the subtitles in Portuguese in the video configurations: https://www.youtube.com/watch?v=1EPNYWeEf1U
@alpha3224
5yr
Hello, I'm a beginner who just got on the path of understanding how to draw anatomy( In my case I started with the head first) and I would like to know what can I improve as this is my first time ever drawing heads with the Loomis method. Any help or criticism is appreciated ! :)
Julia Whitenight
I'm not familiar with the Loomis method, just wanted to say that I applaud your focused approach to improving your skills. Keep it up!
Manoo Murthy
Hello: I am not an expert, just a few lessons ahead of you. These look good to me! There is improvement between your first and last head and it shows that you really worked towards understanding the head as a 3D object, not just as a set of directions. Heads come in all shapes and sizes and heads that may look 'wrong' can sometimes be right if the proportions of the head you are drawing are non standard. All of these read the way you want them to. If I were to nitpick, I would suggest watching the video on Proko's anatomy course on the neck so that you can get those proportions right. A lot of what looks 'odd' on some of these heads is not the head but rather the neck being out of proportion.
Miynx Ren
5yr
Hello! I did some simple exercises as a warm up for this assignment. I will be working on drawing more complicated angles in the next few days
Hemanshu Bhojak
The one with a lot of faces is my warmup sheet and I could not resist but draw some finished heads. Liked the quick sketches. Easy to practice ovals and loomis heads.
Jesper Axelsson
Hi @Hemanshu Bhojak! Really nice drawings! Clean lines, and you seem to understand the loomis head well! I´ll try to look for things to help you further: Two main things to look out for when drawing the loomis head is the angle of the ellipse and the convergence of the feature lines; -The ellipse should be perpendicular to the brow line; - The feature lines should converge to a common point in the distance, like a road does. They can be parallell but never diverging DRAW THROUGH A good way to check your construction and to tackle the jaw in difficult angles is to draw what´s on the non-visible side as well. This is a crucial part of perspective drawing and will improve you understanding of three-dimensionality. You can try it if you want. I hope this was helpful :)
Chris Bodary
Assignment Post. I used the 3D model for the first 86 then photos from my phone for the rest. Tried to stick to keeping everything perfect 1/3s and resisted trying to draw features lol. Tried to draw the necks from imagination, they were a struggle. Very open to critiques. I really enjoy seeing everyone’s posts, this is great 👍🏼 I also attempted to apply the Loomis method to my dog’s skull as a bonus!
Guanhao Cheng
Hahaha, the part about resisting drawing features really spoke to me. They're looking good so far! Maybe just keep in mind distortion in ones like 75. I think less of the left side of the face should be visible from that angle. Most of them look solid, though. Keep it up!
Manoo Murthy
Hello: I am a beginner who is trying to study art as a passion project along side a full time career. I have done this exercise to try to understand head structure. My next step will be to study some shading and basic lay ins of the eyes, nose, and hair to do quick sketches on applying these structures. Then I would like to study features. I would appreciate some feedback on my work and advice on both my plan and how to further my development. Thank you for your help =)
Gannon Beck
These are pretty good, Manoo! Keep going.
Jesper Axelsson
Yeah! Nice studies! Continue to watch the videos and do the exercises and you´ll keep on improving. There will be struggles along the way but keep at it. To get through those struggles it has helped me to make practicing a routine. For me a daily practice session was the easiest routine to uphold. I hope this was helpful :)
Marie Logan
In my first two pages I didn’t know about the 3D mode so I made them up from my head. My last page was considerably better. My previous ellipse theory does not work when the subject is looking forward. Not perfect but the practice definitely shows improvement.
Clinton Ibe
Wow I admire your hard work Marie. Keep it up😊👍🏻 amazing
João Bogo
5yr
Hi, Marie. Nice effort! I would like to give a little advice on these. By looking at your drawings I feel that you're improving in the concept of 3D head, but you're struggling putting down your lines. Number 99 is the best example. You drew a good 3/4 view but the lines are shaky. Sometimes this is caused by the way you're holding the pencil and how much pressure you're using to draw. It's also a common problem that some beginners don't have enough confidence in their lines and they draw really slow...which ironically hurt their drawings more. Here's an exercise you can do to improve your line quality: Take a bunch of paper (the cheaper you can find, old notebooks filled halfway through are the best) and before you start drawing your loomis heads, your gesture drawings, etc you do a few warm ups: -Draw free hand ellipses and circles -Draw long lines from one edge of the paper to another -Draw long curves -Draw two points really far away in one page and try connecting them with one line. As you're doing this, here's some general guides: -Be relaxed and loose. -Draw from using your shoulder and elbow. Avoid drawing from the wrist -Grab your pencil as further back as you would if you were writing. -Draw faster and don't be attached to any line, circle curve or ellipse. if you make a bad one, just move on to the next. -Don't aim for perfect lines, aim for a fluid motion from your arm. -Don't take too long. 5-15 minutes each day is enough. The goal of this warm up is to improve your hand-eye coordination and also get you more confident in your lines. For more information, Stan has this video about the subject: https://www.proko.com/course-lesson/how-to-hold-and-control-your-pencil/assignments Keep drawing and best regards.
Krisztian Lerchner
practiced for 8 days constructive criticism welcome
Geert-Jan
5yr
I've spent this weekend drawing Loomis heads. These are some of my latest. I could really use some feedback. What do you guys think?
Kelly Ramirez
I will continue to fill out several pages. but here are my starts. I find it hard to get those ellipses to make sense! The more extreme angles are difficult as well. But I really enjoy drawing from the 3D model! Do the placement lines look right? I think a few are a bit wonky, but I can't pinpoint which yet. Any advice?
Marie Logan
I've been trying to figure out if there is any pattern that can be used drawing the long axis of the ellipse. I think it will always be angled the direction the eyes would be looking out in the pose of the face.
João Bogo
5yr
Very good start! They look solid. Ellipses are a little challenging. But there's a few good videos on Youtube that explain the theory (just search "how to draw an ellipse") . I think Drawabox has one lesson about it that's pretty straightforward. If you want to spend some cash Marshall's old perspective course has useful information and so How to draw by Scott Robertson. But then again you'll be fine with free Youtube videos. But also don't stress to much about the ellipse. Once you put features, most of it gonna disappear. Make sure they're the correct size (if you draw the wrong size it's going to mess the measuring of the thirds) , but always remember that these are construction lines. They are just place holders until you draw something definitive. Means to an end. I think your problems with the placement of the lines comes from you trying to follow the 3-D model which has curved ones. And with curved lines it's harder to keep track to where they converge. To remedy this you can try 2 things: - Draw a box in the same position of the head and divide into 3. Then draw the head by its side. The lines will have the same degree of conversion. Remember the lines of the eyes, nose and chin are parallel. They'll converge to the same point. - Try drawing the 3-d model, but first try use just straight lines. Once you get the placement right you can draw the curved lines you see in the model. General advice that can reduce the wonkyness of a head. Pay close attention to the size of the perfect thirds. If the head are looking straight, they are equal. Looking up, bottom third will be bigger and the other will get smaller as they recede. Looking down it's the opposite. It's important to know how they will change and how much they will change as they move. So be really attentive with your measuring as it will make the placement of the features easier later. Keep drawing and best regards
Lidia Santonja Gisbert
OMFG I'ts been soo long since I come to learn with the courses (the art school almost made me to stop drawing for the discouragement, so ironic don't you think?) and I was on the verge of a heart attack because I didn't recognized the website (I learned more on a few videos than the 2 years on the art school) Those videos really makes me feel confortable with the drawing proces, it makes the learning proces so fun and pleasure, thanks for all your work :3
@lukethesloth
My first attempts drawn from the 3D model and images, I had a lot of trouble especially when the heads were tilted downwards (such as in the image I attached here).
Warren Bonett
Nice start. I have trouble with downward tilts too sometimes. Think much of it is a matter of trying to get your eye in. Seeing the shapes for what they are rather than what one expects. I’m going to tackle it by making a model in clay with all the marks on it.
Matthew Manghi
I think thee look good and I would suggest maybe roughing in the head as a cube as an initial step to help sort to the perspective for tilts. The draw the head in that cube for the most part. I think that can really help keep things in line in perspective.
@carissa
5yr
He was purposely getting the circle wrong. He got a perfect circle on the 5th try!
Kimberly Hawkins
Trying out some heads. These were from imagination and I really struggled with some angles.
Ibrahim El Shazly
Touch your neck. You can feel it starting from under your chin at the front and on the back it starts way up higher, where? Go feel for it, it actually sits on the occipital prominence, much higher to where you have drawn it. Don't worry, the flaw lies in the construction model itself, the sphere flattens these useful angles and makes it impossible to find the right origins for the main neck muscles Remember, the head should be flowing into the neck and the rest of the body. It's not just a balloon floating around!
Warren Bonett
Looks like a great start.
@dish
5yr
Hi! This is what i got after my first practice session. Two problems i faced frequently: 1. the chin/jaw shape looks weird 2. front view for downward-looking angle ends up being a really long face (my best guess is it might look better if i shorten the length between the hairline-nose-chin) Any help regarding the above issues or critique in general would be much appreciated. Thank you!
Bradwynn Jones
Hi Dish! To help draw the jaw/chin shapes you can use rhythms side to side to draw in perspective. It can be a challenging area to draw for sure. At some angles it's a question to ask if we can see the far side angle of the mandible or not. Your number 12 and 14 look really good. I think doing more of these will help and also look at portrait references too. One good exercise is to think of the head as being inside a elongated box shape and then draw the thirds of the face angles on it. This also helps to make sure the vertical and horizontal alignments (thirds of the face) are on the same tilt. There is definitely a need to adjust the thirds for perspective when the head is looking downward. Good work!
Enrique Nuñez Mendoza
Hello everyone! This is my first post. I don´t know if it is right to use this space for showing finished work but I would like to show my recent artworks based on what I learned from this course. Please feel free to critique my work. Have a great day! Greetings from México.
@carissa
5yr
It's really good. My favorite is the first and second one.
Bradwynn Jones
Really good work! Love these. It may be a preference thing or style but I'd try to lighten up the shadows on some areas to pop the core shadows more. I'd keep the occlusion shadows dark but kind of fill in the other shadows with a sense of reflective light just enough to show the form through core shadows. My favorite is the last one. Beautiful work!!
Abdul Saeed
So good!
Aki
5yr
My first assignment which was fun to do :). Thank you for tips and critique, really appreciate it: Head 1-50: drawing the Loomis head from the 3d-Model, doing lay-ins from the practices, some lay-ins from real-life reference photos. I am not yet very consistent regarding line placement. Will definitely repeat this task 50 more times to get more routine!
Bradwynn Jones
Strong work here! The 3d model and Loomis examples look great and did the photo reference ones give you more challenge? They did for me when first learning this method of drawing. Though these studies are so good for developing dexterity, muscle memory and an instinct for the structure and rhythm of the face I used to have challenges with people who looked different from Loomis faces. Now I like to think of the basic loomis head as a thing to stretch and change as needed (taking comparative measurements) for who ever my subject is.
Help!
Browse the FAQs or our more detailed Documentation. If you still need help or to contact us for any reason, drop us a line and we’ll get back to you as soon as possible!