How to Draw the Head from Any Angle
This lesson has a premium version with extra content. Get it now!
10M views
lesson video
How to Draw the Head from Any Angle
coursePortrait Drawing FundamentalsFull course (35 lessons)
-20%
$52
$65
You save $13
assignments 252 submissions
Roberto C
Wanted to spice things up and make sure I maintained the volumes by animating a short turn. Done in procreate.
LESSON NOTES

Check out the Premium Portrait course to support the lessons and get access to every portrait video.

Drawing the Head

In this first lesson I’m going to attempt to summarize and simplify Andrew Loomis’ approach to drawing the head. Here we go.

If we take the head and remove the eyes, nose, lips, and ears we are left with 2 simple masses. A ball for the cranium and a boxy shape for the jaw.
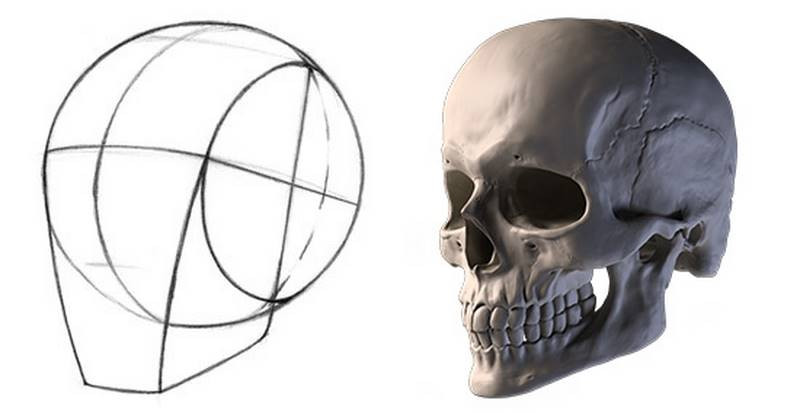
loomis head and skeleton

The cranium is spherical, but with flattened sides. So, chopping off a slice from both sides gets us a very close representation of the cranial mass.

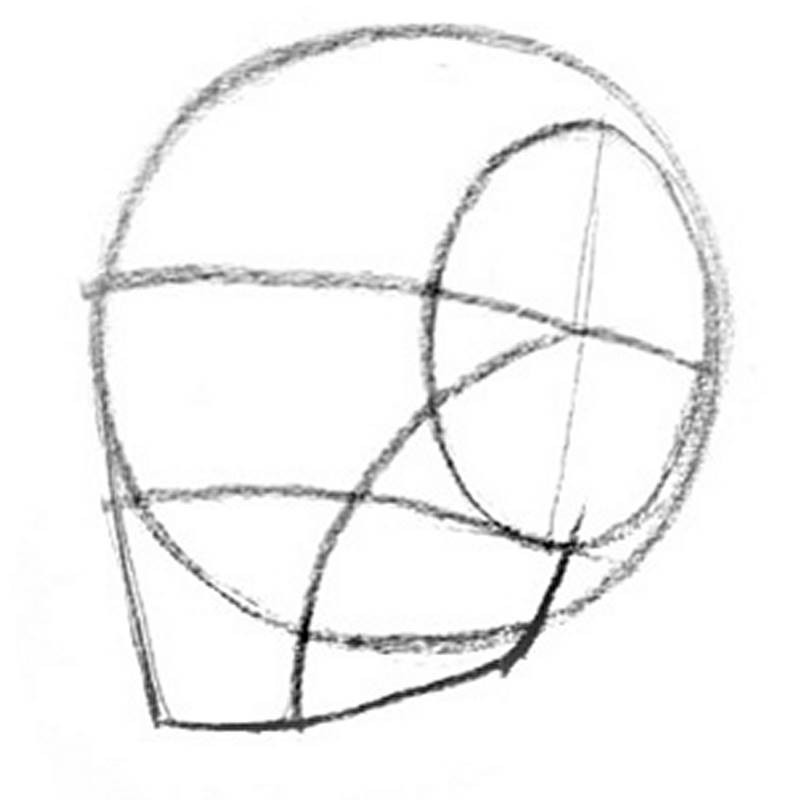
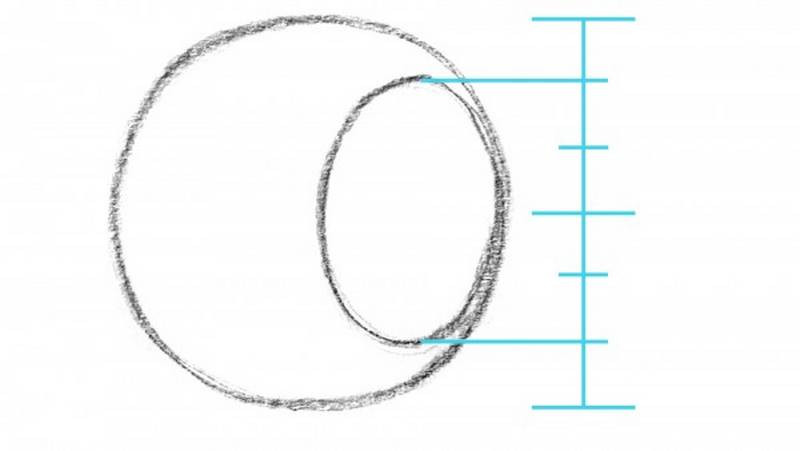
When drawing the head, I’ll start with a ball and draw an oval to indicate the flat side plane. The sizes are important here. Make sure the ball is a perfect circle. Don’t be sloppy. The oval is a bit more tricky. The height will always be the same, no matter what angle you’re drawing the head from. It’s ⅔ of the height of the circle. From the center and top of the circle, divide that area into thirds, and this will give you the top of the oval. Do the same at the bottom.
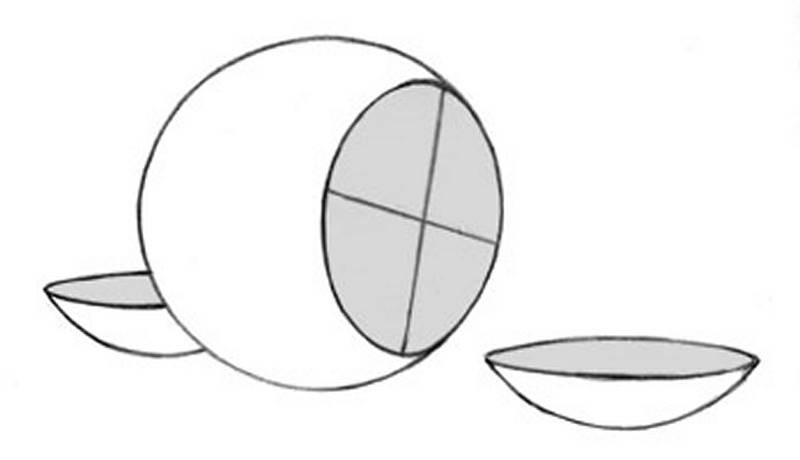
slices of the cranium
angle of the head circle measurements

Finding the Left and Right turn: The width of the oval will depend on the direction the person is looking. Compare the size of the front plane to the size of the side plane. The top portion of the oval falls on the corner of the forehead, where the front plane meets the side plane. This area is usually rounded and so it’s open to the artist’s interpretation. I've found that it usually lies near the end of the eyebrow.  The line on the front plane represents the brow so pay attention to the angle from one brow to the other.
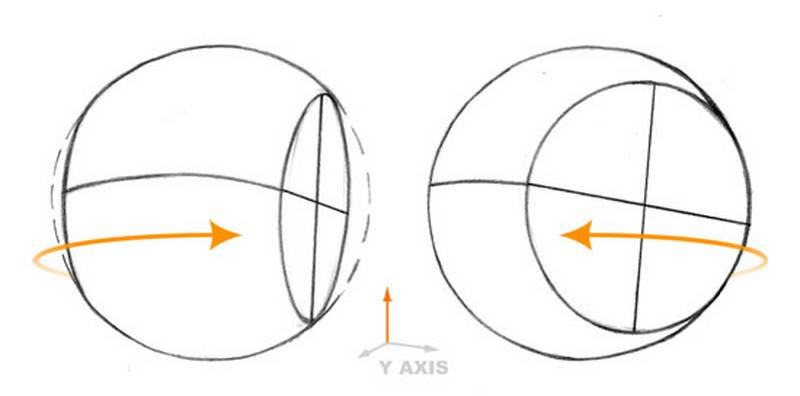
cranium side to side angles

Finding the Up and Down tilt: The vertical tilt is indicated by an angle along the side plane. If the head is tilted up, the angle will point up and if the head is tilted down, the angle will point down. The degree of the tilt will determine how steep to make this line. I like to use the angle from the ear to the brow.
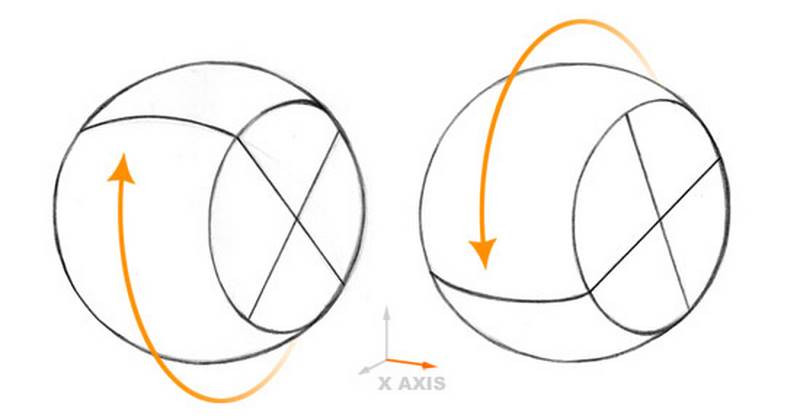
cranium tilt up and down

Then, at the base of the vertical line, draw a curve identical the the brow line. This represents the bottom of the nose. Drawing the same line again from the top of the oval brings you to the hairline.

The face can be broken down into nearly perfect thirds, chin, nose, brow, and hair.
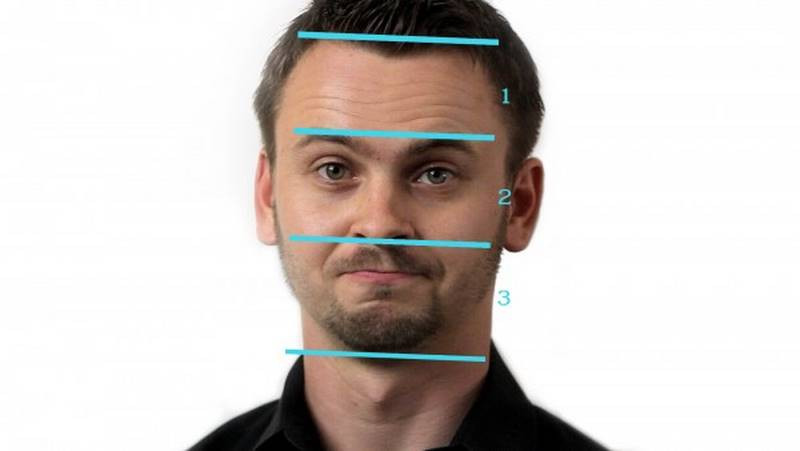
angle of the head

We can use the measurements we’ve already found to find the where the chin should be.

drawing chin on head

Observe the general shape of the jaw and draw in the major angles starting from the brow and ending at the side plane of the head. It’s usually about halfway into the oval, or a little bit farther back.

how to draw the jaw

Now that we have the foundation of the head established, we can finish it by putting in all the features! Don’t worry, I’ll explain this step in more detail next time. Each feature deserves it’s own lesson.
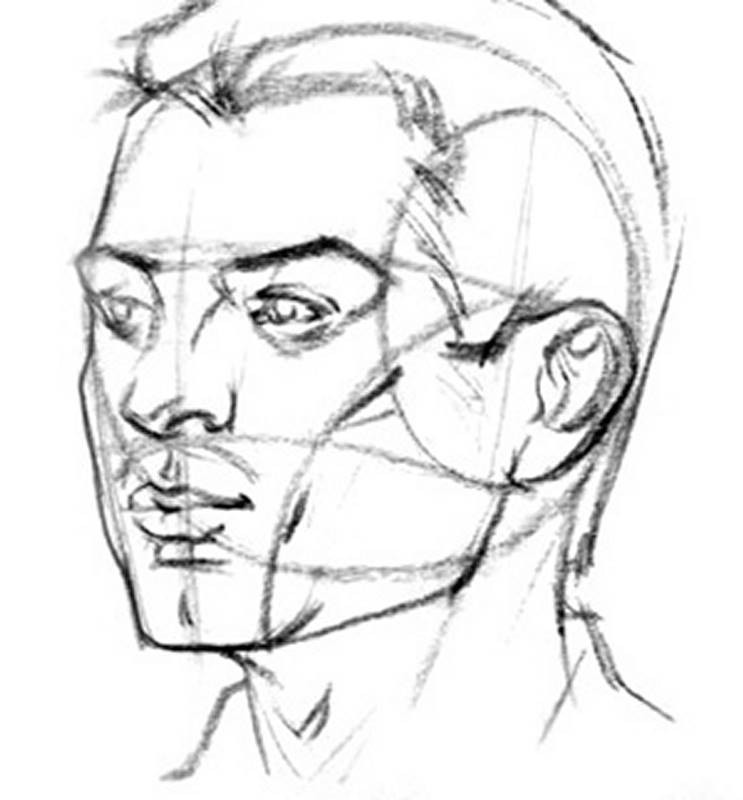
angles of the head
Let’s go through that one more time.
  1. Start with a circle for the cranium
  2. Oval for the side of the head
  3. Angle to show the person looking up or down. I’ll go with a subtle down tilt.
  4. Draw an identical curve to find the nose
  5. Double that distance to find the chin
  6. Attach the jaw
angles of the loomis head

Now you have a 3D representation of the head ready for the features. This approach is really good to establish the perspective of the head. A good exercise is to try to think about the head as a simple elongated box.

simplify the head into box

The angles on the front plane of the face such as hair line, brow line, nostrils, lips, and chin will be the same as the angles on the front plane of the box. The angle from brow line to ear is the same as the angle on side plane of the box.

These angles are really important because they establish the head as a 3-d form in space.
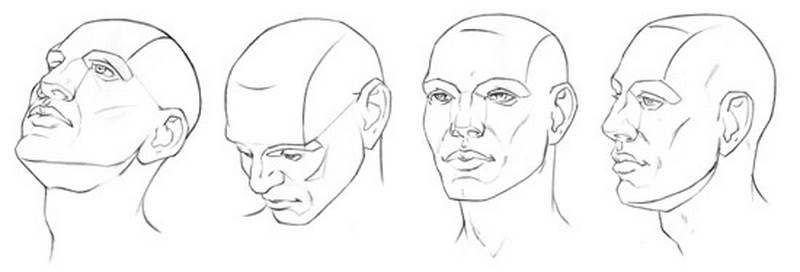
draw the head from any angle

This may seem overly technical with so many details to remember but with practice it actually becomes very easy so get that sketchbook out and practice it a hundred times with a variety of angles! You’ll find you improve much quicker than you think.
drawing the head and hands andrew loomis

Drawing the Head and Hands - by Andrew Loomis

This video summarizes this book. The full version is a great resource.

Like what you learned? Check out the next lesson How to Draw the Head from Side View!

DOWNLOADS
txt
how-to-draw-the-head-from-any-angle-transcript.txt
5 kB
mp4
Drawing the Head From Any Angle.mp4
512 MB
ASSIGNMENTS

Draw the Loomis Head

Take a bunch of pictures of either yourself or someone else and then use them to construct the head using the Loomis method. Focus on getting the up and down tilt correct. Make sure to make careful measurements that I mentioned in this video and keep your lines clean. Remember that every person has individual proportions that will be different from the average loomis head. At this point, just draw the average proportions. Once you’re comfortable with that, you can try to capture the distinct characteristics of the person you’re drawing.

If you’re having trouble drawing the circle or oval of the head, spend some at the beginning of each day warming up your hand with a lot of circles and oval.

Newest
Michael
3d
I like the app timer it’s good for different positions
Michael
4d
Started the course today, exited to join this community! Started the first couple with the 3D loom head en then I used the timer tool for photo reference. The timer to makes it allot more fun for me with the two minute timer. I think I should stick with only the average proportions but to see what is what I draw some eyes and noses. All tips is welcome 🙏 thank
Vue Thao
3d
Avoid adding facial features such as the eyes, nose, and mouth. They're merely a distraction. Just focus on the construction of the Loomis method.
Christopher Corbell
Here's a page of my drawings for this assignment. These are all from reference - I'll try to do some original photos and keep practicing. I completed Michael Hampton's Head Drawing and Construction course before this one and found his alternative or variations on the Loomis approach really helpful too. I think lots of practice with different methods is helpful, there's getting the idea at first and then there's the repetition that makes it start to become natural.
Kyle McCollum
Feeling accomplished. I was able to understand why my first front facing head was so narrow and adjusted accordingly on the next one.
Patrick Bosworth
Nice adjustment, the second front facing head has great proportions! Once you internalize the basic framework, you can adjust it on purpose to fit different character types, or to suit the particular portrait you're working on. Keep it up!
Ami learning to draw
Hi! Today with the loomis method, I drew 3 portraits using photo reference. I drew some plains to get depth in face drawing. But I couldn’t draw the plains on side view. Please critique my drawings. Thank You! @Patrick Bosworth@Melanie Scearce@Rachel Dawn Owens
Chuck Ludwig Reina
Nice drawings Ami. One thing I would look out for , is how big the circle that represents the cranium is. The head is often much larger and longer than we realize. The jaw should only extend about a third longer than the height of that circle. Also note, the eyes are generally about half way between the top of the head and the bottom of the jaw. Keep it up!
Ami learning to draw
Hi! I first want to thank @Patrick Bosworth and @Melanie Scearce for telling me to start and master level 1 for drawing head! How right they are! Anyways, today I drew many loomis heads. Please critique my head drawings! Thank You! @Patrick Bosworth@Melanie Scearce@Rachel Dawn Owens@Chuck Ludwig Reina@Martha Muniz
Patrick Bosworth
Really nice progress, Ami! You're really starting to get the hang of the framework, and the tilt of the head! Great job! Keep practicing with this basic framework, try to draw it in as many different angles as you can, look at photos and try to draw the Loomis head in the same orientation as the people in the photos, and have fun with it! Keep up the good work!
@ink555
2mo
I tried to draw some more extreme angles butttttt yeah didn't work so well. Oh well I can always practice more🤷🏼‍♀️
Unexpected Koi
These look really good. Have you tried the model loomis head you can pose? It lets you see exactly what needs to be adjusted.
Jon Passig
4mo
I've been drawing for a few years now but am embarrassed that I still don't have the structure of the human face memorized. I plan on doing another 50-200 of these until I get it right but could I get some help with these? I have a hard time visualizing what I'm supposed to do to account for the slice off the opposite end of the head. Also just general critique would be more than appreciated. Thank you!
@athrillingepisode
100 times like you said, the more i did it the less i had to erase, as you can see in the later heads less smudges😂😂, but i actually learned a lot with this assignment, thank you.
@feawi
8mo
Just some sketching practice of the head using the Loomis method, trying to play around with the shapes of the head
Nate Ferguson
This first step has actually tied in perfectly for an assignment in the Drawing basics course, Simplifying a portrait from observation!
Nate Ferguson
I can tell that I'm gonna need to do this a whole bunch, like everything else I guess. I do love the break down of the shape of the head into digestible parts. It's like a base layer blueprint which is nice. I'll try and incorporate this into my sketch warm-ups each morning.
@navyservant61
That’s good,bro!!!
Glenn Vasaturo
Rivelle
11mo
My Loomis Heads. Both fun, and sometimes challenging.
Kevin Ortiz
11mo
I have a question about marking the centerline and the side circle using the Loomis method. Whenever I study the reference I have to analyze it carefully, however, the measurement can be a bit off. The centerline is far away or the side circle is either big or small.
Marco Sanchez
I still got some problems drawing from different angles, I'd like you mention things to improve.
@feawi
1yr
just practicing different tilts of the head to realty understand it. Critiques are appreciated.
@feawi
1yr
any critique would be great, one of the problems I’m having is understanding if at the bottom of the jaw should it be drawn like a L shape or should the jaw go across with a slight angle?
Rachel Dawn Owens
Maybe this helps
Nicole Guz
1yr
100 Heads Challenge By Ahmed Aldoori Process: *20 minutes per head *10 a day for 10 days (not strictly followed as I have a toddler 😄) * I used Loomis Head Method as that is the only method I know for now(I will learn the other 2 methods in the future) I did this as a challenge to get better and faster at making heads and it proves to be very challenging as I am bad at proportions and shading but I am willing to get better. # tips, advices or critiques are very welcome
Jim H
1yr
@Nicole Guz if I could give you the persistence award, I would! Do you have any favorite heads? Did you try something out and it worked well that you'd like to repeat in the future?
Nicole Guz
1yr
For the fourth week of my portrait study, I sought to learn from Stephen Bauman's approach by mimicking his shading and line work. Afterwards, I practiced these skills by creating portraits of Hollywood actors based on different references. I invite any advice, insights, or critiques.
Martha Muniz
Beautiful rendering, and great mileage! I would recommend using the guidelines for the facial features especially to double check the placement and construction before going into shading. Making sure they align in the same perspective, meaning all the features are facing the same direction, is key to making a portrait feel solid, and doing it as early as possible saves more time than if you were to correct it once it's all rendered out. I've added an example of what I mean by checking the alignment, hope this helps! :)
Nicole Guz
1yr
Three weeks into drawing portraits after watching tutorials. Any tips and critiques? How can i bridge the gap between my current skill level and that of accomplished artists such as Stephen Bauman and Jeff Watts ? I use graphite on 8.5x11 paper
Melanie Scearce
These are lovely portraits. Keep it up! Mileage is what separates the likes of Jeff Watts and Stephen Bauman from less experienced artists. My advice is to continue your journey and enjoy :)
Help!
Browse the FAQs or our more detailed Documentation. If you still need help or to contact us for any reason, drop us a line and we’ll get back to you as soon as possible!