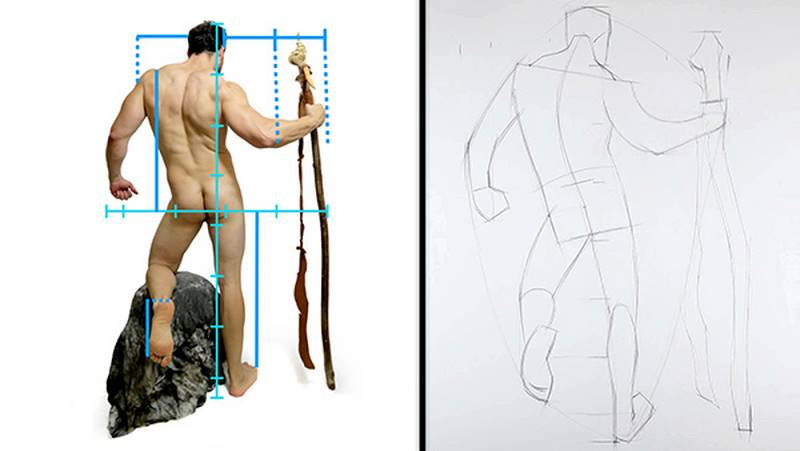
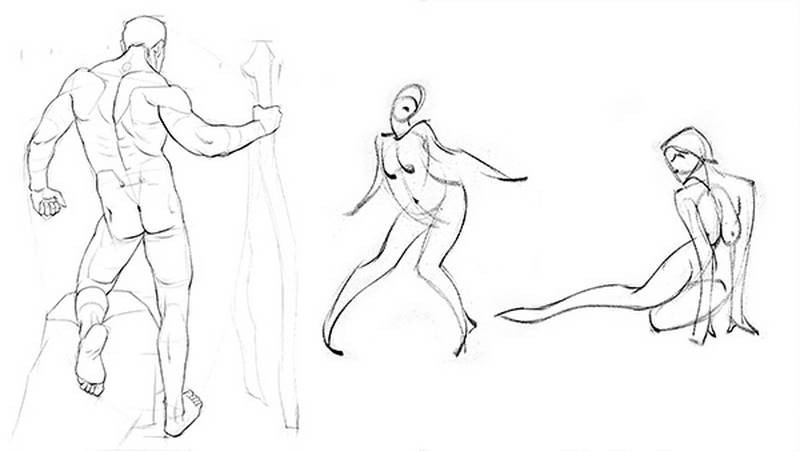
The first and most important part of a figure drawing is the layin. Without a good layin you rarely end up with a good drawing.
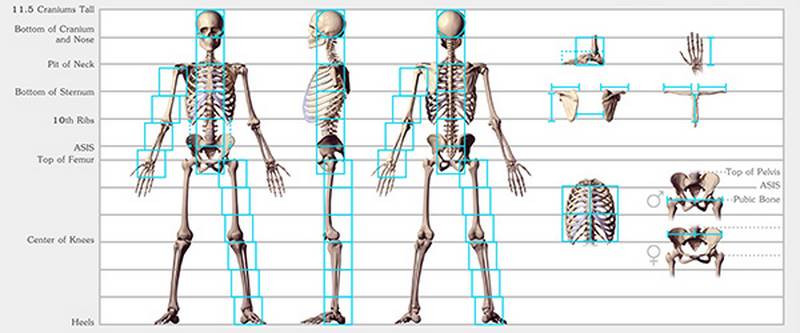
In the last lesson we learned the average proportions of the body. The problem with that is when the body moves out of the static soldier pose, those measurements change the way they are perceived by our eye. Foreshortening changes these relationships. If drawing from imagination you can remember the proportions and do your best to apply perspective to them. If drawing from a reference photo or a model we are given the opportunity to measure. A direct way to transfer the effects of perspective to our drawing.
Measuring is exclusive to observational drawing and you won't use it so much when drawing from imagination, but it's important to practice because it tunes your eye to what's correct.
Measure with your Pencil
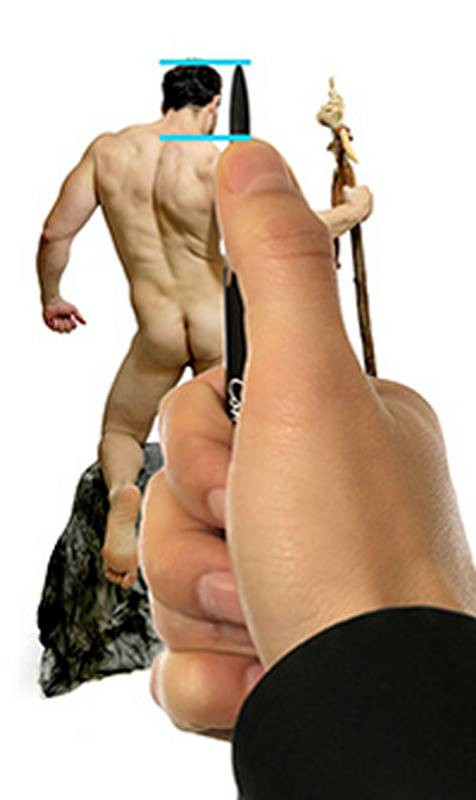
We can use all sorts of measuring tools like calipers or string. I like to use the tool already in my hand - the pencil!
- Hold your arm straight out, without bending the elbow. Bending the elbow will bring the measurement closer to your eye and increase the size. The measurement will be consistent if the elbow is locked.
- Tilt your head to bring the eyes as close as possible to the pivot point at your shoulder. This is important to keep the measurements consistent throughout the whole subject. If you don't do this. When measuring around the top of the pose, the pencil will be closer to your eyes and when measuring around the feet it will be farther from your eyes. This difference in the distance makes the measurements inconsistent. Keep your eye near the shoulder to minimize this.
- Close one eye.
- Use the tip of the pencil as the top point of whatever you’re measuring and put your thumb at the bottom point.
- Now that you have the unit, you can compare it to another part of the figure.
-
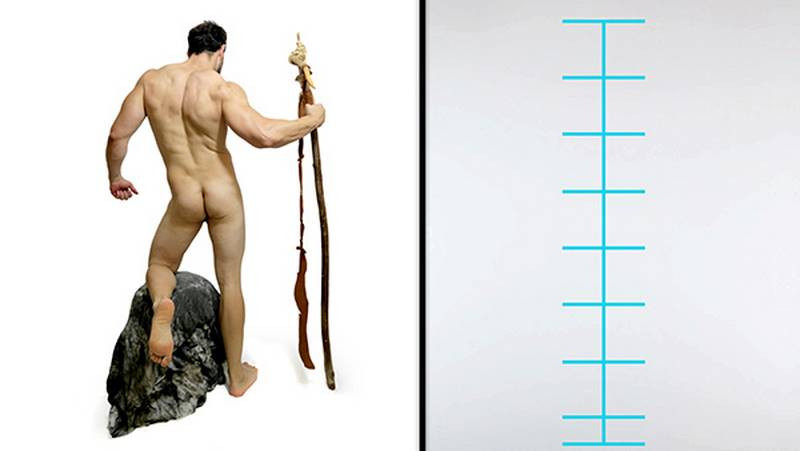
For example, it's very common to count how many head lengths fit in the height of the pose. Move your measurement down below the chin and note where your thumb is. Repeat that down the figure and count the units. This pose is 7.5 heads tall.
You can do this to measure the relationship of anything in the pose, not just the head. You can say the length of this arm is the same as the length of the lower leg or whatever works for the pose.
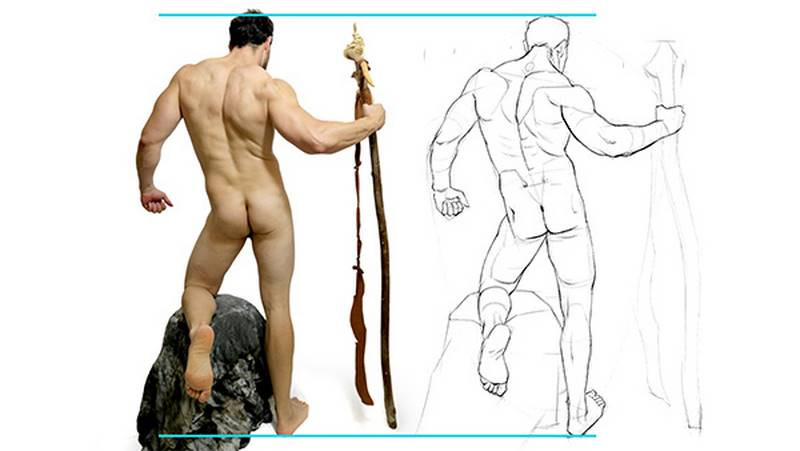
The approach I’m suggesting here does NOT require that the size you measured with the pencil be directly transferred to the paper at the same size. That would be called the sight-size method, where the drawing is the same size as the subject you are seeing.
Measuring Relationships
The approach I’m showing today involves measuring relationships to make the composition fit on the size surface you're working on. We’ve established that the pose is 7.5 heads tall. The size of our paper allows the pose to be about this big, so mark the top and bottom. Then break it up into 7.5 units. That tells you how big the head should be on the page and you have points for all the places where the head units lie on the pose.
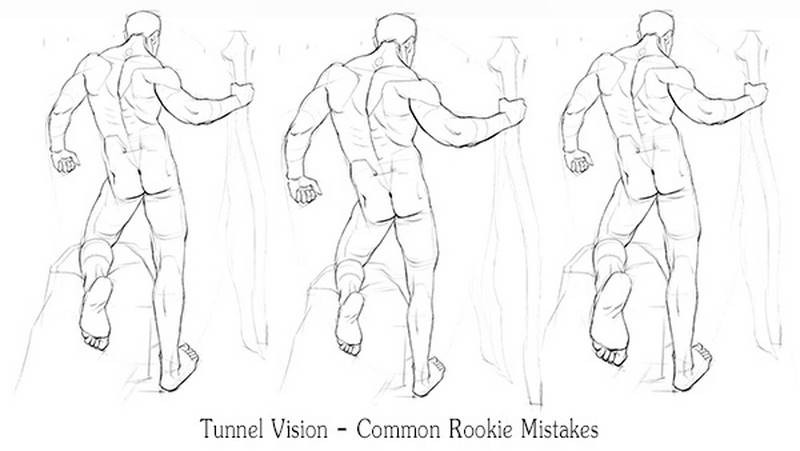
Doing this helps to prevent one of the most common rookie mistakes - progressively drawing things bigger as you go down the page, or smaller as you go down the page. This happens because we get tunnel vision.
We focus on the small portion of the drawing we are currently working on. We relate things only to the things near them instead of the whole picture. And if we tend to measure things slightly bigger than they really are, the drawing will slowly get bigger and bigger as we work our way down the page. Relating the whole thing first is a way to step back and look at the big picture. Make sure the foundation works before we add the parts.
Already this tells us a lot and it makes measuring the rest of the figure much easier. We can also rotate the head unit horizontally and do the same thing for the width of the pose. Notice how in this pose the head is closer to the left side. Avoid putting it in the exact center by default, since that could create an unbalanced composition. Think about the placement of the drawing vertically AND horizontally.
At this point, you could also find the center point of the pose by dividing the height and width in half. Then find where that center point is on the model. In this pose, the center point is about here in his right glute.
Shapes and Angles
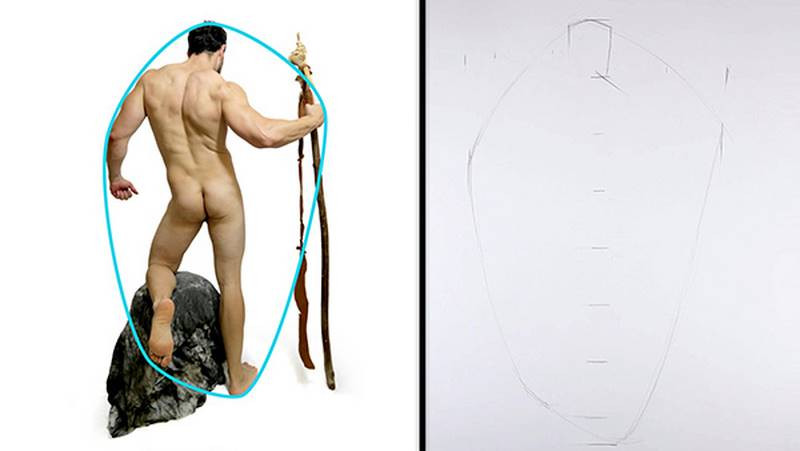
With the head units in place, we can start drawing in the shapes. Start with the largest shapes and use simple lines. The largest shape we can use is what’s called the Envelope. Use large angles connecting the outside points of the whole pose. Imagine if the pose was gift-wrapped. Doing this allows you to look at the big picture and establish its perimeter. Everything else should fit inside this shape.
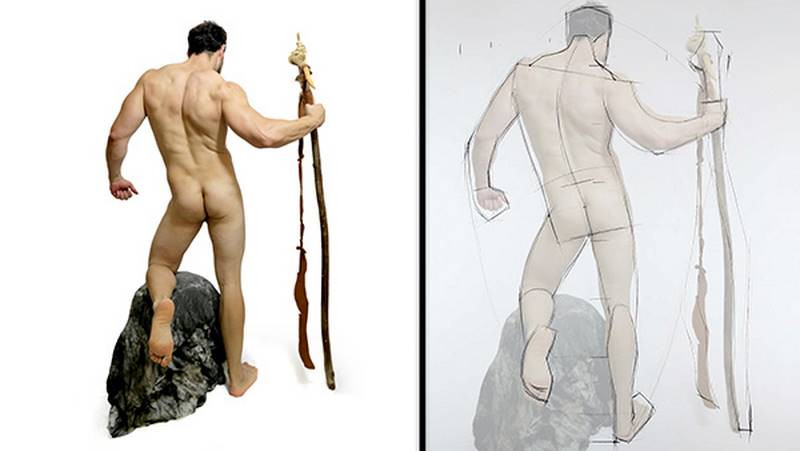
Now start observing the next largest shapes along the body. Focus on getting the angles right with simple gesture lines. Remember that a gesture line can be either a straight line, C curve, or S curve. It should capture the motion of the form. This allows you to get the big picture working without committing to any details. You can easily make corrections as you go. Once you start adding subtleties in the contours, it’s less likely that you will change things and if you do, it’s more time-consuming because you have to redo all the details. So, keep it simple and worry only about the major relationships at first. It’s also a good idea to keep your lines thin and light. Most of these initial construction lines will need to be erased later, so if you draw dark thick lines, you’ll end up with a very messy drawing.
Though we are drawing gesture lines here, it’s a bit different from the 30-second - 5-minute quick sketches we did at the beginning of this course. In the quick sketches, we were not too concerned about the proportions. Only the motion and energy. It’s hard to get accurate proportions in a 30 seconds sketch. In this lesson, we are much more concerned about proportions. As a result, we will lose some gestures because we’re not exaggerating as much, or not at all. It’s a side effect of careful measuring. Usually, my goal is to construct accurately while capturing as many gestures as possible.
Plumb Lines
A plumb line is an exact vertical line that you can drop to see alignments within the pose. If drawing from a model we can actually use a string with a weight at the end to determine a perfect vertical.
Here we see that the acromion process aligns with the inside of the heel. Also, the armpit aligns with the outside of the knee and ball of the foot.
We can also use horizontal alignments. Horizontal and vertical measurements are more accurate than angles. They are much easier to get right because you can align them with the edge of the paper and we tend to have a pretty clear vision in our mind of horizontal and vertical.
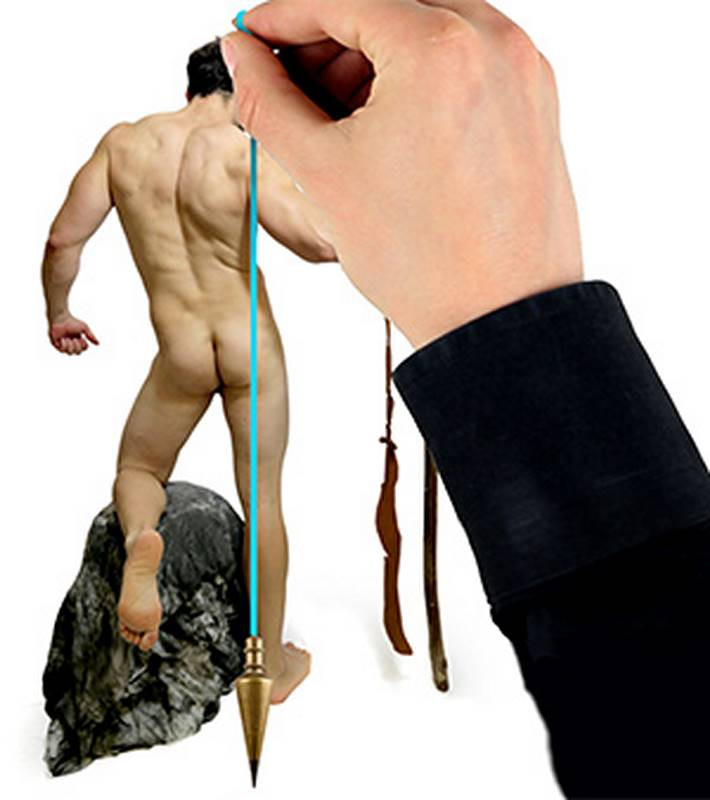
Subtle angle variations can make a big difference. Such as measuring an angle from the head to the shoulders to find the width of the shoulders. If your angle is slightly off on both sides, the shoulders end up being wider or narrower than you intended. It’s ok to use angle relationships, I do all the time, just keep in mind that there’s more room for error. Double-check them when possible with verticals and horizontals.
Triangulation
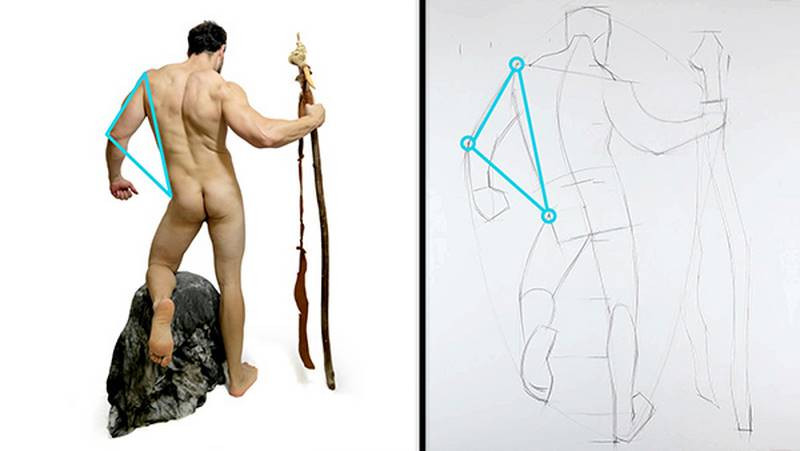
Something that might help to measure angles is triangulation - measuring angles of 3 points instead of 2. If we’ve determined these 2 points to be correct and we’re trying to find the placement of a third, we can estimate the angle from one point and then the other.
If these two estimates don’t match, well then we have to re-measure them. The actual point is probably somewhere in between. Then we can look at the triangle shape made by these points and compare that. This gives us another chance to catch a mistake since we’re looking at a shape not just the angle of a line.
Each Pose is Unique
Each pose has its own solutions, and relationships that make the most sense to measure for that particular pose. For example, in this pose the length from the elbow to the fingertips is exactly 2 head units. However, in this pose, it’s not a nice whole number. It’s a little bit less than two. So, you might need to look for other relationships that will help you find that length. A plumb line from the fingertips lines up with the edge of the pinky of the other hand. And the elbow lines up with the point directly in the middle of the chest. It's nice when things relate to whole numbers. But, sometimes you'll need to take your best guess at "a little bit less than 2". And then check it with other relationships.
Negative Shapes
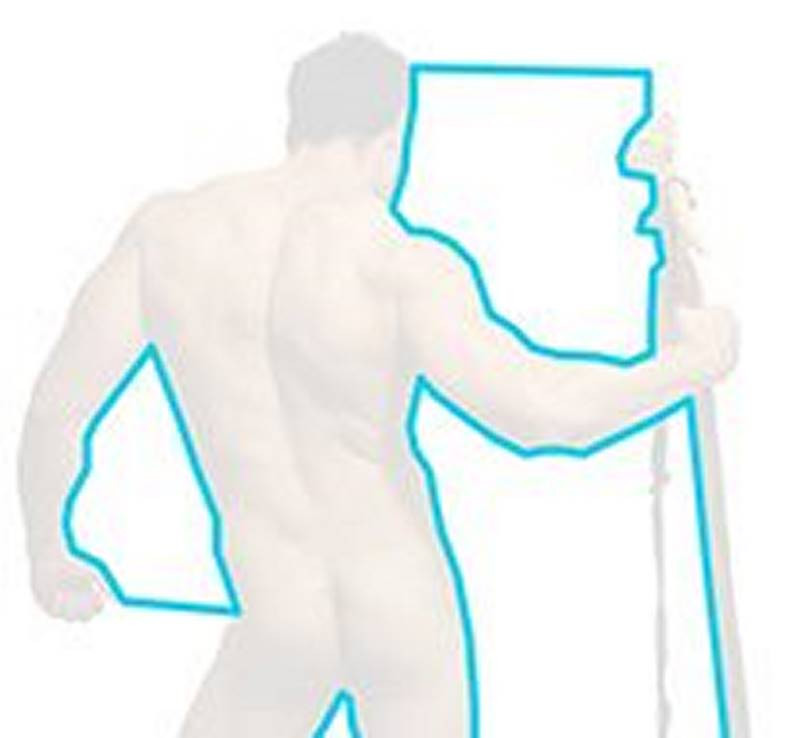
Another trick to finding accurate shapes is to look at the negative shapes. A negative shape is the space around or between the subject. It’s the background. The shape here between the thighs is a triangular shape. This shape is easier for us to judge then the shapes of the thighs themselves because we have less preconceived opinions about what that shape should look like. So, we are more likely to make an unbiased evaluation of the negative shapes.
Trust Your Eyes
If something looks wrong, then it's wrong, no matter how many times you measured it. The mistake might be between a relationship you didn't measure or the small margins of error in the measuring compounded to make a significant mistake. Being a millimeter off while holding the pencil up, can add up to inches in your drawing. So, measuring will get you close, but it's much more important to develop your eye to see relationships without a ruler. Your eye can be a much better tool than a ruler.
The way to develop this is to do a lot of careful drawings focusing on getting accurate proportions. When you practice these exercises, it’s important to have a feedback loop. Either have someone with a trained eye check your drawing or have a method to check it yourself.
In the premium section, I introduce two methods of practicing and checking yourself.
Details
Now that all the major shapes are in place, it’s safe to focus on the smaller parts and add the more subtle plane changes along the contours and within the forms.
What about Gesture?
This episode has been about capturing accuracy. But how important is accuracy? That’s up for debate of course.. I don’t think the answer is the same for everyone. How much do you want to change your reference? How important is it that you capture the exact likeness of the subject? Or is it more important to capture the feeling in an expressive way? There’s a balance to this and that’s partly what determines your style.
In the early stages of your learning process focus on complete accuracy. Make it as perfect as possible to tune your eye and to develop the ability to draw accurately. Don’t choose to be more expressive simply because you’re not capable of accuracy yet. Expand your abilities so that you have the choice. Lean towards accuracy when the job requires it and lean towards expression when the artwork calls for it.
For practice, start by separating the two concepts
- Do longer careful drawings focusing on getting accurate proportions
- And do shorter sketches focusing on gesture
Eventually, the two will mold together and be part of your thought process. Ultimately during each stroke, you will be making subconscious decisions considering both accuracy and expression.
In the next video, I’ll show you how to use these principles in an actual figure drawing. I’ll take you step by step through the whole process. This video is available in the Premium Section. I also show you 2 methods of practicing measuring and checking yourself. So if you’re interested in seeing that, check out the Figure Drawing Fundamentals Course. The Full course has extended versions and a lot of examples from the lessons like, gesture, structure, bean, robo bean, mannequinization, balance, exaggeration, proportion, measuring, and shading. A lot of information and it’s very affordable.
Choose one of the methods I describe in the lesson above. Either digital or traditional. Practice laying in a figure drawing pose and use the measuring techniques you learned. You can use the photo provided below, or any other pose you like in my pose sets.


