How to Draw Hands – Muscle Anatomy of the Hand
This lesson has a premium version with extra content. Get it now!
1.3M views
lesson video
How to Draw Hands – Muscle Anatomy of the Hand
courseAnatomy of the Human BodySelected 3 parts (371 lessons)
-27%
$347.25
$477
You save $129.75
assignments 102 submissions
Luke Ng
Here are m hand Assignment submissions. All comments and critiques are greatly appreciated
LESSON NOTES

I get a lot of tutorial requests, but today's topic is hands-down the most-requested. Today, we learn how to draw hands.

My previous hand lesson explained the bones. Even if you're not interested in drawing skeletons, the bones determine the proportions and range of motion. For the hand in particular, a lot of the forms of the bones are visible on the surface, so you gotta know them! If you didn't watch that lesson yet, it's here waitin' for you...

How to Draw Hands - Bone Landmarks

In the next few lessons, we'll cover everything else about hands. We're gonna do it in four parts. Part 1 is about the muscles of the hand and how they should inform your drawings. Then, I'll teach you how to draw the surface details of the hands, like fingernails, skin folds, and fat pads. In Part 3, I'll show you a drawing process for drawing hands from reference or from your imagination. And part 4 will be a series of step-by-step drawing demos. It's gonna be good. If you've been wanting to get better at drawing hands, clear your schedule. And tell your friends...

So, welcome to Part 1...

Muscles of the Hands

Most of the muscles that control the hand are located in the forearm. Remember those? They're called the extrinsic muscles of the hand. It means they're located on the exterior and send long tendons to control the hand. Now we'll study the intrinsic muscles of the hand. The ones located in the hand itself.

These muscles can be grouped into three teardrops: The thumb gets two teardrops and the pinky gets one on the palm side. Their teardrop-shapes are wider at the wrist and taper towards the fingers.

Showing Muscles of the Hand Tear Drop Examples

The one on the palm side of the thumb is the biggest. They're like the Papa Bear, Mama Bear, and Baby Bear!

But what about fingers? The fingers are made up of bones, tendons and fat... no muscle fibers in the fingers! All muscle bellies end before the metacarpophalangeal joint, (blue). That goes for the thumb, too. Remember, the thumb only has two phalanges. As you can tell from it's shape, the thumb is different from the others. There are a lot of muscles surrounding the thumb and it has a much larger range of motion.

3D Hand Model Showing Hands

Thenar Eminence

Let's start with the thenar eminence. That's a fancy word for the thumb mass on the palm side. It's the biggest and most important muscle mass on the palm. It emerges from the wrist and attaches along the thumb bones. It stretches out when you stick out your thumb, but even then you can see how thick it is. It's even more obvious when the thumb is brought towards the palm, and all the muscles bunch up into a big mass around the base. Papa Bear has a fat pot belly. You can think of it like a cone or a chicken drumstick on the thumb's metacarpal. It changes shape as the thumb moves, which makes it a little tricky, but as long as you know its origin and insertion, you know the area it fits into.

How to Draw the Hands - Learning Thumb Movement

To fully understand it’s form, you gotta know the layering of the muscles. I’ll explain all the individual hand muscles in-depth in the Premium version of this lesson.

Hypothenar Eminence

Next up, the pinky muscle mass, technically called the hypothenar eminence. This one is long and narrow, not quite as thick or wide as the thumb mass. It may look like these two masses meet in the middle of your palm, but the muscle fibers actually stop a little short with a tendinous gap between. It's the fat sitting on top that blends them together.

Drawing Hands Tendinous Gap

Don't go overboard with the hard edge between them or you'll end up with hand-butts! In general, it's better to shade it with tone than mark it with a black outline. Unless the palm is squeezed together, bringing Papa Bear and Mama Bear in for a hug. In that case hand butts are totally acceptable.

Hand Butts - Cartoon Hands

The pinky mass starts at the base of the hand. It actually travels over the side of the hand and attaches to the outside of the pinky metacarpal. It makes this mass. This is why the ulnar side of your hand is kind of squishy when you poke it, while the radial side is hard and bony

Drawing the Hands - Charcoal Drawing

This pinky mass has a weird muscle on top of it that's kinda unique. It runs perpendicular to the other muscles of the pinky. This muscle is called the palmaris brevis. Sound familiar? There was that palmaris longus muscles we learned in the forearm lesson that had the wide palm aponeurosis at the end of it. Well, the palmaris brevis originates on this palmar aponeurosis. It inserts on the skin along the pinky border of the palm. Ok, interesting... What does this muscle do? It pulls the skin inward and helps to improve grip. Go ahead and try it. Squeeze your hand together like you're gripping something. Notice that interesting indent it creates along the side of the hand. That's the skin being pulled. The skin and palmar fat bunch up. Under the crease you can see that large abductor digiti minimi. I bet you've seen that indent a gazillion times, but never really understood it. Now you know.

First Dorsal Interosseous

The final teardrop shape is the first dorsal interosseous. It's the Baby Bear teardrop on the dorsal side of the thumb. It creates this egg-shaped bulge between the thumb and index finger metacarpals, filling that v-shaped gap between the bones. Since it's between the two bones, the dorsal surfaces of those bones are still subcutaneous. That means you can feel the back of the bones and the soft squishy muscle between. Go ahead and find it on yourself.

When the thumb is out, this muscle mass is stretched out. Look at the overlap between this muscle, on the dorsal-ulnar side of the thumb, and the muscles and skin on the palmar side. There's a lot of depth to this area. Beginning artists often draw a simple contour and accidentally flatten it out. Instead, focus on the overlaps. Draw overlapping lines so it's clear what's in front and what's behind. It will add depth to your drawings. This is why anatomy is helpful - now you know where this mass is coming from, so you can draw it with more context.
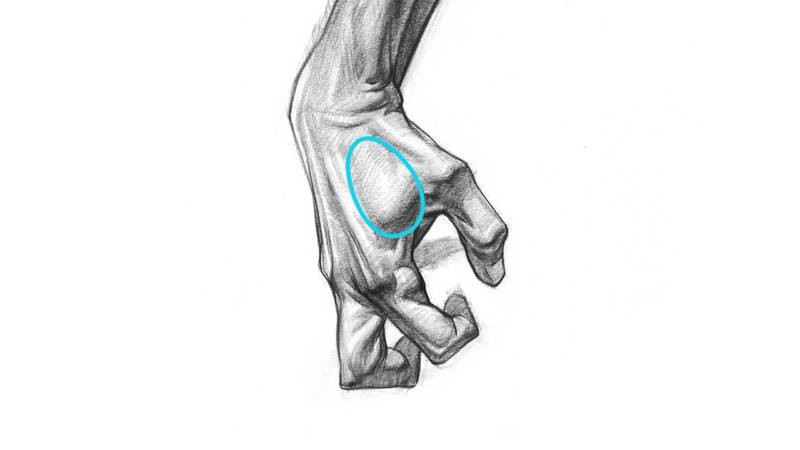
Drawing the Hands - First Dorsal Interosseous

When the thumb is squeezed in, it pops out as a big round egg form. It's not as thick as the palmar thumb mass. It's shorter, too. The dorsal thumb mass only reaches the metacarpals, while the palmar thumb mass starts way up at the wrist.

When the thumb is squeezed in, it pops out as a big round egg form. It's not as thick as the palmar thumb mass. It's shorter, too. The dorsal thumb mass only reaches the metacarpals, while the palmar thumb mass starts way up at the wrist.

So, you can see in this photo the dorsal thumb mass ends here at the metacarpal bone. The palmar thumb mass peeks out down here, much closer to the wrist.
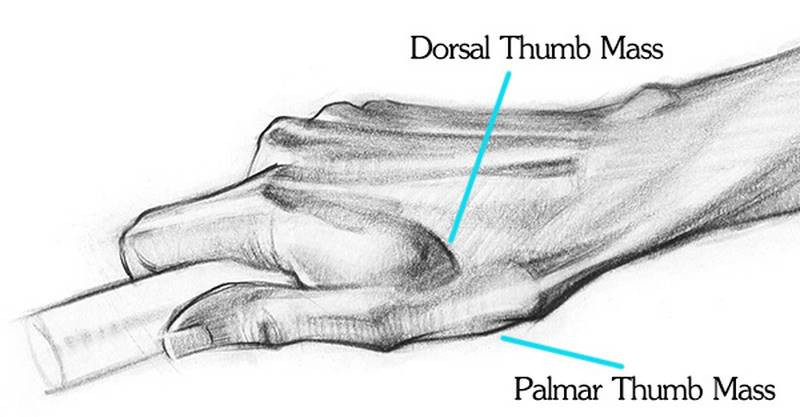
How to Draw Hands Thumbmass Diagram

Remember there's a lot of loose skin around this area too. When the thumb and index fingers spread, the skin is pulled tight in a straight line between the knuckles. As they come together, that line loosens into an inward curve. When they get really close together, the skin gets pinched and bunches outward.

Ok, so those are the muscles of the hand!

DOWNLOADS
txt
muscles-of-the-hand-premium-premium-transcript.txt
14 kB
mp4
Muscles-of-the-Hand-Premium-1080p.mp4
357 MB
zip
Hand-Assignment-Images.zip
2 MB
ASSIGNMENTS

Assignment

It's time to get your hands dirty! Your homework is to draw hand quick-sketches. Focus on the three fleshy masses I talked about today. Your goal is to create drawings with good gesture and simple 3D form. Make sure you use a good balance of straights and curves. Identify the superficial bony areas and check to make sure your muscle forms attach to the right spots on the bones. Be sure to post your drawings in the Anatomy discussions tab, so that you can get feedback and possibly included in the critique video.

Newest
Amortquio Flores
No idea how I did
@chinanoahli
Does ‘Adductor pollicis’ refer to the area marked in red in the picture?
Melanie Scearce
That is the general area where the adductor pollicis muscle is but the specific area of the red mark represents a skin fold that sits on top of it.
Lig ma
6mo
Please give me any critiques if yall have some
@cattlewagon
Hey - have been trying to get a bit of mileage on hands as I’ve been avoiding for too long, but getting a little frustrated with how they’re turning out so figured I’d post here for feedback. Mixed in a couple of Milt Kahl studies on the last page (an idea I stole from one of Proko’s sketchbook tour videos) and tried to apply what I learned from those when interpreting photo references. The hand in number 7 belongs to none other than Tom Baker
Kassjan (Kass) Smyczek
I am in a different country so I can‘t use my scanner. But i tried to take a good picture: Here is my hands assignment. I was doing all the assignments with the mechanical 2mm pencil that proko recommends. Shading always felt kind of tough because there is not much of „edge control“ you can do with a mechanical pencil. So always I wanted to start with charcoal but learning two new things: anatomy + charcoal is a recipe for frustration. So now - after I finished the anatomy course - i will practice more anatomy with charcoal. I watched the latest Nosferatu movie and wanted to make a Count Orlok hand :)
Rachel Dawn Owens
Wow! You’re drawing so much for this class and it all looks so amazing! These hands are very impressive. You can still render soft edges with graphite if you use a smudge tool. Also, the prismacolor ebony pencil is a good one that can be sharpened like charcoal to get a variety of marks. It’s a personal favorite of mine. I also included a drawing from the brilliant artist Soey Milk who does some amazing drawings using graphite pencils. It is possible to get smooth shading with graphite. It just requires more time and work than charcoal. I love charcoal drawing because it is so fast. It’s good to practice with both. You will learn a bunch from using either tool. Your drawings are looking excellent. Very sharp. Maybe soften it up a touch in certain areas to add more variety and contrast.
Camellito
11mo
Here are my assignments. So excited to study the hands.
Melanie Scearce
Wow, very nice!
Alejandro
1yr
Melanie Scearce
Fabulous!
Jean Pierre Daviau
Drawing hands is challenging; even a minor error can undermine a great deal of effort. I have attempted it three times already. Pay attention to the invisible small finger knuckle, the 'raccourcis' of the hand, and especially the thumb.
Jean Pierre Daviau
Initially, I estimated it by sight. Then, I realized it was an abbreviated view and incorporated several vertical lines. Next, I considered the grids of 1/2, 1/3, and 1/4 proportions, as well as a square with diagonals. Subsequently, I observed that the top of the hand was curved, which meant I needed to examine the subject closely since even minor alterations can significantly affect the realism of the hand's depiction.
Jesper Axelsson
Hi @j4e8a16n, nice study! - When you drew the hand, what was your process like? I think knowing that will help me with giving feedback. 😎👍
Ezra
1yr
Really difficult lesson, #6 feels off but I’m not certain why
@lazy0
1yr
Another, batch of hands studies that I have made, I've showed the process of gesture, construction and the final results. On the hand that is spread out all the way, I had troubles with its perspective and foreshorten, I forgot that the palm is smaller and the fingers are bigger. I tried my best to overlap the best I could with it but there only so many things you can do to make a garbage can look ''nice''. The webbing of the hands confused me but over all I just failed. feed back are welcome btw. (also my reference choice kinda sucked because the images were low quality)
Andreas Güntensperger
Some more Handpractice. Sometimes i struggling with the proportions but it is getting better...
Jean Pierre Daviau
Thank you very much, I will work at his..
Jean Pierre Daviau
Thank you very much, I will work at his..
@lazy0
1yr
These are my batch of hands studies that I have made, I've showed the process of gesture, construction and the final results. The gesture part, its getting easier the more I do them and the I'm getting faster with that process, but I have trouble with putting the palm in perspective. Other than that the rest are pretty simple, but I do double check my proportions and try to make them as dynamic as possible, but I would still like outside feedback on it. The Construction part, for me the only problem I run into is that, the Phalanges Are pretty tricky for me because it feel like when I start to box them they look at little off, I don't know if my construction is good enough to move to the next stage. The Final part, I combined the muscle shapes with adding the flesh, but I still feel like its wrong. Also its pretty hard to add subtly because I'm only limited to line art, so I try my best to add light hatching, but I feel like I don't know what the hell I'm doing in the final part, I don't know if I have to get better at line art, study other artist because it looks bland and a little underwhelming. This is a pretty long, but I want to know how to get better at drawing hands.
Jean Pierre Daviau
Andreas Güntensperger
Still struggling a little bit with the Hands. I don't know is it the proportion, the Gesture or the Structure. Or maybe it is just me, because i'm watched to long on my pictures. Feedback welcome :)
Melanie Scearce
You have a great grasp (pun intended) on the gesture and structure of the hands from what I can see here. Great job!
Ash Chung
2yr
Just some practice...
JooYoung Choi
Wow those are awesome! Have you ever held a clear ruler or piece of plexiglass glass when taking your reference photos? It might be a nice way to see what the hand is doing behind the fret board :)
Patrick Bosworth
This is a great idea, finally I can practice drawing and guitar at the same time!! Terrific studies!
Ash Chung
2yr
Melanie Scearce
These look great, Ash! I especially like the first one and second drawings, the form of the muscles looks great. On the fifth drawing I noticed that the fingers looked a bit short and I think it's because the first joints are not long enough in your drawing. That's a tough pose, I think if you retried it and also focused the muscle shapes made by the palm you will get a more successful drawing out of it. Keep up the good work!
Daniel
2yr
How can I make my shading look less muddy? The drawing looks patchy in some areas like the fingers.
Samuel Sanjaya
my attempt at hand quicksketches
@saschu
2yr
Madelyn Kuipers
I know this wasn't exactly the assignment but I wanted to get the underlying structure of the muscles and where they sit into my head. Feedback and critiques are welcome and appreciated!
Marco Sordi
Awesome study!!
Volker W
2yr
I like the amount of effort you put in this. Very nice studies
Gannon Beck
Wow. Fantastic work!
Help!
Browse the FAQs or our more detailed Documentation. If you still need help or to contact us for any reason, drop us a line and we’ll get back to you as soon as possible!