How to Draw Biceps – Anatomy for Artists
This lesson has a premium version with extra content. Get it now!
389K views
lesson video
How to Draw Biceps – Anatomy for Artists
courseAnatomy of the Human BodySelected 3 parts (371 lessons)
-27%
$347.25
$477
You save $129.75
assignments 33 submissions
Luke Ng
I struggled with Identifying the brachialis in the models, especially on the medial side of the arm. Also, I'm not sure if the brachialis and the deltoid are supposed to attach to the same location of the humerus. It looks that way on most ecorches I've seen though I could be wrong. Any Critique about my anatomy or general drawing is greatly appreciated
LESSON NOTES

Today we’re gonna learn how to draw the biceps and its friend, the brachialis. The brachialis sits under the biceps and helps it bend the elbow.

brachialis sits under the biceps

Brachialis

It originates from the lower half of the humerus, starting right where the deltoid ended.

The brachialis inserts on the coronoid process of the ulna, which is that hook on the front that grips the humerus.

The biceps sit on top of the brachialis, so the brachialis is only visible along the sides of the arm.

It’s kinda like a muscle sandwich where you can only see the brachialis bologna along the edge.

brachialis bologna along the edge
brachialis is only visible on the side of arm

Like all arm muscles there is asymmetry here. The brachialis is higher on the outside and lower on the inside.

The inside view is also softened by the veins, arteries, and nerves that overlap it. So, it’s form is usually larger and more visible on the outside of the arm.

When flexed, it appears as an oval-shaped relief on the sides of the arm.

The brachialis is a really good wingman. It helps the biceps look bigger by pushing them forward a bit. On that note...

Biceps Brachii

It’s time for the superstar of the arms - the biceps brachii! This is a two-headed muscle, as the name tells you, just like the triceps is a three-headed muscle.

So the biceps have both a long head and a short head that you need to know.

brachialis is a really good wingman

biceps brachii long and short head

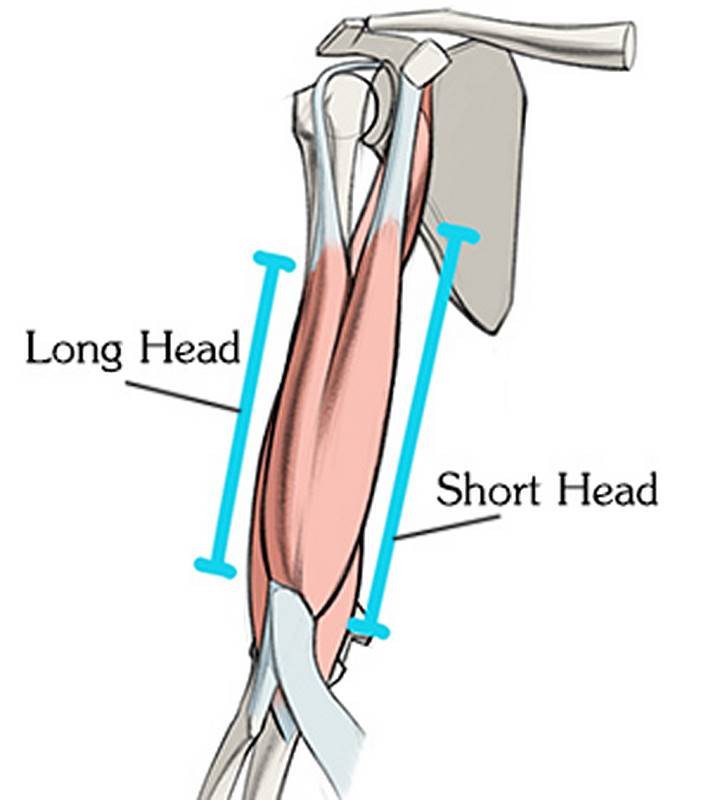
The long head originates from the scapula, at the supraglenoid. That’s just at the top of the shoulder joint. Its tendon travels over the head of the humerus and down the bicipital groove. Since, the long head points directly at the head of the humerus, you can use that to locate the head of the humerus when drawing from a model. Keep that in mind during our tracing assignments.

The short head originates from the tip of the coracoid process, Don’t mix it up with the coronoid process of the ulna, where the brachialis inserts. I know, these names were poorly chosen. You just wait, it gets worse.

Both the biceps’ short and long head merge together to make a simple, large, fusiform muscle belly. Which comes to an abrupt end in a tendon that buries itself into the forearm, to insert on the tuberosity of the radius. So, the biceps never directly attach to the humerus. For the upper arm superstar, that’s pretty weird! I also want to point out that the biceps go to the radius, and the brachialis goes to the ulna. Together they pull on the forearm to bend the elbow. The biceps also help supinate the forearm,

Remember how the arm muscles are asymmetric? The biceps run from the shoulder joint to the radius, which creates a diagonal angle.

There’s a couple important differences between the short head and the long head. First of all, the short head is longer.

Ya, the naming is bad. The “short” head muscle belly is higher up on the arm and extends down lower. It’s probably called the short head because it has a shorter tendon. Which is ridiculous.

The biceps are lopsided in the way they’re named and the way they’re shaped. So, keep that in mind when you’re designing them in your drawings. The separation between the long head and short head is sometimes visible at the top, where it comes out from under the pec and deltoid. This is especially noticeable when the arm is straight out. And of course, only when there's little body fat to soften it.

But it also matters if the arm is supinated or pronated. Since the biceps insert on the radius, as the radius pronates away, the biceps are stretched out thinner.

They will look flatter and longer, softly transitioning into the elbow. But when the arm is supinated, the biceps look shorter and fuller.

flat tendon branch of the biceps

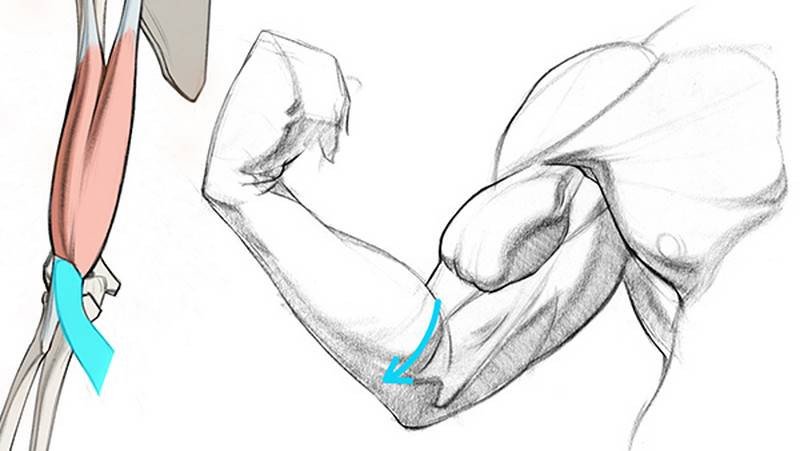
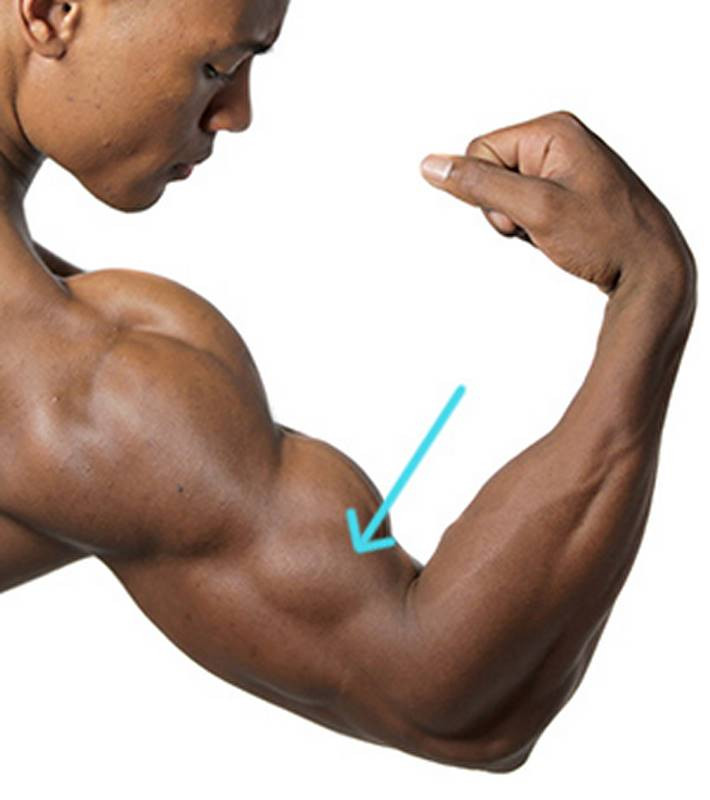
There’s one last thing to cover. The biceps have an interesting effect on the forearm. A wide, flat tendon branches off from the bottom of the bicep, travels downwards and medially, and attaches to the skin above the forearm flexors. This is a couple inches below the medial epicondyle. This tendon basically acts like a belt strapped around the forearm. When the arm flexes, the forearm muscles are trapped between this tendon and the elbow. So the muscles bulge here and you'll see a dimple. It’s most noticeable when the elbow is at 90 degrees, the forearm is supinated, and the arm muscles are tensed.

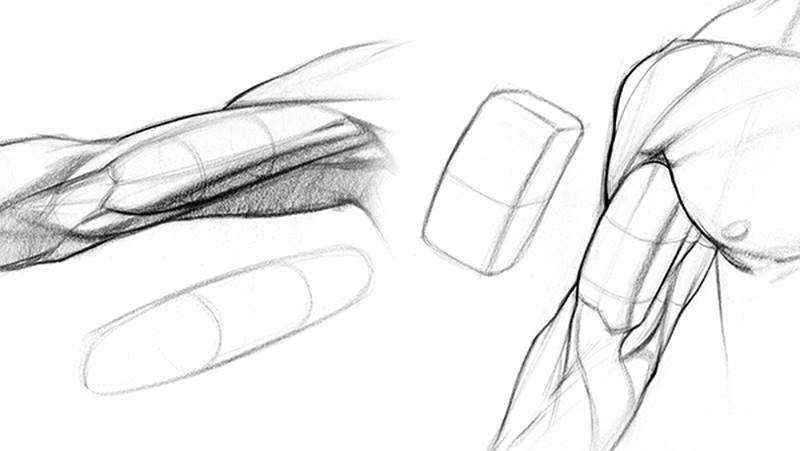
For skinny males and most females, the simple form of the biceps is cylindrical. For athletic guys, the biceps can be thought of as a box, with clear top and side planes. Although when the biceps flex, they become shorter and more spherical.

simple form of the biceps

That’s it for now, but look forward to learning all about the triceps in the next lesson.

Coracobrachialis

If you want to learn about the biceps other friend, check out the Premium Anatomy Course.

DOWNLOADS
zip
Upper-Arm-Assignment-Images.zip
3 MB
mp4
How-to-Draw-Biceps-Premium-1080p.mp4
236 MB
txt
Upper-Arm-Front-Muscles-Premium-Transcript.txt
8 kB
ASSIGNMENTS

Assignment: Draw the Biceps

our assignment is to do quicksketch drawings of the upper arm from the model photos I’ve provided below. Start with the gesture then focus on drawing the forms of the muscles. Since we already learned about the deltoid, you can have some fun with those too.

Newest
Amortquio Flores
@aleeex
6mo
Assignment tracing I did to better understand these muscles, however I still have a lot of trouble seeing the underlying structure and supination/pronation, so any critique (especially involving the arm bones) is really appreciated
Kassjan (Kass) Smyczek
I am in a different country so I can‘t use my scanner. But i tried to take a good picture: Here is my biceps assignment.
@robot0906
1yr
Can have critique please? I need to understand these muscles.
Melanie Scearce
I looks like you have all of the important muscles in your drawings, now it's just a matter of figuring out where they connect and how they change when flexed. It's a truly wonderful challenge to take on :) What helps me is to do tracings before I dive into an anatomical study. I find that I ask more questions when trying to work out what goes where beforehand than when I am in the midst of a drawing. You could print out the images and use tracing paper or do the tracings digitally. It also helps me to label the muscles. That's just what works for me, but it could work for you too! I also try to find references to have available, like Richer's Artistic Anatomy and the free app 3D Anatomy for Artists, which is a great way to learn the origins and insertions. I included my tracing of the images you included. Hope that helps!
@robot0906
1yr
Here are my assignment drawings plus some from imagination.
Alejandro
1yr
my assigment for this lesson, loved the poses
Rachel Dawn Owens
Beautiful!
Melanie Scearce
Super clean drawings!
Patrick Bosworth
Very nice work!
Ezra
1yr
Enjoyed this one! The positioning and visibility of the brachialis still confuses me a little. Any feedback is welcome :)
Melanie Scearce
The brachialis is mainly visible on the outside of the arm since there are arteries, veins, etc that cover it on the inside of the arm. It creates an oval shape when flexed and is visibile on your drawing #3 between the triceps and the biceps. Hope that helps!
Holly Laing
Here's my assignment for the biceps, any critique/feedback is welcome! :) 
Liandro
2yr
Looks awesome, @Holly Laing! Careful construction and accurate anatomy. Great work!! One suggestion I'd make (which doesn't concern anatomy directly) would be to avoid using a hasty zig-zaggy pattern when shading with a pencil-like tool, since it can create some "noise" that kind of breaks the realistic design which I believe you were going for. Instead, what I'd recommend would be to try to work with hatching and cross-hatching (something like what @David Finch shows in this video: How to Cross Hatch for Comics - David Finch) or, alternatively, to use a more "painterly" approach and have your shading rely just on broad tone marks (I'm attaching a quick paint-over). Hope this helps!
Madelyn Kuipers
Had a hard time with some of the tendons and positioning so feedback and critiques welcome and appreciated!
michael gilbert
Daniela Grippo
Any suggestions?
Demetrio Cran
Hola Daniela! Creo que entre Argentinos podemos hablar en Argentino :-) Lo que dice Steve es muy acertado, creo yo. Es posible que te entusiasme mucho la anatomia y estés usando esa energía para sentarte a dibujar, pero veo que no te vendria mal reforzar algunos fundamentos. Por ejemplo, Steve menciona el gesto. Yo sumo la forma en que usas el "sombreado" para describir el volumen. Creo que podés usar de referencia a Steve, que con gran economía (solamente dos tonos) muestra mucho volumen y con gran claridad. Por supuesto que Steve es muy avanzado, pero lo que se puede sacar de la experiencia es que tal vez sea buena idea probar con un sombreado más simple. Bueno, es un gusto encontrame con dibujantes de argentina.
Steve Lenze
Hi Daniela, There is a couple of things I see in your arm drawing that I think you could work on. To begin with, the arm has no gesture, it's very straight and stiff. Your anatomy and the way you are thinking about the flex and relaxed part of the muscles is what is contributing to the stiffness. It's easier to show then explain, so I did a quick sketch to show you what I mean. I hope this helps :)
Phattara Groodpan
Tsotne Shonia
I'm still experimenting with the shading, there's still a lot to do. I think I'm not varying my core shadows enough and need to be more willing to "erase" my lines, but I'm making slow progress 😊
Benjamin Green
Most of these are really good. One tip I can lend you is that you don't typically need a core shadow for every muscle. Shading each muscle individually will generally look terrible. Bigger shadow shapes and maybe a pinch of reflective light here and there will look artistically better. Anatomy is about subtlety.
Jesper Axelsson
Hi @Tsotne Shonia, nice studies! Your tracings of the anatomy look pretty accurate💪 - I think I would give you the same advice I gave you on the foot bones assignment: to practice drawing from imagination. Drawing from imagination reveals what you don't know and helps you get to know the anatomy even better. In some of these I'm lacking a sence of a bone beneath, and the muscles being layered on top. In drawing 1, 2 and 5 I feel like we're lacking some of the arm's volume; maybe because the unvisibile anatomy hasn't been clearly considered. I like to treat my anatomy studies, kinda like écorché sculptures; you build from skeleton up to the surface. - I think the drawings would look even more appealing if you balance the round forms with some hard planes. Try to be a bit more boxy in you mass conceptions. In image 6 for example, you have a wonderful opportuniy to draw an almost box like biceps. - Try to consider the gesture more when adding the structure and anatomy. If you study this drawing by Michelangeo https://i.pinimg.com/originals/21/86/5f/21865fe4ea3811d6cdad9a961d5d5ce3.jpg, you might notice how every single line is contributing to the gesture. It might help to think about a river flowing through the body; the forms are like rocks that the water flow across, around, smashes into, splashes over and the lines you draw is the water interacting with them. One of the difficulties with figure drawing is to keep on adding to the gesture, while adding the forms and details, and this river analogy might help with that. Hope this helps :) Keep up the good work!
Samuel Parker
Found some time to get back to this course! Been busy with my mentorship with Simon Lee.
Margaret Langston
Posting my attempt at the biceps assignment, which shows my very fuzzy knowledge of anatomy in general. I will come back and copy the SP demos at some point.
Marco Sordi
2022/11/25. Good morning everybody. Here's my latest anatomy study (source: "The Anatomy of Style" by Patrick Jones). Thanks and have a good day.
James Paris
Here are my assignments for this exercise
Jesper Axelsson
Really nice!
David Gutmann
Jesper Axelsson
Hi @David Gutmann, nice drawings! Good gesture and shading, I can clearly feel the forms. - I would do some deeper studying of the anatomy to make sure you know all the muscles from this lesson and their attachment points. In drawing 2, I'm unsure whether you're aware of the biceps's insertion point at the radius and the presence of the brachialis, since they don't seem indicated (though I'm seeing a light line that might be part of the brachialis). Maybe you were, but choose to leave it out for a focus on light- and shadow-shapes? You can shade of course, though for your anatomy studies I would recommend that you lightly indicate, or at least in the lay-in, find the muscles and bones that lie deep as well. In image 3 you've indicated the coracobrachialis, though I'm unsure whether you know where it's heading for the coracoid process. In drawing 4 you seem to have grouped the biceps with the brachialis into a single cylinder. Hope this helps :) Keep up the good work!
@abrahan13
3yr
Any feedback is appreciated
@viny
3yr
biceps exercises ready, I'm still going to do some more, I don't think I understand everything right.
@viny
3yr
another study 8 months later
Luke Ng
3yr
Nice work! Keep going
Help!
Browse the FAQs or our more detailed Documentation. If you still need help or to contact us for any reason, drop us a line and we’ll get back to you as soon as possible!