How to Draw and Shade the Human Torso
This lesson has a premium version with extra content. Get it now!
325K views
lesson video
How to Draw and Shade the Human Torso
courseAnatomy of the Human BodySelected 3 parts (371 lessons)
-27%
$347.25
$477
You save $129.75
assignments 32 submissions
Nicole Lee
Hi, I finished Proko's anatomy course and am currently studying Watts on Bridgman book. Below is a drawing using photo reference from his book. I mimicked his design for shadow shape but also try to create my own. Not sure if I can upload the photo from his book so didn't provide the reference photo here. Can anyone please provide critique on this drawing and where I can improve? Thank you!
LESSON NOTES

Drawing Materials for this Demonstration


Paper: Arches 88 Silk Screen Paper
Pencils: Conte 1710 hb and b pencils
Eraser: General's Kneaded Eraser (Any brand)
Charcoal Powder: General's Powdered Charcoal (Any brand)
Sable Brush: Rosemary & Co Filbert Series 276, Size 12 (Any large soft sable will work)

Step 1 - Prepare for the Drawing with Studies

I'm approaching this drawing as a portfolio piece, or something that might hang in a gallery. I think this is a good mentality to have going into a longer drawing because we take it more seriously. With that, comes prep work...

drawing studies for torso anatomy

I like to do some small sketches before I jump into the actual drawing. Proportion studies, gesture studies, value studies, and anatomy studies. These give me a running start when I begin the drawing. In the premium version of this demo, I walk you through each one of these studies.

Step 2 - The Layin

Basic Shapes

Since I'm drawing from reference, not from imagination, the first step should be heavy on measuring. Checking to make sure my proportions are correct. In fact I'm going to start this drawing like I start all my figure drawings from life. Identify the largest shapes and rhythms, then add the anatomical details on top.

Shadow Mapping

The next step is kind of in-between of the linear layin and the shading stage. We're going to create a map of the separation between the lights and the shadows. As we do that, we're going to design interesting edges and shapes to the core and cast shadows. I know that might sound confusing. If it does, you probably need to go back and rewatch the shading lessons from the figure drawing course.

torso anatomy drawing layin

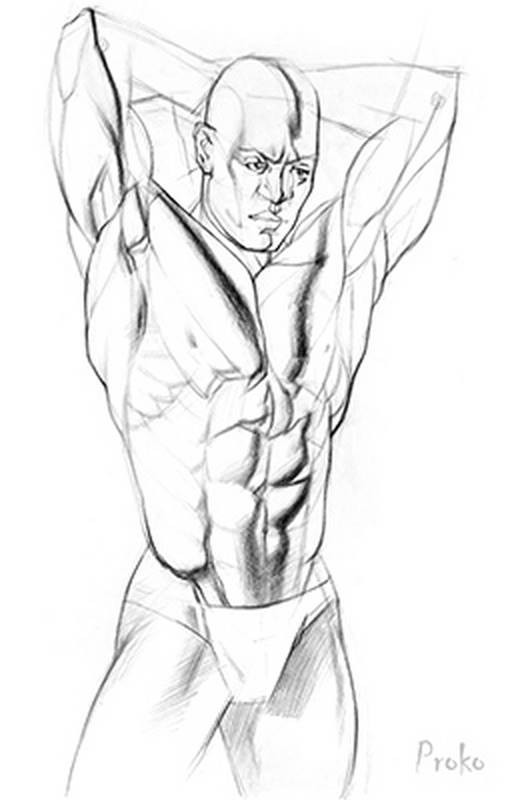
Some muscles like abs, serratus, and obliques naturally have repeating forms. Try to design them to have some kind of variation and rhythm. Look for variations in edges, shapes, values, and sizes.

Step 3 - Shading the Forms

General Tonal Composition

We have the layin finished, now it's time for the shading. I like to start by separating the lights from the shadows. A quick way of doing this is with some charcoal powder.

I dip a soft sable brush into a little jar of charcoal powder. Lightly tap the brush on the jar to knock off some of the charcoal and slowly start spreading it onto the shadow areas. Don't do this too fast. Take your time and keep it clean.

Details

This part of the drawing gets very meticulous. It takes a long time to shade properly. We have to analyze every plane change, every edge, every shape, every value of every core shadow, halftone, highlight... There's a lot that has to be processed and we shouldn't rush it. If we're going to study the human form, then we should actually put in the time to study the forms. This is how we do it. This is where a lot of our time will be spent. If you're like me, this process is absolute joy. It's like meditation. Play some good music and spend your day shading!

The charcoal powder also has a limit to how dark it can get. As I'm filling in and cleaning the shadows, I'm also darkening the overall value of the shadows. If the shadow value is too light, then I don't have much to work with in the lights.

Think of the torso as a simple rounded egg. Think about the light direction and how the halftones transition from light to dark, to coreshadow, to reflected light. This overall egg effect should be present in your drawing even when the small detailed forms are added. The best way to make that happen is to add the large halftone gradations early. Like the dark halftones on the abs.

When shading it helps to think about planes. Not the flying planes. I'm talking about geometric shapes. Instead of blending in a bunch of soft arbitrary tones. I'm observing the value of the side planes, bottom plane, top plane and front plane. I'm looking for clues in the photo that will help me show these forms.

torso anatomy drawing final portfolio piece

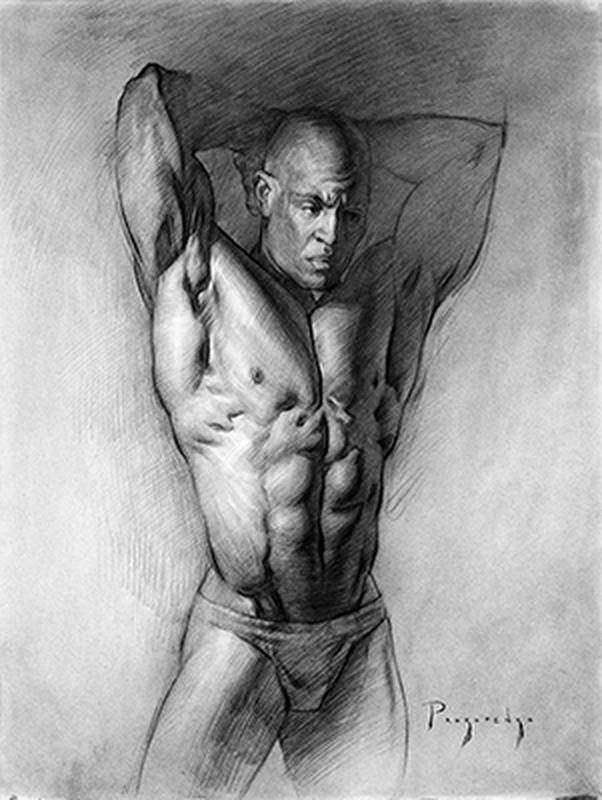
Approach the highlights like any halftone shapes. Don't just erase them. Draw and design the highlights. Think about the shape, edge, and value. You can even use line direction on a highlight to show the form, just like you would with a halftone.

In the light areas I use the tip of the pencil to get a thin line. I also make sure my pencil is nicely sharpened when shading an important light area. Using the tip in the lights adds finer detail, texture, allows you to cross hatch with the forms for a better 3d effect, and forces you to shade slower and make better decisions.

***
I hope you enjoyed this demonstration! In the premium anatomy course this demo is over 1 hour long and I go into much more detail explaining each step of the process, guiding you through the anatomy of the torso. Portions of the video are in real time and the parts that are sped up are sped up much less than this video was. If you liked this demo, you'll definitely enjoy the premium version that's included in the course.
DOWNLOADS
txt
torso-drawing-part-3-premium-transcript.txt
17 kB
mp4
Torso Drawing Part 3 - Shading - 1080p.mp4
965 MB
ASSIGNMENTS
Newest
Carlos Pérez
i'm grateful Stab demos properly , it makes it look so simple to perform it and the explanation was simple too . Whenever i work on a piece , i'm thinking on the bone inside , on the position of each part , the egg effect as mentioned here ,
Dennis Yeary
My attempt at the the human torso
Liu Bide
1yr
Martha Muniz
Hey there! Beautiful work so far, it seems like your torso studies have been paying off well :) When it comes to shading, I would recommend continuing to emphasize the core shadow, which you can do in this case by darkening it further. This can help add dimensionality and depth to the forms you are depicting, as well as bring in more contrast and readability. Hope this helps, and let me know if you have any questions!
Cernunnos
1yr
hi, this is my assignment on torso drawing :) - have a nice day - Carlo
Melanie Scearce
Amazing work!
Dubčido
1yr
Hey, my go on Tony's torzo..
Dubčido
1yr
Thank you friends, glad that you like it. Tried to learn as much as possible from the lesson, but also had moments when i forgot and just drawed, was fun..
Ash
1yr
Awesome job, Martin!
Phil
1yr
fantastic work!
Ezra
2yr
Torso full drawing! I’m not really satisfied with the shading but it’s difficult to pinpoint why. The arm muscles are also off but thats alright! I’ll learn more about them in the future lessons :) used graphite pencils of different hardness (B, 2B, 6B)
Marco Sordi
2023/12/27. Hi everybody!! Here's another diagram of the torso muscles. Thanks!
Marco Sordi
2023/12/24. Good morning everybody. Here’s another torso study. Thanks and have a good Xmas eve.
Shaun
2yr
Magnificent.
Marco Sordi
2023/12/21. Good morning everybody. Here’s a quick torso study I made today. Thanks and have a good day.
Child Granny
Here's my attempt. It doesn't feel done, but I feel like moving on for now. The gesture and face feel a bit off, as does the shading. I started out doing the blender stick smudging technique, but then watched the videos through and attempted the rest with the crosshatching technique Proko recommends. It was a great challenge, and I learned a lot! Thoughts and critiques welcome!
Valerio Capriati
Hi. I think they are all positioned correctly and are very detailed. my criticism is towards the pose, I think you could have curved the body slightly making it more interesting, so it seems very static to me and despite the beauty of all the muscles and fantastic facial details, I think it could be improved significantly with little effort
Sofi
2yr
Here´s my attempt! It was super tough but also super fun. Now I can tell I streched out his torso too much LOL. Feedback would be greatly appreciated!
Samuel Sanjaya
My process of this longer figure drawing. I attempted this before watching the demo. I wonder how proko can spread charcoal powder as smoothly as in the video, mine was hard to spread and seems to immediately stick into the paper. Any feedback/critiques will be greatly appreciated.
Myles Goethe
Peter Tinkler
This is my contribution to the human torso shading exercise. I decided to try my own source material, but I did watch the above video and found it extremely helpful. This is a charcoal sketch of a sculpture, Heracles and the Nemean Lion, from the Barber Institute in Birmingham (one of the local galleries near where I live). The main focus is the torso of course, but I admit I was drawn to the arm muscles as well. There's a bit of exaggeration and extra tonal work for drama and effect, and I did take a couple of liberties with the source material, which I hope is acceptable. I've included my general process, and my reference.
Steve Lenze
Hey Peter, This is a cool reference that has a lot of tonal variation that gives it a nice 3D feel. unfortunately this statement: "There's a bit of exaggeration and extra tonal work for drama and effect, and I did take a couple of liberties with the source material." Makes it impossible to critique. All the things I would say need attention is covered by that statement. I guess what you have to ask yourself is: what am I trying to achieve. To create an accurate drawing using the rules of light hitting an object, or, to do it the way I want. No judgement, either way is fine, it just makes it hard to critique. If you want some help understanding how light works and to achieve accuracy, let me know and I'll go over this with you :)
Sarvesh Gupta
Here's my attempt of the human torso. I'm still kinda new to shading so not that good at finishing yet. Might reattempt it later. Feedbacks are welcome
Steve Lenze
Hey Sarvesh, I can see your drawing is pretty good, the angles are good and the gesture feels pretty solid. The waist and ribcage area are a little small so always check your proportions. As far as your rendering is concerned, it is clear that you are confused by all the values presented in the reference. My solution to you is to ignore all the values you see by squinting until all you can see is two values- dark and light. Then, fill these values in and ignore all the rest. When you can do this successfully, then you can start adding middle values, dark accents and highlights. I did a quick demo to show you what I mean, hope it helps :)
Lars Trunin
Did it before looking at Stan’s demo. It’s a humbling experience — to learn how much you still have to learn. Also, I think I need to upgrade my paper. It was really fighting against the Conte pencil.
Ernesto Palma
That´s a great thing about practice, it shows you what you need to improve, so you can focus on that for the next practice and so on. If we already had all the skills developed and knowledge memorized, we wouldn´t be studying! lol I do like that you were willing to go all the way through even with difficulty, great effort bud!
necplusprocess
hello, just finished my torso drawing, any feedback appreciated
Steve Lenze
Hey necplusprocess, Nice job on your drawing. I went ahead and did a quick sketch to show you some of the things I noticed. I hope it's helpful :)
@helenkwok
3yr
25/7/2022 (1.5hr)
@kugeltisch
dayum, looks great
Bartłomiej Wójcik
Just finished
Romain Decotte
Hello :)! I have just finished drawing and shading the torso :)). I thoroughly enjoyed the whole process - thank you @Stan Prokopenko! I have attached my prep work - measurements, values and a thumbnail. I did it using a B charcoal pencil as I did not have an HB one. I find shading quite complex and challenging and still have plenty to learn. I would be most grateful if I could get some feedback @Jesper Axelsson. Onto the back muscles now :)! Happy Easter, Romain
Jesper Axelsson
Hi @Romain Decotte, nice drawing! Great job with structure and anatomy and following the process Stan suggested! - "I find shading quite complex and challenging and still have plenty to learn" I found shading to be hard too :) I didn't pay much attention to it the first few years. My goal was to learn how to draw Tarzan 🍌🦍, so all my focus went into gesture, structure and anatomy. It's only the last two years that I've been digging into shading. May I suggest something? If your goal is to be able to do work that involves shading and composition with light (basically any work except unrendered 2d animation maybe), I think I would actually recommend you to learn more about shading and composition, rather than learning more anatomy at the moment. This drawing and the work in your previous posts show that you already have a solid grip on gesture and form. If you can smack basic shading on top of that you'll be able to create awesome work, that I think will even surprise yourself. Right now, the shading weakens your drawings. I made the "mistake" of ignoring shading in the beginning. It was not a waste of time, I learned a lot of other stuff, but without knowledge of shading, I couldn't do much beyond line and wire frame drawings. Just learning the very basics of shading has opened up a whole new world of possibilities for me. The course that really opened it up for me was Joseph Todorovitch's course From Painting to Canvas on NMA https://www.nma.art/courses/from-paper-to-canvas/ It showed me that when you know gesture and structure, shading is pretty easy; you map out shade and shadow, fill it in with an even tone, soften the form edges and keep edges of cast shadows sharp. I took Joseph's course during the winter and I'm currently practicing value studies, since I felt like that was my weakest point. If you want to dive deeper into shading (get answers on questions you might have, learn about values and how to invent light with even more control) Dorian Iten has a course called The Shading Course – Fundamentals of Realism, Light & Shadow (you can also find it on his website if a monthly membership suits you better https://www.theshadingcourse.com) Hope this helps :) Feel free to ask if you have any questions about my suggestion!
Help!
Browse the FAQs or our more detailed Documentation. If you still need help or to contact us for any reason, drop us a line and we’ll get back to you as soon as possible!