How to Draw Hair
2.2M views
lesson video
How to Draw Hair
coursePortrait Drawing FundamentalsFull course (35 lessons)
-20%
$52
$65
You save $13
assignments 60 submissions
Joseph Osley
[Post TWO of TWO] You can't upload more than 20 images to a post so I had to split them up. A competent person would've maybe ordered them correctly, but I have no claim to that adjective. Some of them are way too light. Sorry.
LESSON NOTES

I feel like hair is one of the most difficult things for people to draw. A lot of us approach it in the wrong way. We just jump in a start scratching away. Drawing hair takes patience. There’s a lot of little shapes, lines, highlights, and its easy to get impatient and sloppy. But we really need to slow down and approach it one step at a time. And when you get to the details, you need to focus on designing, not just copying as you see it.
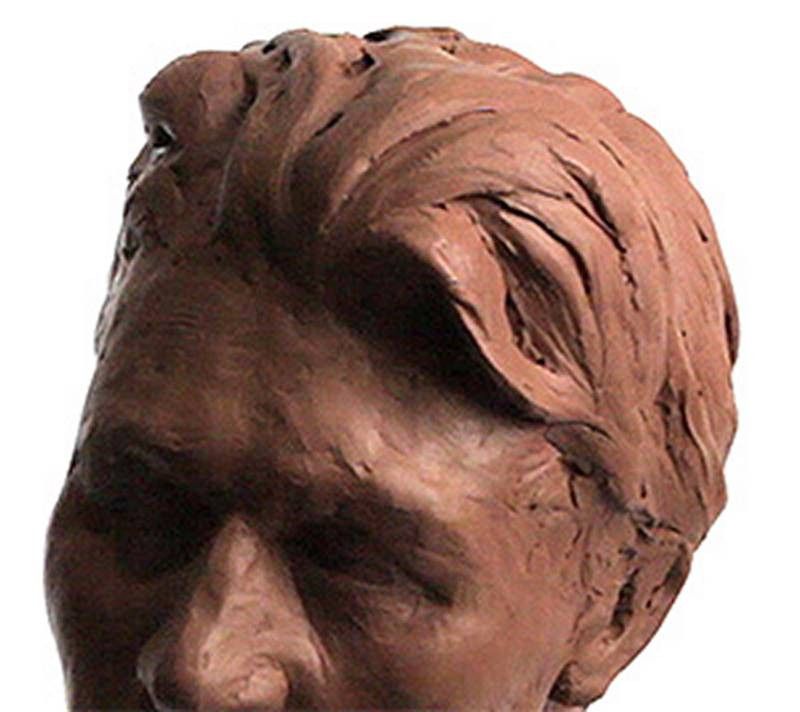
sculpted hair volume

The approach to drawing hair should be the same as sculpting hair. You don’t sculpt hair with individual strands. You find the volumes of the groups. Think of the hair as a 3 dimensional form, just like, the nose. and lips. It has mass. And it has all the same elements of light, although slightly hidden by the texture and all the strands. Ignoring the form and going straight for the texture results in spaghetti hair. it just looks like a bunch of lines coming off the head.

VOLUME

So, the first volume we need to think about actually isn’t even the volume of the hair. It’s the volume of the head. Or, whatever it is that the hair is on. If you’re drawing a Dog, you gotta think about the rib cage or the legs.

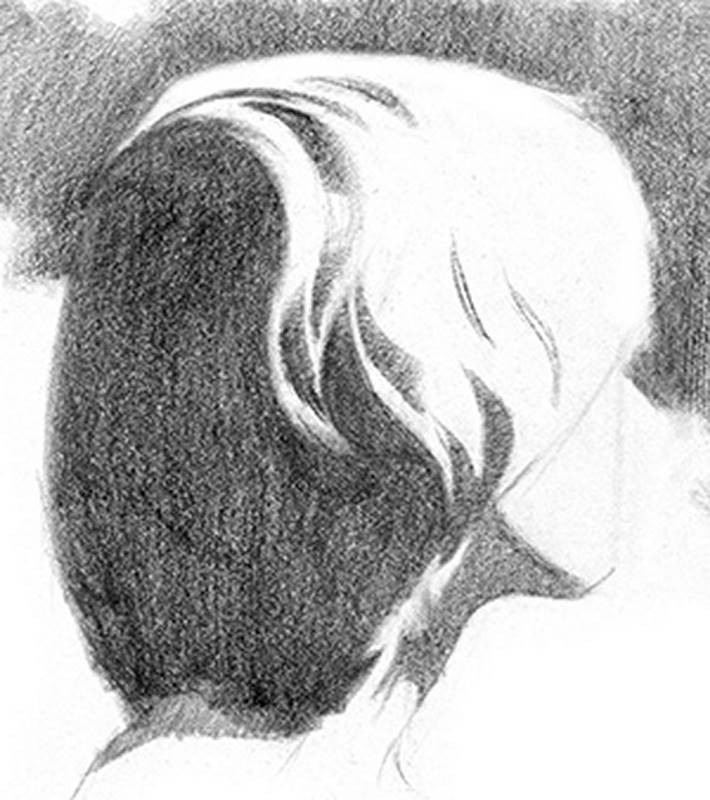
The groups of hair wrap around the form underneath and inherit the same light patterns. In this example, I made sure to shade the large group of hair to resemble the rounded form under it, before I added all the texture on top. The left side of the hair mass is all shadow, then it transitions and has a bunch of halftone shapes, and then all the highlights are on the right.

forms underneath the hair

Now we get to the part where we draw the locks of hair. And everybody’s hair type is different. If it’s straight, you’re just gonna get a cylinder. If it’s curly, you’re gonna have a lot of little locks, and that design problem becomes a bit more difficult. But whatever the hair type, figure out what those shapes are and design them as volumes, not strands. So, for example here’s a lock of hair. It’s like a ribbon with some thickness to it. This ribbon has shadow, halftone, and a highlight.

It doesn’t look like hair, but it does look 3-dimensional. To make it look like hair we need to add a 4th element – Texture.
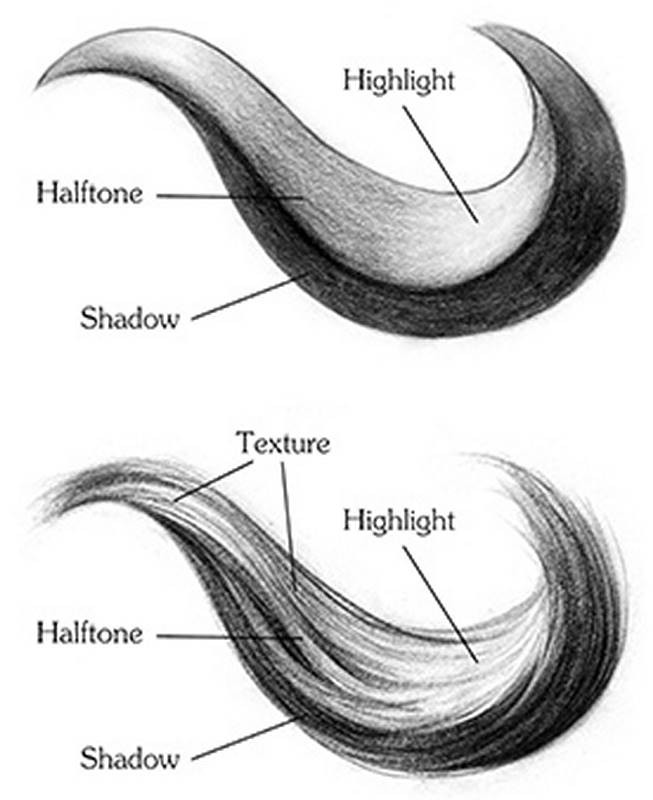
basic forms of hair strands

TEXTURE

This includes the separations between the smaller groups of hair, a few lines representing strands, and breaking up the contours. There will be stray strands that soften and break up the edge between hair and background. Make sure to add variation along the edges to make it more interesting and believable. The connection to the skin shouldn’t be outlined.

Show some gradations, otherwise it will look like a wig or clip-on beard.

skin to hair gradation

When adding the texture part, its all about the design. Don’t get too repetitive with the strokes.

Try to create organic and interesting shapes with the overlaps and groupings. There needs to be a good balance of simple areas and complex areas with a lot of detail. Get the illusion of the strands. Don’t try to draw every single strand.

Have confidence with every stroke. It’s better to draw a quick confident strand slightly out of place, then a wobbly ugly stroke in the right place. Don’t be timid. This happens when drawing strands that drop down the forehead. People don’t want to mess up the face. But, it doesn’t matter if it’s in the perfect spot… Hair moves.

Usually you want to start the stroke at the root and let it taper towards the tip. But if you have good control of the pencil, you can taper correctly from either side. make sure you’re holding the pencil like a brush and use the length of the charcoal to get thin lines, and the side to get soft thick lines. Transitioning from one to the other gets you a nice taper.

Designing Shadows

I like to approach shadows as flat graphic shapes. It’s important to get an attractive, well balanced separation of light and dark before beginning to render/shade. Try to find ways to connect as many shadow shapes as you can. Even with curly hair, where you have a lot of little shapes, it’s important to connect them. Otherwise you’ll have too many floating shapes which can be distracting. This goes back to good design. Inside the shadows, keep the texture and contrast to a minimum. You want the focus to stay in the lit areas of the hair.

Designing Halftones

The areas that will have the most visible texture is the halftones. These areas get a little bit of light from the highlight side and some darks from the shadow side creating the most contrast and detail in these areas.

Don’t forget that halftones are mostly gradations. They gradate towards shadow on one side and towards highlights on the other.
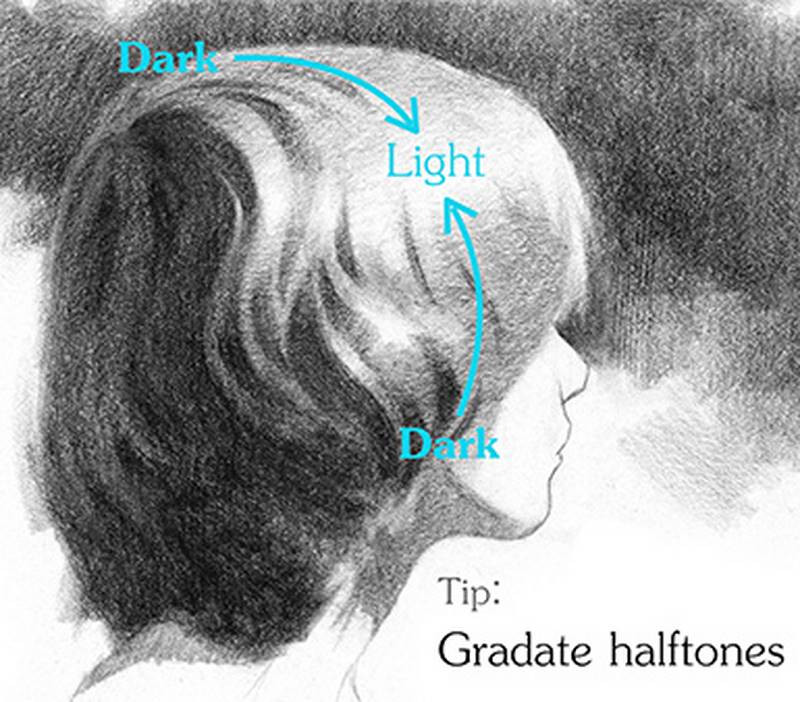
gradate halftones hair

Designing Highlights

Highlight areas should still appear light after the texture is added. That means strand texture should be thinner, lighter, and sometimes remove texture all together. Have the highlights glow. Try to connect them as much as possible only leaving a few lonely highlights. And try not to make each highlight the same. Give them variety in length, thickness, edge, and value.

So, let’s take a quick look at how I broke down this drawing into steps.

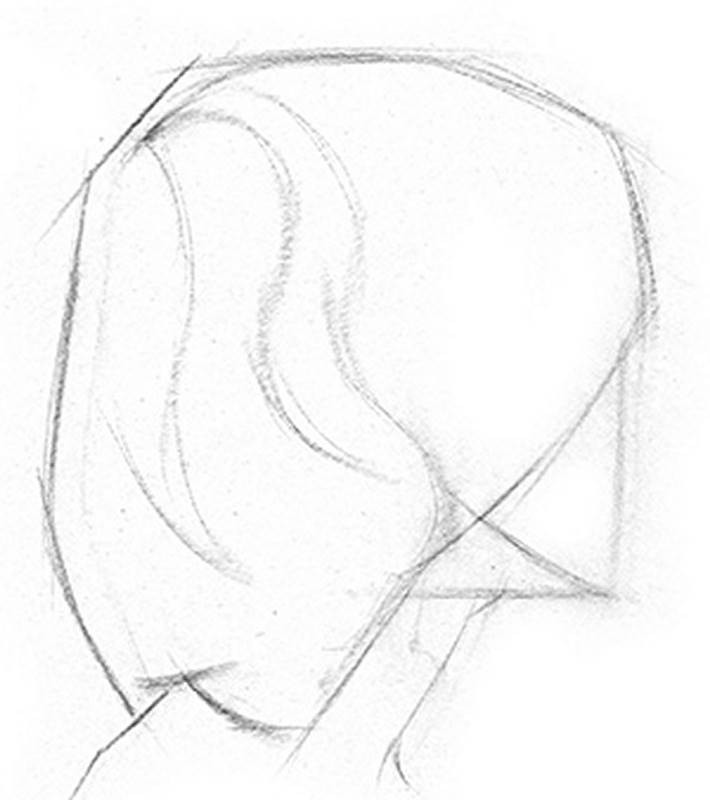
As always, I started with the linear layin getting the major shapes and rhythms.

Then I separated the lights from the shadows focusing on the design of the graphic shapes.
drawing hair step 1 layin
drawing hair step 2 designing og graphic shapes

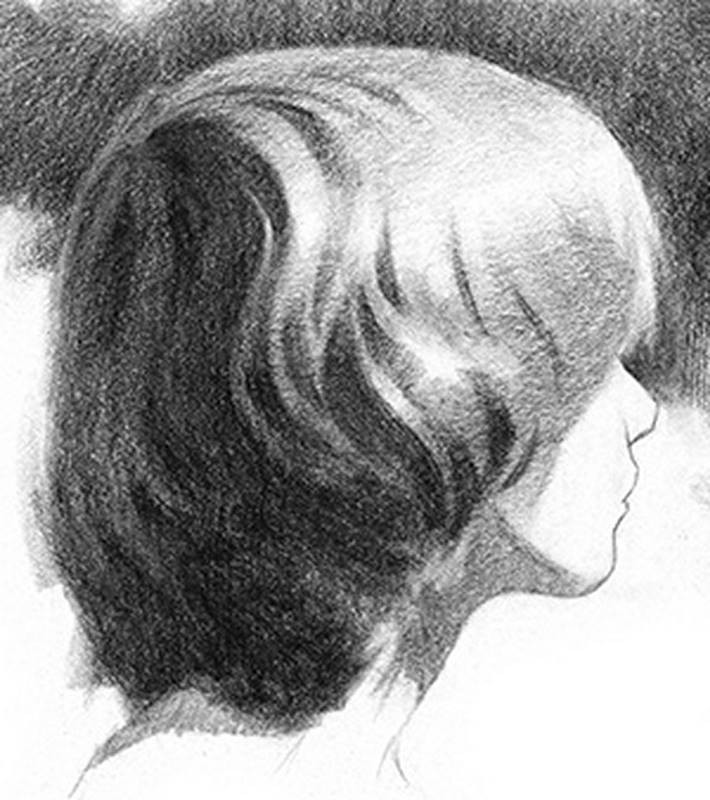
In this step I added dark accents inside the shadows to separate the reflected lights from occlusion shadows. And in the lights, I added gradations from halftone to highlight. At this point, the drawing should look 3-dimensional, since we’ve added all the basic elements of light on form.
drawing hair step 3 accent occlution shadows
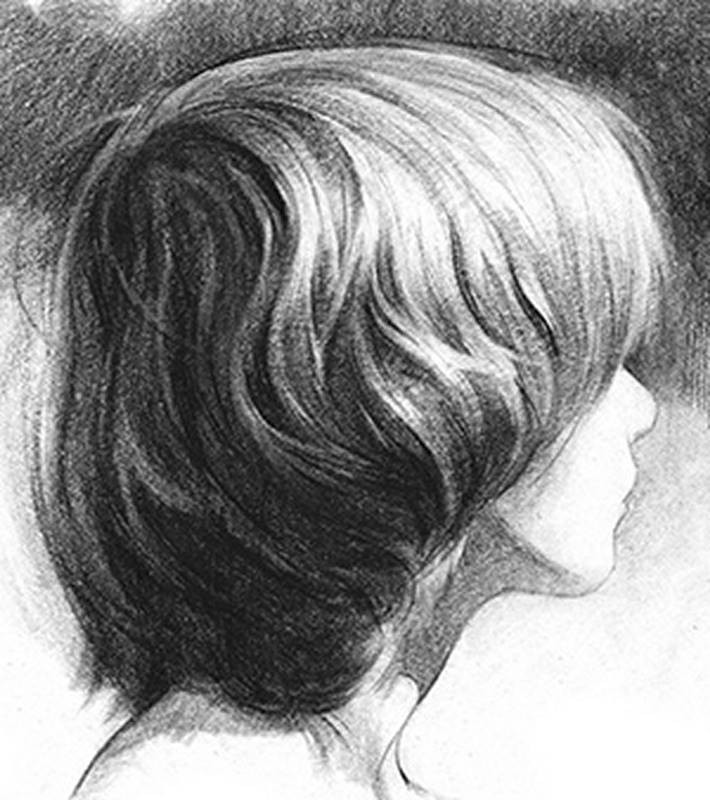
drawing hair step 4 texture of the strands

In the final step, I added the texture of the strands. The strokes should follow the rhythm of the locks we defined in the previous steps. Notice that drawing the strands is the last step, Not the first.

Check out the next lesson on Portrait Drawing in Graphite – Timelapse.

***

Want to learn more? Be sure to check out the Portrait Drawing Fundamentals course, which includes step by step instruction, real-time demos, 3D models, and Full Demonstrations.

DOWNLOADS
txt
how-to-draw-hair-transcript.txt
6 kB
mp4
How to Draw Hair.mp4
708 MB
ASSIGNMENTS

Draw the Hair

Find some good photos online (get some with clear light and shadows). Don’t use photo taken with a flash. Many magazine photos of hairstyles have flat lighting that you should avoid drawing from. Follow my step-by-step lesson to complete the drawing. Capture the major forms of the hair before you add the strands.

Newest
Christopher Corbell
More hair studies (a bit quicker). Learning something with each attempt, but clearly need to keep practicing and looking at good examples. I think finding something like 'gesture' in the hair is eluding me, it still feels too scratchy/choppy.
Christopher Corbell
Happy Halloween! My first attempt to use the ideas from this lesson - lots of flaws but already better than any hair I've drawn. It's from a PR Photo of Morticia Addams (Carolyn Jones) circa 1964. A lot of things don't satisfy me but there are a little sections here and there where I felt 'ah, that's how it's supposed to work!' This was a bigger charcoal+graphite study on newsprint, I will continue doing a lot more smaller sketchbook studies from different photos & post some in the next assignment.
Chuck Ludwig Reina
Looks awesome. Loved this depiction of Morticia and super on point for Halloween! As far as doing more studies, I'd say do a lot more loose ones on newsprint too. Stay loose and light with your arm and don't worry about "finishing" the drawings. Getting in the milage of doing 10 quick drawings vs 1 finish is usually the best use of your time when developing a new skill. Keep it up!
Benjamin Roseman
Here's another hair study I did. This took longer than I intended. Hairs been a constant challenge whenever I'm trying to draw from imagination. I can hardly come up with anything. I've studied a number of JC Leindeckers paintings and still get lost. Critique would be much welcome.
Joseph Osley
[Post TWO of TWO] You can't upload more than 20 images to a post so I had to split them up. A competent person would've maybe ordered them correctly, but I have no claim to that adjective. Some of them are way too light. Sorry.
Ash Chung
1yr
My gosh... the level of detail! You can really feel the hair looking at these, its' lightness, heaviness, smooth and textured, you even have wet hair. Very well drawn, quite something to tackle. And of course, one cannot leave out the mullet. Really wonderful work.
Aaron Smith
Hair is so difficult to draw. You've done an amazing job :)
Gannon Beck
These are absolutely incredible. You're able to capture the subtle nuances of various hair types and textures with remarkable touch. You're well on your way to being quite the portrait artist! Amazing work.
Joseph Osley
[Post ONE of TWO] I drew 100 Heads of Hair. I spent 26 days on this, which is way too long, but I had some IRL stuff. This was by far the most challenging of the 100 studies I've done. Hair is bonkers. I've always struggled with it. Making long tapered strokes is physically difficult for me. Hair demands an elegant touch at times and I just cannot get there. That aside, I think I found myself improving throughout them. Thinking of the hair as a sculptor made all the difference. On an unrelated note: I think all bald people should get a 25% discount on their portrait quotes.
Patrick Bosworth
Just 100 more examples of incredibly inspiring work! Amazing!
Benjamin Roseman
Martha Muniz
Nice! This captures great volume and texture. Something that could help add more realism is thinking about the light source in the reference and drawing. I notice some hairstyles, especially in the bottom row, with more evenly distributed highlights throughout all the hair sections. Pinpointing the specific direction the light is coming from and how softly/harshly it distributes across the hair as a whole can make the hair more believable, as if it were actually affected by a real life environment. After capturing the general distribution of light & shadow, you can start adding the smaller hair section divisions to really make it pop. You have great work so far -- keep up the good practice! :)
*Reworking Profile* From The Game.
22/2/2024 Hey guys, things looking pretty good here, with @Jesper Axelsson’s challenge, it made me discover my weak point with imagination and viewing the head/hair in different perspectives, while keeping consistency with Proportions. Even though I feel like I’ve known it already, I didn’t realise just how bad it was till I took this challenge. Guess it’s something I’ll have to tackle in the future. Anyway, on the left is the drawing with the Reference. On the Right is purely from imagination.
Jesper Axelsson
Hi @Crimson The Vixen, did you see the reply I gave to your other post? https://www.proko.com/s/VsLE There's some tips on an exercise there that I think will really help 😎👍
@amit2140
2yr
Hi id like a critique both on the hair and the loomis head
Ernesto Palma
Very nice sweeping force in your lines, they are rather clean! I see what is holding you back from producing a 3D feel in your head construction. It is the fact that your lines are not agreeing with each other, they do not relate to one another in a singular 3D space. This is because when lines are parallel or converging, they tell our brain that they are part of a plain, like a wall, in a 3D reality that we are seeing through a sort of window, which is your picture plane, the paper. The illusion is thus broken because the lines do not agree and we can immediately then read them as flat linear shapes on a flat surface. To fix this you must study Perspective. There is no way around it but fortunately it is not at all rocket science, although it definitely has mathematical concepts in it, such as parallel lines, angles, etc. I will recommend that you check out a fun little video to introduce yourself to Perspective made by the wonderful Marshall Vandruff as a Halloween special on youtube: https://www.youtube.com/watch?v=eFKMw8YekFY Follow that by checking out a book called Perspective Made Easy, and patiently do the exercises. It might take a few weeks to get through it all, but it is THE most essential tool you will have as an artist that wants to draw things that appear to have volume.
*Reworking Profile* From The Game.
19/2/2024 Hey y’all, trying to continue more of the challenge! But first I start out with a traditional practice from observing through Reference! Left page = Reference Right page = Imagination
*Reworking Profile* From The Game.
18/2/2024 Hello again! Back with another drawing, but this time with the notion of a challenge provided by @Jesper Axelsson! I’m gonna be taking this challenge 1 step at a time, so I hope you guys enjoy it!
Jesper Axelsson
Hi @Crimson The Vixen! I appreaciate that you tried the challenge :) I would encourage you to keep trying it. I'll give some feedback to consider in your next drawing. - I like the shape design in the top left drawing of page two. The shapes are simple, yet have a sense of form, and there's a nice rythm connecting them. One thing I notice is that all your drawings look quite different from the reference of Jane. The shapes don't match. Being able to control the proportions of the shapes is going to be important as you draw from life but also when you draw from imagination. So I would suggest this next assignment: Try drawing Jane again from the same reference. But only do ONE drawing this time. Your goal should be to have a line drawing that's an exact copy of the lines in the reference of Jane. Include everything; even face, neck and clothing. This is to help you see the drawing as a whole. Let's set the time limit to 1 hour (so that you don't get caught drawing it for too long). I would suggest this process: • A light drawing focusing on establishing the major volumes • on top of which you add even smaller shapes • then look at one line at a time and try to make them match the reference. I hope this helps :) Let me know if you have any questions!
*Reworking Profile* From The Game.
18/2/2024 Not bad, this is pretty alright as a short one. I’m probably gonna upload another one from the challenge @Jesper Axelsson gave me.
*Reworking Profile* From The Game.
17/2/2024 Here some more drawings for y’all! Hope you enjoy these ones too!
*Reworking Profile* From The Game.
16/2/2024 Classic Double Spread for today, I hope you guys enjoy this one!
Jesper Axelsson
Hi @Crimson The Vixen, you might benefit from doing some studies of how an animator approaches drawing hair. Maybe it could be interesting to do some studies of Jane from Disney's Tarzan (1999). She has about the same haircut as the girl in your reference photo. Notice how the animators group Jane's hair into larger shapes. Here's a challenge: Copy some drawings of Jane's head and hair by the Disney animators. Then try to pose her head into a new angle from imagination. Compare your drawing to the Disney animators' drawings. Look back and forth. Has the shapes deformed in your drawing? Make adjustments. Try to make it look as if it's still her hair, only in a different angle. I hope this helps :) Let me know if you have any questions!
*Reworking Profile* From The Game.
15/2/2024 Sorry for the late uploads! But here ya go.
*Reworking Profile* From The Game.
14/2/2024 Second Batch! Drawing (1:2)
*Reworking Profile* From The Game.
14/2/2024 Hey guys, so ai went a little overboard again and made 2 pages worth of drawings, so I hope you enjoy these 2 different examples! Drawing (1:1)
*Reworking Profile* From The Game.
13/2/2024 Made only 3 drawings since I wanted to go back to Character Designing, but I now actually wanna draw more, might come back, who knows. Hope you enjoy!
*Reworking Profile* From The Game.
12/2/2024 Double spread of my work, I’ve decided to change up my study schedule from school, and only focus on studying my subjects on days of school to prioritise my time spent drawing. I think I’m really gonna improve faster with this one bois! Anyway, enjoy.
*Reworking Profile* From The Game.
11/2/2024 Hello again, this time I’ve made a few more drawings for today, so I hope you all enjoy them. Went a little crazy here & there.
*Reworking Profile* From The Game.
10/2/2024 This new method makes me feel like drawing for longer periods without burning myself out! For now I’ll just upload this one today, Hope you just enjoy!
Help!
Browse the FAQs or our more detailed Documentation. If you still need help or to contact us for any reason, drop us a line and we’ll get back to you as soon as possible!