


In this lesson we’re going to learn the anatomy of the Pelvis. We’ll explore the structure of the parts, the difference between a male and female pelvis, and how to simplify the structure to make it manageable to draw.
The Parts of the Pelvis
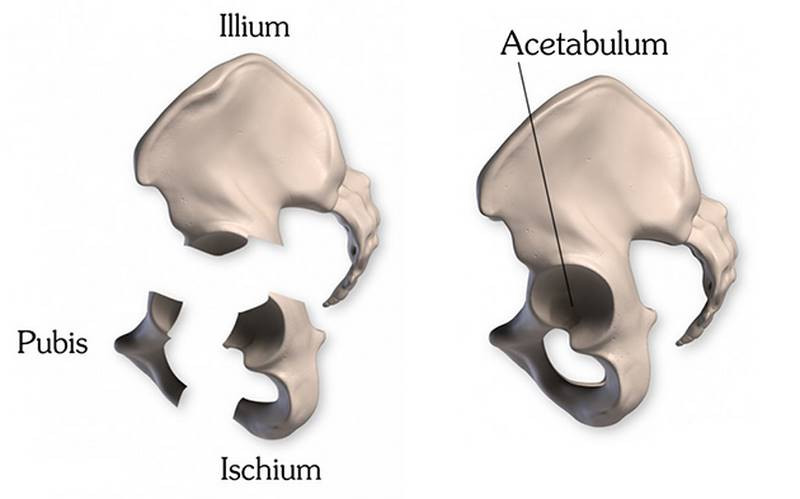
The 2 hip bones, along with the sacrum and coccyx of the spine form what’s known as the pelvis. Each hip bone consists of 3 parts. These 3 parts actually start out as 3 separate bones at birth and fuse together throughout puberty. On the top half stands a wing-like wall called the ilium. Under the ilium, in the front is the pubis. And behind the pubis is the ischium. You can remember that there’s all sorts of “icky” stuff that happens in the ischium.
These 3 bones fuse together right in the middle of the acetabulum - a deep socket of the ball and socket joint of the hip. The femur sits right in there and rotates in all directions to move the leg.
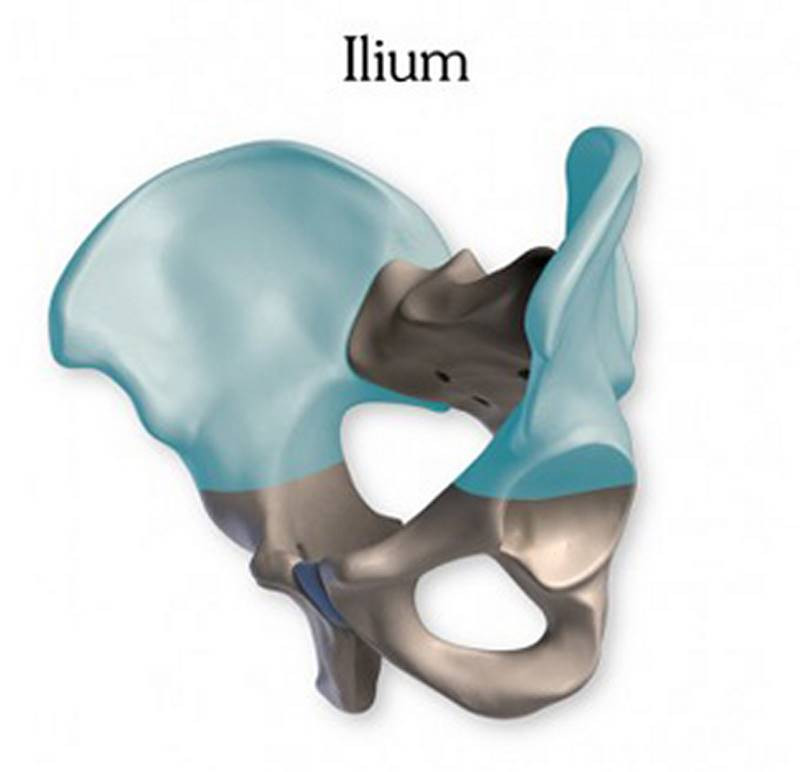
Ilium
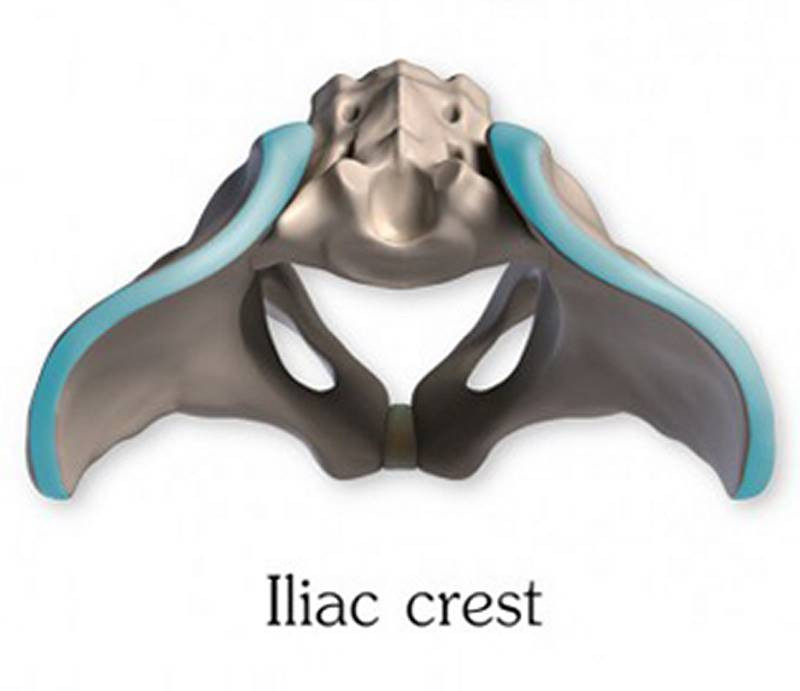
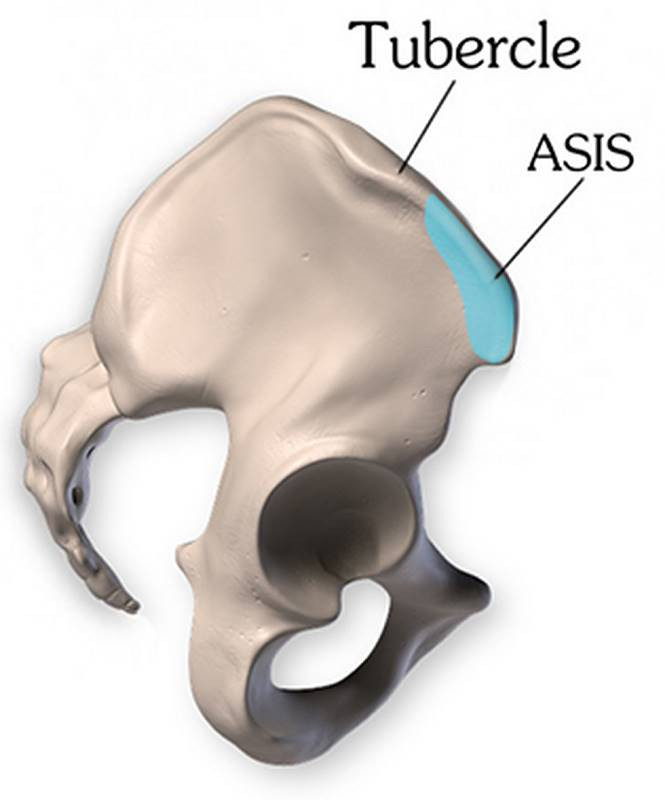
The Ilium is the largest of the 3 parts. The 2 curved walls converge in the back, connected by the sacrum. The part of the ilium that is visible in the surface is the top edge known as the iliac crest. The iliac crest starts in the front at the ASIS, that’s Anterior Superior Iliac Spine. And it ends in the back at the PSIS or Posterior Superior Iliac Spine. I mention these two landmarks a lot. And I use them a lot when drawing the figure.
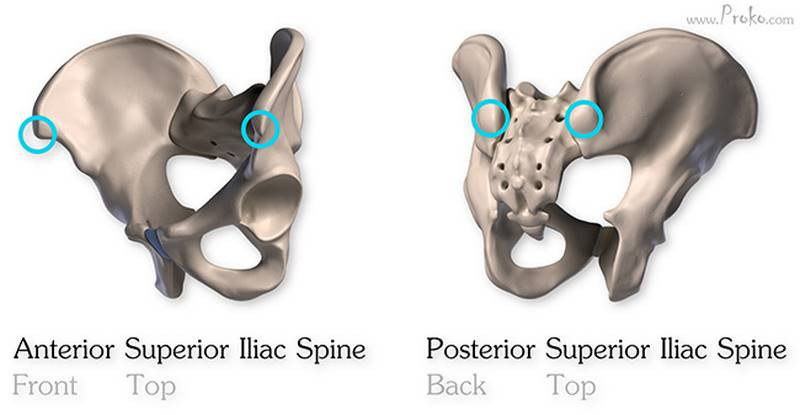
From top view, the crest curves outward from the ASIS for a short distance to the tubercle. Then curves back for a longer distance, and then almost straight backward for a short distance to the PSIS. From side view, the crest creates a half circle arc. This arc shape will vary, from a smooth curve in some people, to a sharp corner at the top point in other people. This high point is somewhat back from center. Men tend to have a more angular high corner, while women have a smoother curve. Only the front 1/4 of the crest is actually visible on surface. The rest is covered by the external oblique muscle on the sides and flank fat in the back.
On a more muscular or overweight body type, it appears as a sharp edge, indicating the bottom border of the external oblique. If the torso bends laterally, the external oblique is stretched up, sometimes exposing the middle section of the crest. On a very lean person, the ASIS pokes out as a visible protrusion. It pokes out even farther when the spine is extended, and the muscles around the ASIS are stretched. The visible portion curves downward and inward. Try to feel it on yourself..
In the back the Posterior Superior Iliac Spines are surrounded by muscles and flank fat. They are usually seen as two dimples where connective tissue attached to the spines pull the skin inward.
You might see a subtle indication of the crest in men, though mostly softened by the flank fat. In women it can be so softened that the hips appear to continue all the way to the top of the waist. In some poses when a lean model stretches her back muscles, the bones push out and appear as protrusions instead of a dimple.

Pubis
Ok, let’s move on to the pubis. The two sides are joined by a cartilaginous disc at the pubic symphysis. This is a commonly used landmark, but you won’t actually see a bony point because it’s covered by pubic fat. You can find it by following the trail of the inguinal ligament. A thin string-like ligament stretching from the ASIS to the pubic tubercle just lateral of the pubic symphysis. It defines the lower border of the abdominal mass called the “furrows of the groin” and appears deeper in men.
The pubic symphysis aligns with the level of the tailbone, although this varies. In men, it’s also on the same vertical plane with the ASIS. Another useful alignment, is the pubic symphysis tends to be the vertical center of the whole body. In the back, the vertical center is between the bottom of the sacral triangle and the bottom of the buttocks, right in the middle of where the glutes meet.


Gender Differences
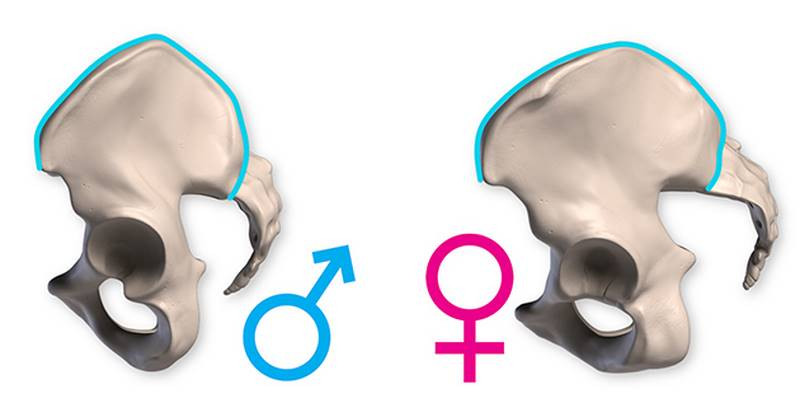
The pelvis has the most divergence between male and female of the entire skeleton. Mainly because a female pelvis is built to allow a woman to give birth.
The female pelvis has lighter and thinner parts. It’s about 2 finger widths wider and 2 finger widths shorter than a male pelvis. The walls of the ilium are more vertical, but not as tall. The pelvis is tilted forward more on a female. The ASIS protrude forward more and don’t align with the pubic symphysis. On a man, the ASIS and pubic symphysis align on the same vertical plane.

You might also notice that the pubic arch is much wider on a female pelvis. About 120 degrees in women, but only 90 degrees in men. This means that women’s ischia are farther apart. Creating a wider gap between the leg muscles because the insertion points of the adductor muscles are farther. On a woman, you might see a gap even if the legs are together. On a male, the gap is much smaller. Sometimes there is no gap, even if the legs are separated.
The widening of all these parts on a female pelvis pushes the acetabula laterally, which in turn pushes the greater trochanters. These differences, along with more fat distribution, account for why women have more prominent hips. An average woman will have a higher body fat percentage than an average man, so the baby doesn’t starve during hard times.

Like the pelvis, the sacrum is also shorter, wider, and curves posteriorly more. On the surface, this plane of the lower back is more angled on a woman and more vertical on a man.
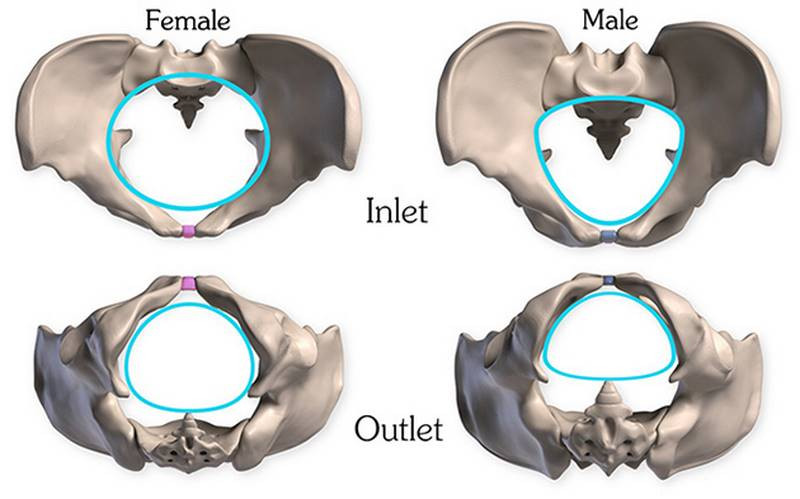
The main reason for the wider female pelvis is to create a larger inlet and larger outlet for a baby to pass through. The inlet is a round shape most easily seen from the top of the pelvis. Very round and wide on a female. On a male pelvis the inlet shape is smaller and more triangular.
The outlet is the space between the bottoms of the ischia and tailbone. Everything is more spaced out on the female pelvis, perfect for childbirth.
To review, a male pelvis is characterized by height, weight, more vertical angle, thickness, sharper angles, and a smaller cavity. A female pelvis is characterized by width, lightness, forward tilt, thinness, and a larger cavity.
Simplified Structure
As you can probably tell, the forms of the pelvis are quite complex. Trying to imagine these forms from various angles, let alone drawing them, is very challenging. Let’s take a look at how we can simplify the pelvis to make it easier to construct and pose the body.
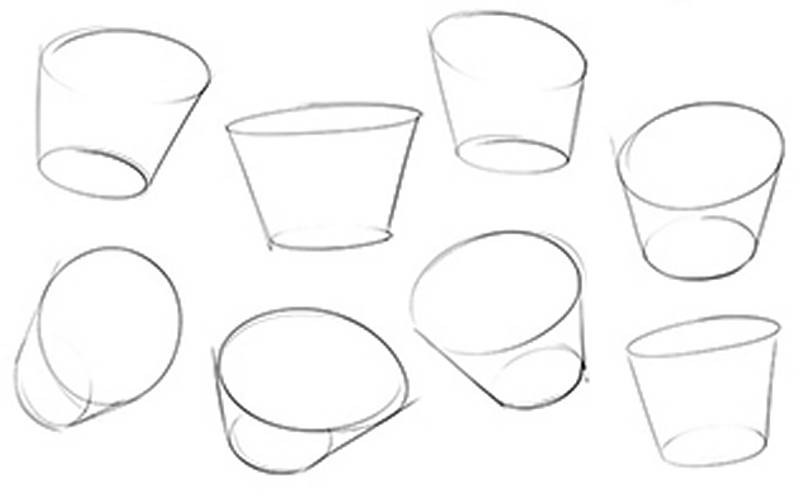
Bucket
The method I’ll use a lot in this Anatomy course is the bucket. I like it because starting the construction with a bucket allows us to get very accurate placements for the landmarks.
A bucket is basically a tapered cylinder. This cylinder, in a neutral standing pose, is tilted forward, like the pelvis. It’s wider at the top and narrower at the bottom. Also, the width is longer than the depth. So the top and bottom caps are not perfect circles.
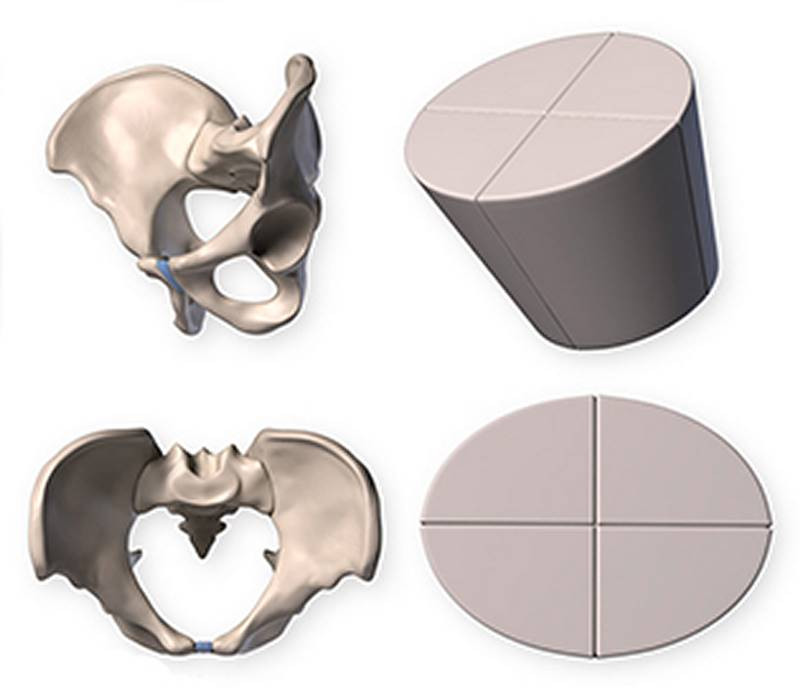
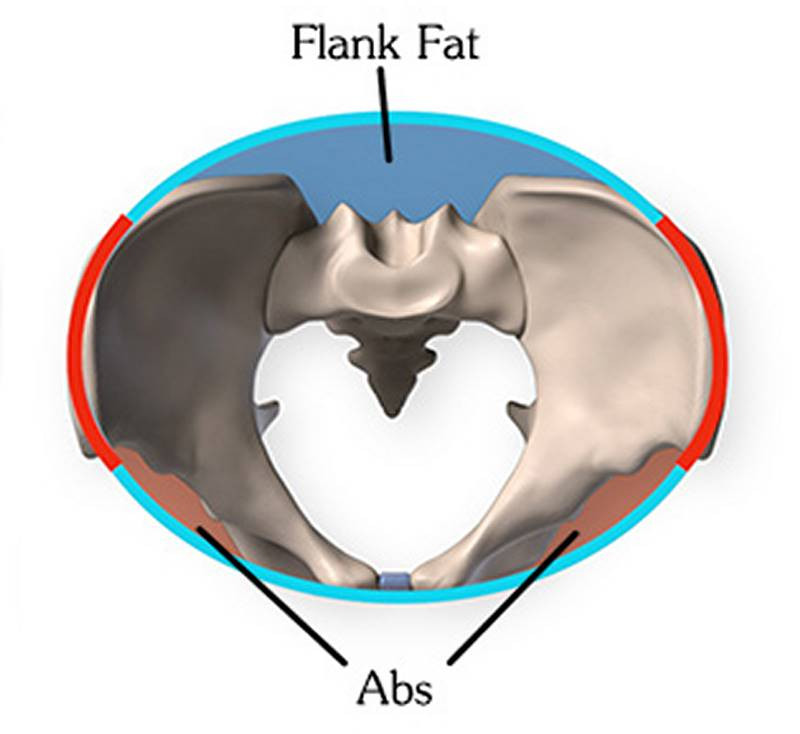
This ellipse of the top cap is the first thing I draw. It determines a lot of things. The width, the forward tilt, and the side to side leaning. It’s also not too hard to find on the surface of a model. From the front, use the ASIS points to determine the side to side leaning angle. Now, from the top you’ll notice that this ellipse doesn’t really follow the shape of the iliac crest all the way. It does for this middle portion but then the crest takes a sharp turn inward, leaving some extra space. Well, if you consider the muscles and flank fat in this back area, this ellipse actually follows the surface curve nicely! And in the front, the curve follows the form of the abs. Of course, on an obese body, this won’t work as well. So, we’re looking just at this portion of the iliac crest when drawing the top ellipse.
After I’ve established the ellipse, I’ll add the side planes. The length depends on how much foreshortening there is caused by the tilt and our point of view. Longer lines when there’s no foreshortening. And shorter lines when there’s a lot of foreshortening.
You also have to think about the gender differences. Remember, a female pelvis is wider and shorter than a male pelvis. Finally, I’ll add the bottom cap and that gives me a simplified form for the pelvis.
Assignment
Use a simple representation of the pelvis as a bucket. In the next lesson, I’ll show you how to break it down further to construct the minor forms of the pelvis. In the meantime, fill a page with buckets from various angles. Premium Anatomy students, you can login to your account and use the 3D model of the bucket and pelvis as reference. Spin it around and draw the bucket! If you’d like to sign up for the Premium Anatomy Course, go to proko.com/anatomy


