


Last time we learned the anatomical details of the lower back muscles. Now let's learn how to draw the forms.
Erector Spinae
The erector spinae is a long, thick muscle mass composed of the smaller and shorter muscle masses of the spinalis, iliocostalis, and longissimus dorsi, which are classified via insertion point.
I’m also considering the multifidus as part of this erector spinae mass. These fibers are like a branching tree with widening but thinning superior self-similar symmetry.
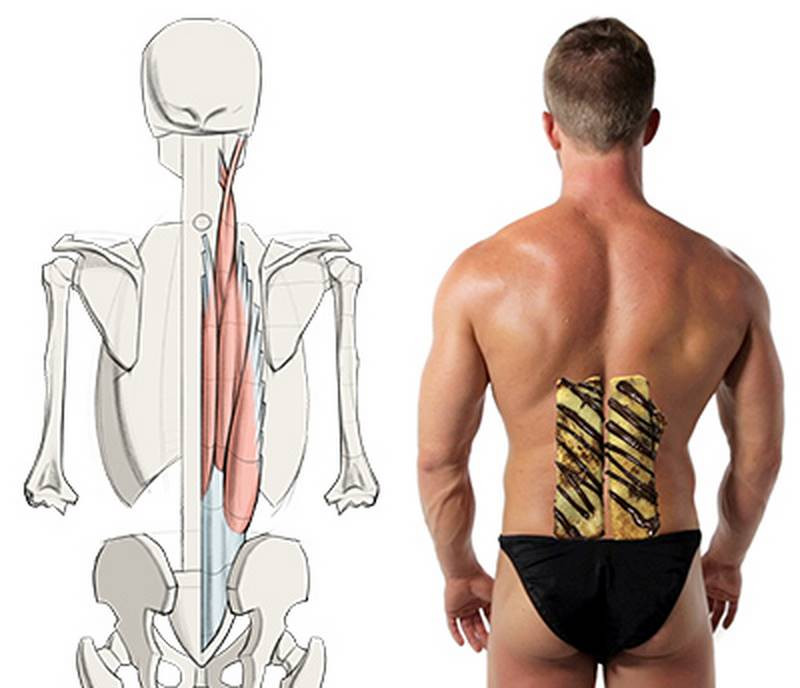
In simpler words, the erector spinae is like a pair of crepes. Delicious, delicious crepes. It has two thick, savory columns on each side of the spine and a depression in the middle. That's almost enough for artists to know. While those sub-groups, the spinalis, iliocostalis, etc, might be distinct for a second during movement on an extremely ripped model, most of the time you can just think of good ol' crepes.
On an average female, the flank area will have more fat, which can soften this contour. So, you see a rounder cross contour with just a depression at the spine.
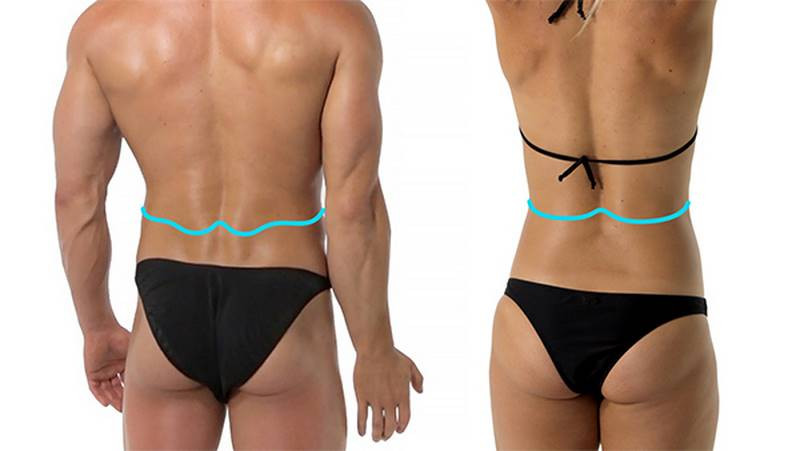
The depth of the spinal depression depends on how developed the muscles are, since that's what determines how much the "crepes" push out. Remember, the spinous processes of the vertebrae are superficial. There's no muscle covering them. You'll see a depression even on lean body types. And even an undeveloped erector spinae will have enough mass to bulge out past the spine.
If you take a closer look at the form of the erector spinae, you'll notice two distinct masses on each side. See how it's all skinny near the sacrum and soft and wide above it?
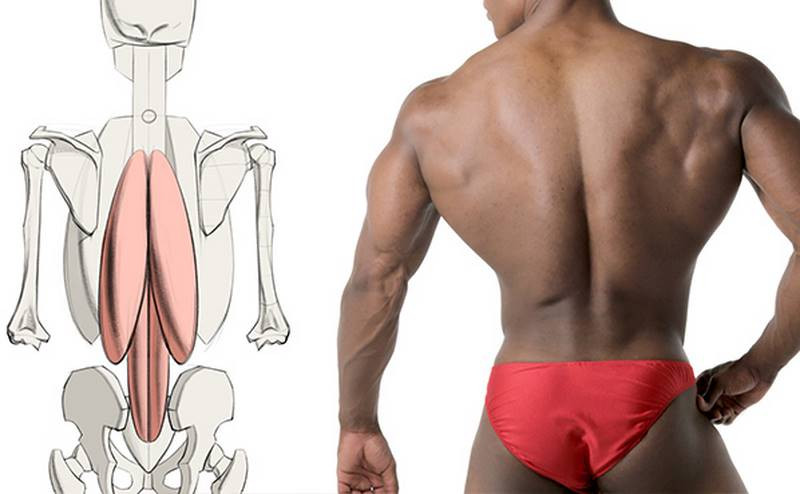
The skinny one is the medial form, with round and narrow columns. The wide one is the lateral form, with softer, flattened columns. It's also angled diagonally. You could simplify both forms into an arrow. It's widest and fullest in the lumbar region and becomes thinner and less visible as it goes up.
Even though the erector spinae passes over the sacrum, the sacrum appears on the surface as a convex triangular shape. Usually, the spinal depression starts right above the sacral triangle.

Since the form of the erector spinae hugs the spine, it’s a great muscle for emphasizing the gesture of the spine. Push the C curve, S curve, or straight of the spine and echo its rhythm with the erector spinae.
Latissimus Dorsi
The latissimus dorsi is wide, but thin. The forms of the muscles underneath will often show through. Or, in other words, it's especially important to understand its function and form during movement, because the way you draw the lats is a case-by-case basis.
The lats are like a towel wrapped around the back. Or a superpowered cape wedgie. I'll give you a minute to take that in.
Its form is thickest on the sides, especially at the top near the armpit. It thins out and softens as it travels toward the pelvis and spine. However, the mass of the lat is very thin on the back. Usually, too thin to see on the surface.
Ok, we get it! The lat is thin. There are, however, a few other effects to watch out for. In order of visibility, the lateral contour is the most obvious, then the top edge where it overlaps the scapula, and finally the jagged edge where the muscle fibers attach on the aponeurosis of the lower back.
First up, that lateral contour. We learned that the pectoralis major serves as the front wall of the armpit. The latissimus dorsi basically does the same thing, but on a much larger scale, on the back. Even though the lat is a back muscle, it's so wide we can see it from the front as well. It adds to that heroic triangular body shape.
You can sometimes see the lats' superior border. On its way from the spine to the armpit, the latissimus crosses over the bottom of the scapula and the teres major. You can see it here splitting the teres major in two. Be careful! The teres major isn't two separate muscles. Also, note how the superior border isn't visible near the spine, since the tail of trapezius muscle overlaps the latissimus there.
Now, let's take a look at the thin sheet portion of the latissimus that covers the lower back. As the lat comes out from the armpit, it wraps around the serratus anterior and bottom tip of the scapula. So, we will see a plane change, like a step down. It starts just behind the scapula and runs along the rhythm of the serratus. On developed latissmus muscles, there's a plane change from the muscle to the aponeurosis. The rhythm is somewhat parallel to that of the serratus.
The aponeurosis itself is a very thin, diamond-shaped sheet. Sometimes the aponeurosis is pulled on so hard by the lat, that it wrinkles. This is an effect reserved for bodybuilders and steroid users but when it happens it's hard to miss it.
Now, these are all great general things to look for. But what you actually see on the body will vary depending on the pose and person’s physique. When the body moves, the latissimus gets a little tricky.
When flexing the spine or when the arm reaches forward, the latissimus dorsi is stretched thin and you may see the ribs.

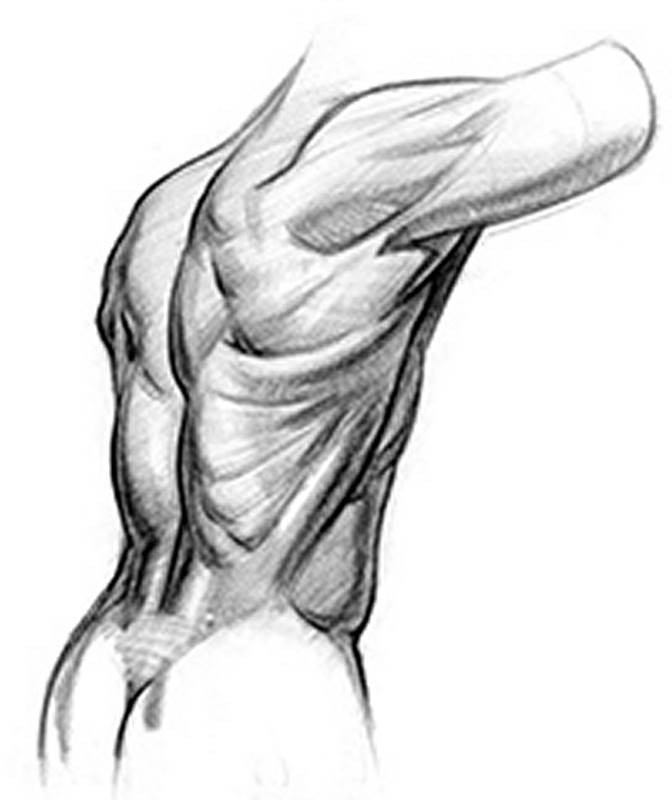
Let's look at a side view. When the lat is relaxed, the thick teres major and serratus anterior muscles define the sides of the torso. Their forms show through the relaxed lat. But when the latissimus flexes, it completely dominates over the serratus anterior. You'll see the arc of the lat cutting off the serratus bundles. But do you notice how we still see the teres major? The teres major is also overlapped by the latissimus dorsi, but since they have similar functions, they are often active at the same time. So, the teres major activates with the lat in this pose and becomes more visible as it pushes through the thinner area of the lat up here. When the latissimus is flexed, you'll likely see two tubes. This thicker one for the teres major, and this longer one for the lat.
Assignment
Your assignment is to do quicksketch drawings showing the motion and form of the lats and erector spinae.
Make sure you’re identifying the forms of the muscles that are visible. If you can see the ribs or serratus through the lats, show those. If the lat is flexed and you can see a long cylinder on the side, clearly show that form.
Remember, a “quicksketch” doesn’t mean it has to be a simple gesture or contour drawing. You can show 3d forms in a quicksketch like we did in the mannequinization lesson. And a quicksketch doesn't limit you to 3 minutes. You can spend 10-20 minutes on a quicksketch if you need to. 20 minutes is quick compared to how long we’d spend on a long drawing. The objective isn’t to draw quickly. It’s to show a clear representation of the forms of the body and motion of the pose, while not wasting time on details.
I’ve provided reference photos in the Downloads tab. Download those and start drawing!


