How to Draw the Head – Front View
This lesson has a premium version with extra content. Get it now!
3.6M views
lesson video
How to Draw the Head – Front View
coursePortrait Drawing FundamentalsFull course (35 lessons)
$65
assignments 78 submissions
Andreia Schemid
I am trying to do all the assignments, using the 3D model as reference. Any feedback is appreciated.
LESSON NOTES

Check out the Premium Portrait course to support the lessons and get access to every portrait video.

Drawing the Head - Front View

The Loomis method shows its true power in a more dynamic angle like the ¾, which I demonstrated in the previous lesson, but it still works on flat angles like the front and profile.

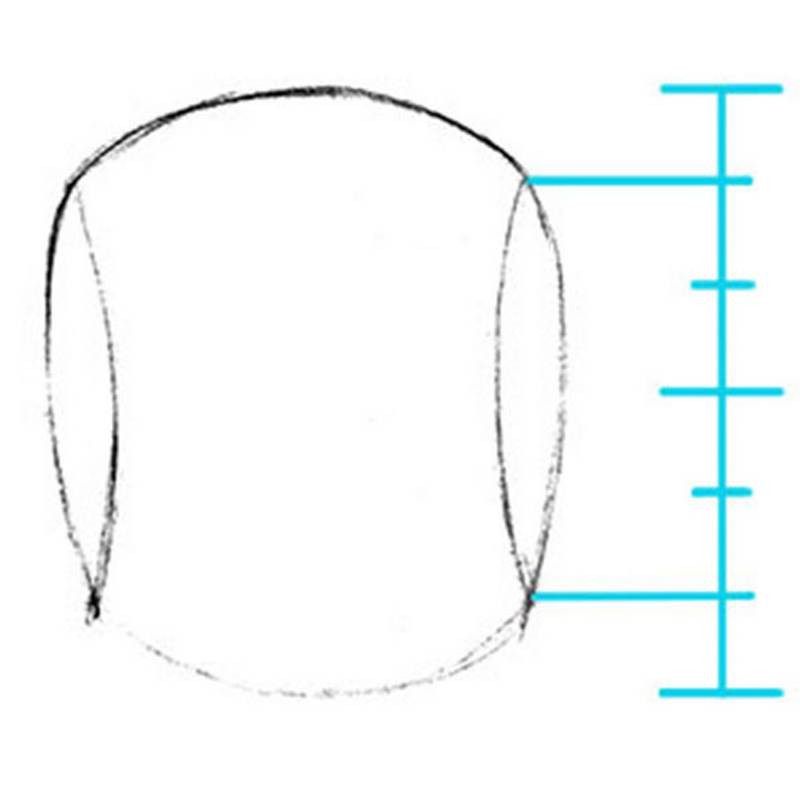
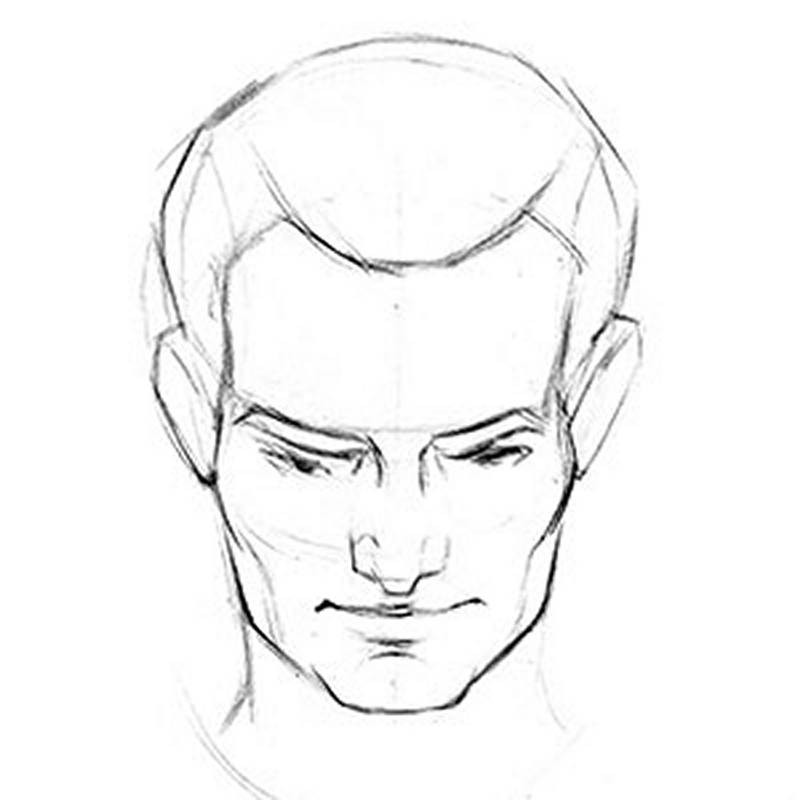
I’ll start with that circle for the cranium, and chop off the sides. Remember, the height of the side plane should be ⅔ of the circle. You can see a very thin piece of each side plane, since the front of the head is thinner than the side.

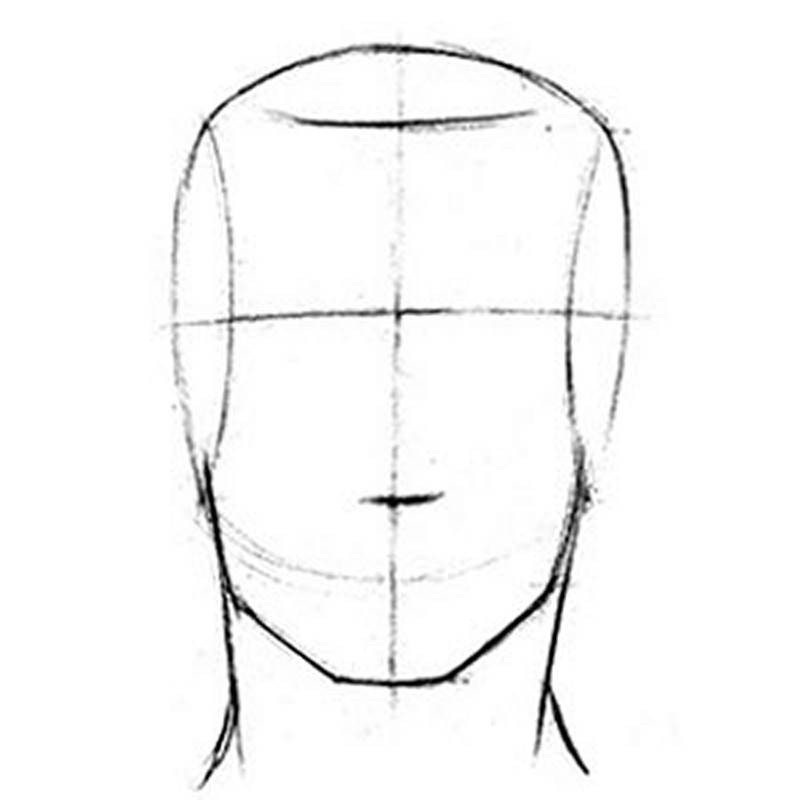
Now let’s determine whether the person is looking up, down, or straight ahead. A good way to do this is by looking at the distance from ear to brow.

Center of Circle
angles of the head front

If the ear is below the brow, then the person is looking up and the brow line will be above the center of the circle. And the opposite if the ears are above the brow. If they are at the same level, then the person is looking straight ahead and the brow will be in the middle of the circle.

Earlier we established the side plane as ⅔ of the circle. This is important because half of that side plane is ⅓ of the face. So, we can take that distance and drop it from the brow to find the bottom of the nose. And again to find the bottom of the chin. Bring it up from the brow to the hairline.

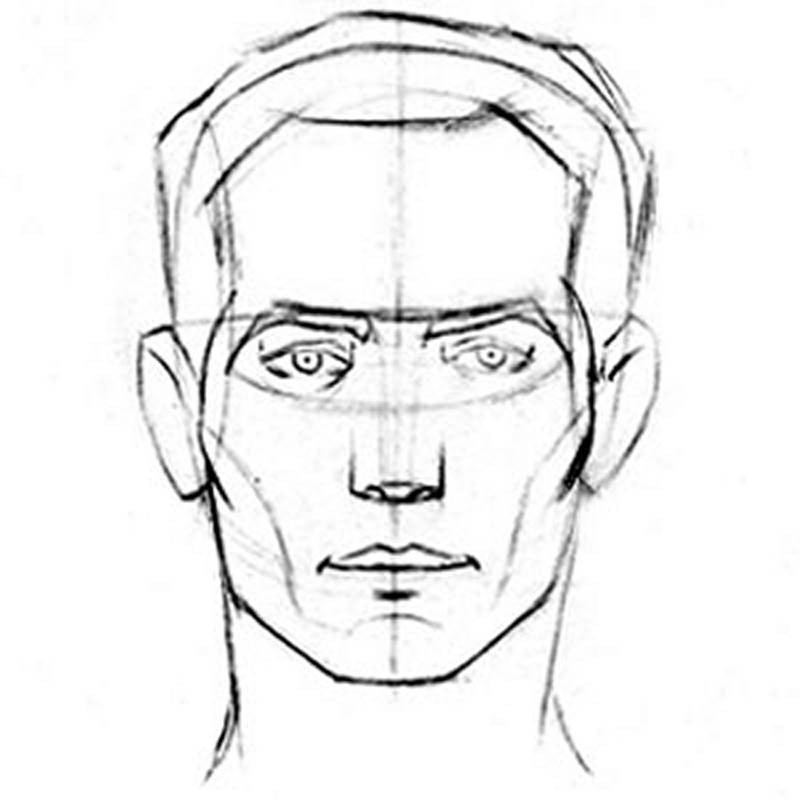
Then attach the jaw to the cranium. The sides of the jaw usually get thinner at the bottom. Establish the width of the chin and complete the jaw. Add the centerline and the neck – the front view is the only angle when the center line is actually in the center of the head shape. Usually it will be farther in the direction the person is looking. The ears sit in the middle third and usually end at the outside of the original circle.

angles of the loomis head

Before we add the thirds, let’s take a little side trip and explore foreshortening.

forshortening example

"Foreshortening occurs when an object appears compressed when seen from a particular viewpoint, and the effect of perspective causes distortion."

This can easily be seen when looking at a flat surface, like a book. When looking directly at the book, we see its full length. But, if we move to a different angle, perspective distorts its length. As things go further away from us, they appear smaller.

See that? That’s foreshortening.

Applying this concept to the face, means that our "perfect thirds" will now be distorted. The third closest to us (in this case the forehead) will be just about the same as half of the side plane. And the other two thirds will get progressively smaller.

Attach the jaw, neck and centerline. The ears are very important in this case because they help to show the downtilt. Always put them in the bottom half of the oval.

And of course, the features.

loomis head from above

Now let’s learn how to draw the side view!

DOWNLOADS
txt
how-to-draw-the-head front-view-transcript.txt
3 kB
mp4
How to Draw the Head - Front View.mp4
343 MB
ASSIGNMENTS

Draw the Loomis Head - Front View

Draw some more loomis heads from front view. Draw some looking up and some looking down and don’t forget about foreshortening.

Knighty Shiny
Heres what i did critique wanted and appreicatdd
Chuck Ludwig Reina
Great work! You picked some challenging poses. A couple of notes: - Be mindful of the under-plane of the jaw, when the head is tilted up. Don't be afraid to add it in. It will give your faces a much more solid feeling. - When the head is seems to be in profile, make sure that is what you're seeing. The features will start to hid behind to side of the face as the head turns away (see my sketch) - Don't trust what you think the angle is, but always double check. In the sketch of the woman looking up and away, you have the angle of the face going the opposite direction. But you know what? What I went to draw it for my example, id did the same thing at first! Our brain will sometimes trick us. These are terrific though. Keep it up!
Account deleted
Loomis method, front view Where should the jaw start? From the spot I marked in red, or from the spot I marked in blue? Thank you.
Knighty Shiny
Pobably red
Christian R
Submitting some straight heads: straight ahead, looking up and down. Used reference for some, imagination for some. Need to improve facial features, as I’m not matching references completely but I will improve once I make it to the features section. Any feedback is appreciated. Thank you!
Account deleted
Hello, I understood from Proko’s lesson that you should draw a circle, then cut the sides, and when you cut it you should represent it with an oval shape on the right and left of the ball like a sliced piece. But my question is: at which exact point on that oval (the sliced area) should the jaw begin?
@bfoxart
2mo
Some front facing loomis heads.
Account deleted
Hello, I understood from Proko’s lesson that you should draw a circle, then cut the sides, and when you cut it you should represent it with an oval shape on the right and left of the ball like a sliced piece. But my question is: at which exact point on that oval (the sliced area) should the jaw begin?
Chuck Ludwig Reina
These look great.
Tammy Eldred
Loomis method definitely helps but still struggling. Need to buy a ruler.
Wibble Wobbles
Here is my first Loomis head from the front.
Christopher Corbell
Here are my loomis heads from the front for this assignment. Just using blocky placeholder features for now.
Chuck Ludwig Reina
Looks good! I especially like the tilting up heads. That's a tricky angle and you nailed it.
@ink555
5mo
1 version without features and one with because I saw a lot of assignments with features and... conformity I guess. I tried to copy what was shown in the video, but for some reason my heads were much wider so it's not very similar. Also, the tilted one looks very flat and I can't figure out why. Any advice on these 2 problems?
Laurie Bergren
Feedback welcome. My own critique is that (1) I feel like I'm starting to get a handle on how to CONSTRUCT these front view heads; but (2) none of them looks recognizably like the model and I'm hoping by the end of the course I'll be better at that.
Melanie Scearce
Keep up the hard work! I took a closer look at the straight on view and I agree that you have a handle on the construction of the head, which is why your proportions match so well to the rule of thirds that Stan discusses in the first video in this series, so great job! This method of construction is an average of facial features, so it makes sense that there is not as much likeness to the reference image. Likeness is difficult to attain but with practice and the tools that you will pick up throughout the course like you mentioned, you'll get it. You can see that this models forehead is a bit smaller than average. In the bottom image, I rearranged your portrait a bit to fit her proportions better so you can see how that alone can get us a little closer to getting that likeness. No reasonable expectation to capture a likeness in the beginning :) Good luck with the course.
Buğra Beyaz
Feedback appreciated
Marco Sanchez
@jhvu1
1yr
Amani Noor
1yr
Front view portrait. Any feedback is appreciated!
Melanie Scearce
Very nice! His left (our right) ear looks a bit small, it looks like the reference lines you used curve at more of an angle on that side. Other than that, everything else looks solid! Good work 👍
froppy green
I tried to apply the principles to a female face.
Vera Robson
I have worked through the course once, but when it came to drawing Nikolai I felt I didn't practice the basics enough. Doing this again, with the final project in mind.
Gannon Beck
Same. I finished earlier this year, but keep coming back to specific lessons.
@sharpjab
2yr
Looking up and down assignments. I feel like I'm getting better at looking down. But looking up is still a struggle. I have been trying to focus on the neck muscles and general trapezoidal structure of the jaw but there's just something about it I can't visually deconstruct.
Xun
2yr
i think you need to focus on the planes of the reference are not matching try to be as close to them as possible. for example in the second pic the first drawing the top lips of the woman in the reference are not visible yet you drew them. similar artists that have suffered from this problem presented their artwork to Angel Ganev on tiktok he fixed them and you will see him explain the concept of the planes it will make so much sense.
Rachel Dawn Owens
Here’s a couple pages from Michael Hampton’s Figure Drawing book that you might find helpful for the neck. Your drawings are great! Looking up drawings will always be more difficult than other angles. thanks for sharing!
@sharpjab
2yr
I feel like I’m still not getting the jaw part of upward tilt correct.
Melanie Scearce
These are great studies @sharpjab. Keep in mind that depending on the angle of the tilt of the head, we may see more or less of the plane underneath the chin. When slightly tilted up, we will see a distinct plane. When tilted very far back, the skin will be stretch from the bottom of the jaw, following the muscles of the neck and will appear as one plane. In your drawing, we see a clear separation of the planes, so your shadow shapes should indicate that. You can use the muscles of the neck to determine the shape of any cast shadows. Hope this helps!
@sknight
2yr
Practicing 3/4 and front view. Found that chopping the sides off the circle for the front view and then retroactively going a little past those lines when drawing the ovals to show the taper of the skull made it easier to not accidentally make the head too narrow.
Rhubarb
2yr
Used photo references for the female and male sets of heads, but not the first two individual ones. I studied a bunch of photos and looked for differences between the average female and male head, but with so many combinations of different camera angles, focal lengths, and facial features, it was difficult to get any clarity on that. The main differences I found were the angles of the jaw, shape/width of the chin, and size of the ears. Did Loomis also come up with a way to construct the average female head but we just didn't get a demo for it? Or do you simply adjust as you go along? 🤔
Patrick Bosworth
Really great studies! You captured a diverse range of faces and features! Overall, you found excellent areas to hone in on when constructing different face types. Subtle changes to the angle of the jaw and shape of the chin will yield dramatic differences in likeness. In Loomis's Drawing the Head and Hands he does cover a way to construct an average female head, but the rhythms and method of construction are nearly identical to male heads. His focus when drawing female heads is mainly on how to handle the subtle differences in the proportions of the underlying structure of the male and female skull, and how to use those differences to guide your portrait construction. Take a look at the 3D male and female skull models in the "Features" section and do a few studies from the front, side, and 3/4 views. Keep an eye out for proportional differences particularly in the jaw, chin, cheekbones, brow ridge, nose etc. In general, Loomis suggests softening the angular/broad features of the male head when approaching female portraits. So if you learn the blockier more angular male head construction as a base, you can use that as a framework to whittle it down and soften it until you reach your desired likeness for a female character. A more slender, rounded jaw line, pointier chin, smaller nose, with a slightly more slender, graceful neck width will quickly visually separate the female characters from the blockier male head/neck. Keep up the great work, the more studies you do the more you'll start to piece together how you like to show differences in your portrait construction methods. Hope this helps!
Jack Mills
2yr
front view sketches
Help!
Browse the FAQs or our more detailed Documentation. If you still need help or to contact us for any reason, drop us a line and we’ll get back to you as soon as possible!