


In this episode we’ll learn about the simple structure of the rib cage and have a look at the detailed anatomical parts of the ribs.
Simplified Structure
The rib cage is often simplified as an oval shape. For a gesture drawing, that’s good enough. But for an anatomy study, it’s not. The rib cage is more like an egg because the top is narrower than the bottom. And more specifically, the rib cage is an egg with planes. It has clear front, side, and back planes. The front plane is composed of the sternum and costal cartilage. The front plane transitions to side plane right where the costal cartilage connects to the ribs. From there the ribs continue backward in a subtle convex curve. Then they reach the angle of the ribs where they take a sudden turn medially for the back plane. The back plane actually has a concave wedge where the ribs curve forward to connect to the spine.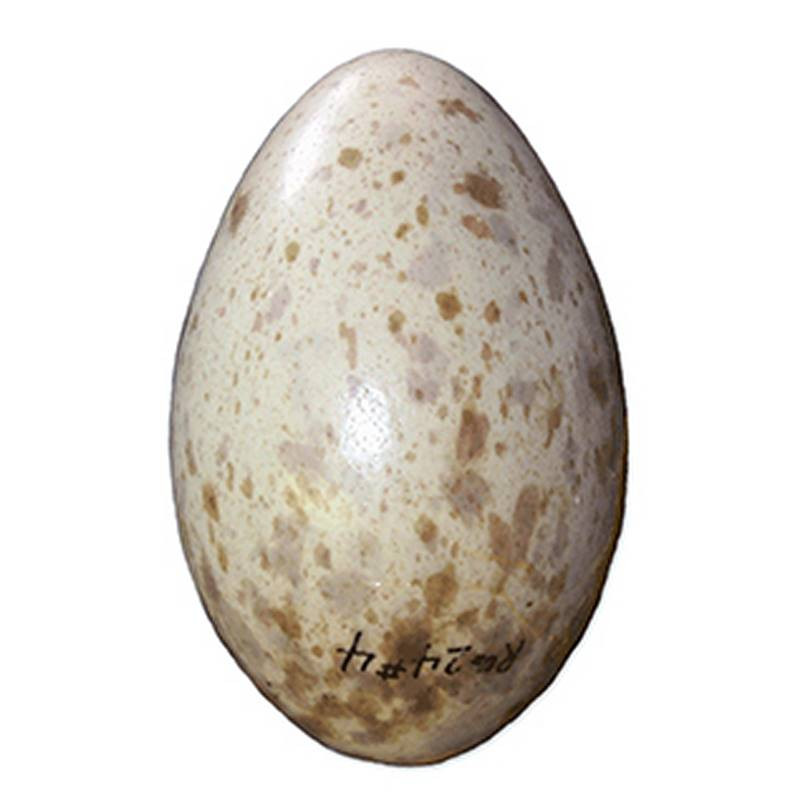
This is unique to humans, allowing us to lie on our backs comfortably. Quadrupeds, like dogs and horses, have pointed spines – the spinous processes of the vertebrae extend way up.
Now don’t miss this. The top plane actually slants forward. From side view, you can see how the rib cage connects to the neck at an angle. The neck curves back to hold up the head vertically. Ignoring this will result in the infamous ‘lollipop neck’.
The bottom plane is complicated. It curves. In the front, from the bottom of the sternum, the costal cartilage angles outward creating the upside down V shape called the thoracic arch. The cartilage of the 10th rib has a sharp “corner of the ribcage”, which you can see and feel on the surface. From that corner, the bottom plane curves around to the back and then up to the 12th thoracic vertebra.


Parts of the rib cage
The Rib Cage is made up of the thoracic vertebrae, which we already covered, twelve pairs of ribs, each connected to a vertebra, the costal cartilage, and the sternum.
Ribs
"Do we really need to know how many ribs there are?"
It may seem like overkill, but when you invent poses or sculpt the figure, you may want to know where to attach the muscles of the torso. The rib cage is an origin and insertion area for many muscles. So, let's learn the ribs so we can attach the muscles in the right place.
"But there’s so many of them!"
Well, not really. Only 12. But don’t worry, if you understand the simple structure of the planar egg and the general pattern of the ribs, you’ll find it easy to place the ribs in that egg structure.

From the back, the ribs angle down slightly. As they reach the side plane, they dive diagonally at about 45 degrees and stay at that angle until they reach the costal cartilage in the front. The costal cartilage of the top half stays close to horizontal. The bottom half curve upward toward the sternum.
"Do women have an extra rib?"
Nope! There is an abnormality in a very small percentage of people who have an additional cervical rib (that’s in the neck). This happens more often in females, but also occurs in males.
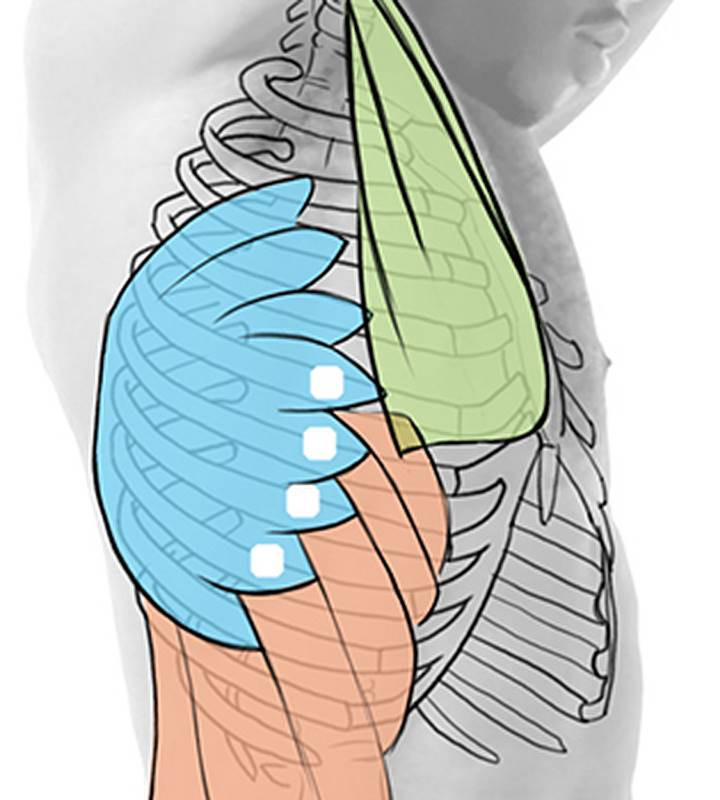
So what parts of the rib cage show up on the surface? On a muscular person when the muscles stretch, we see some of the lower ribs in the front and also in the back.
On a lean person it doesn’t take much of a stretch to reveal the ribs in the front and back, and they’re much more obvious.
Now, how do we figure out where the rib cage is in poses where we can’t see the ribs? Well, we can use our knowledge of where the muscles attach. Rib number 5 is an important one. The bottom of the pec aligns with the level of 5th rib. The first digit of the external oblique originates at the 5th rib. And the first visible digit of the serratus originates at the 5th rib. The 3 most prominent serratus digits originate at the 6th, 7th, and 8th ribs.
Costal Cartilage
The Costal Cartilages connect the ribs to the sternum. They also make the ribcage more flexible and elastic.
On a very lean person with thin pec muscles, you’ll see the first few costal cartilages connecting to the sternum in the front. A bit lower and to the side, the muscle and breast tissue (on a female) will cover the ribs even on a very lean person.
The lower front edge of the rib cage is the Thoracic Arch. It’s made up of the cartilages from the 7th to 10th ribs. Starting from where the Costal Cartilages of the 7th ribs attach to the Sternum, down to the corner of the 10th rib. This corner often stands out in the figure, especially when the model is inhaling or leaning back.
Because the thoracic arch is made of cartilage, it will have more variation than bone. Artists tend to idealize this shape to be 90 degrees on males and a narrower 60 degrees on females. And, a more masculine arch will curve outward and a feminine arch will curve inward.

But the shape of the thoracic arch is more of an idealization than a rule.

Sternum
Also known as the Breastbone, the Sternum is made up of three pieces and looks like a downward facing dagger ornecktie. You can think of these pieces like the sword of a Roman Gladiator. The top piece is the Manubrium, which means ‘handle’, the Body is the Gladiolus which means blade, and the tip of the sternum is called the Xiphoid process. Xiphos, means sword.
The top corners of the Manubrium are where the clavicles attach, forming the pit of the neck.
The body of the sternum is the longer bone, thinner at the top and thicker at the bottom. It’s about twice the height of the Manubrium. On a male, the lower end of the Body is usually located below the nipples and above the level of the lower border of the Pecs. On a female, the placement of the nipple and bottom of the breast varies greatly.
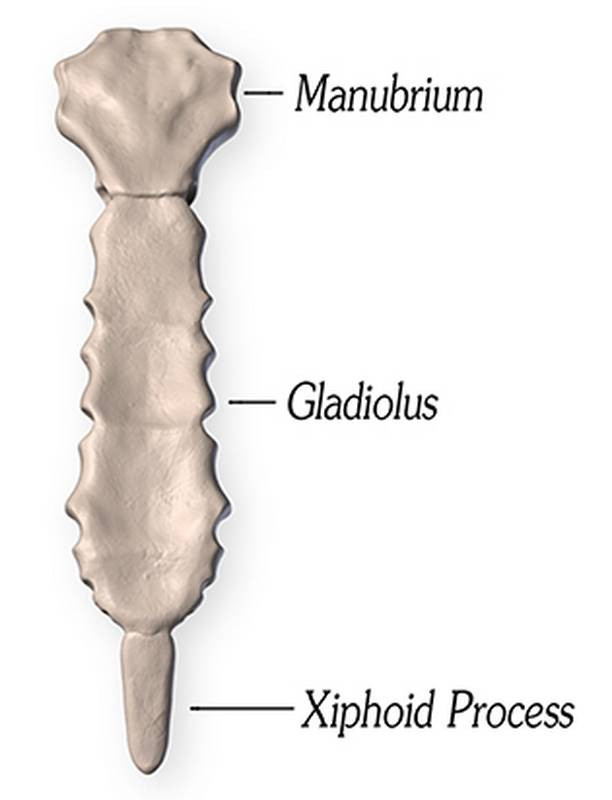
At the lower tip of the Sternum is the Xiphoid Process, or the dagger! It’s about the size of the tip of your thumb and is made of cartilage. Sometimes the Xiphoid Process sticks out from the surface, and sometimes it digs in and makes a depression, surrounded by thick costal cartilage.
Assignment: Draw the Rib Cage
Construct a Robo Skelly rib cage and the pelvis using the bucket method. Try to be as accurate as you can with them. Don’t just draw a generic rib cage shape in there. Look for clues from landmarks and muscle attachments that will tell you exactly where the rib cage is.


