


We have noses of all shape and sizes, but there are things they all have in common. It’s important to understand these similarities so that you can solve any nose from any angle.
In this lesson we’ll simplify the nose into its major planes to understand the perspective from various angles. Then well go deeper and explore the anatomy, and finally based on the anatomy, break up the major planes into the minor planes.
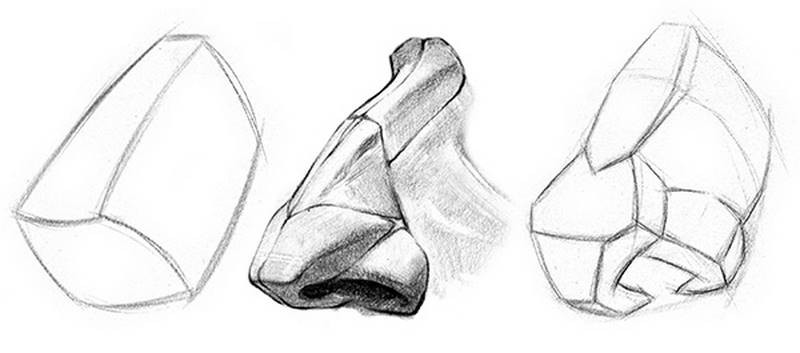
Major Planes
In my portrait drawing classes I see a lot of people struggle to get the nose pointing in the right direction and to look 3-dimensional. To do this correctly it's important to understand the nose as a simplified box. There are the side planes, the top plane and the bottom plane. As the head turns side to side or up and down, all the angles and shapes of the nose will change. This could get really complicated, and that's why it so important to first solve the perspective of the box, and THEN add the anatomy.
From the front view the tip of the nose is aligned with the center line of the face and the side planes are the same width. As the head turns to the side the tip of the nose will extend away from the center line. The far side plane will get thinner and the closer one will get thicker. At about the 3/4 view the further side plane is hidden and eventually at side view even the top and bottom planes are no longer visible.
Now let’s cover what happens when the head tilts up or down. Pay attention to the heights of the top and bottom planes. From straight on, you’ll generally see a little bit of the bottom plane. As the head looks up, the bottom plane gets taller and the tip of the nose gets closer to the eyes. Eventually it will even cover a portion of the eye. The tendency for many artists is to lower the tip of the nose, but of course if you do that, then the nose will point in a different direction than the head. That’s just weird!
At a down tilt, the top of the nose will extend down from the nostrils. Remember that the bottom of the middle third, indicates the connection of the nostrils to the face, not the tip of the nose.
Anatomy
Once you establish the perspective of the nose, it's time to add some details. But if you don't understand the anatomy, it's hard to know what details to put in. Understanding the anatomy helps you to design your shapes to indicate the subtleties of the nose.
The nose is made up of interlocking pieces of cartilage and fat attached to the bone of the skull. Lets group these pieces into 3 groups: The Bridge, Ball, and the Wings.
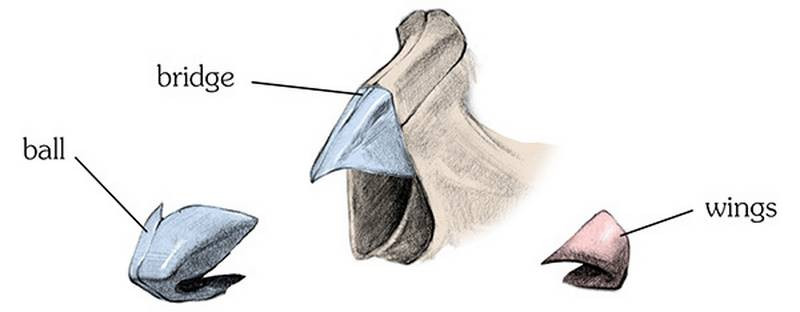
The Bridge
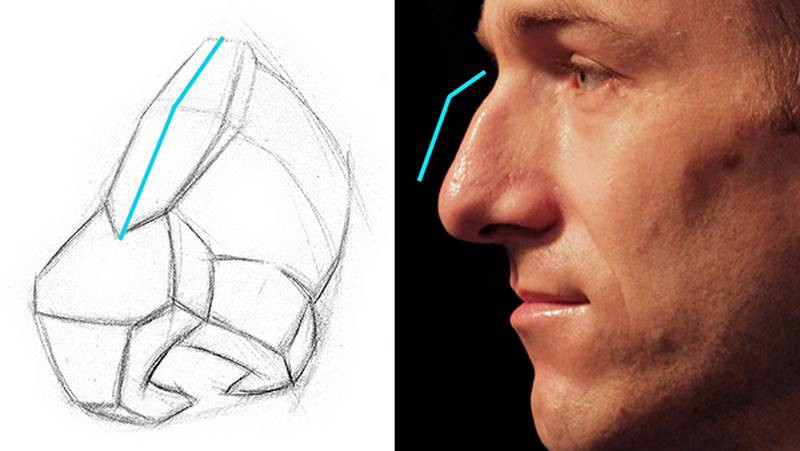
The top half of the bridge of the nose is the nasal bone and the lower half is the lateral cartilage. The side plane is a bone called the Maxilla. And at the top, the nasal bone connects to the forehead at the Glabella, which is a keystone shaped plane that faces downward. The edge of the nasal bone and lateral cartilage has a thin, sharp ridge as it transitions to the side plane and then connects to the maxilla. The lateral cartilage is pointy and wedges between the two pieces that make up the ball of the nose.

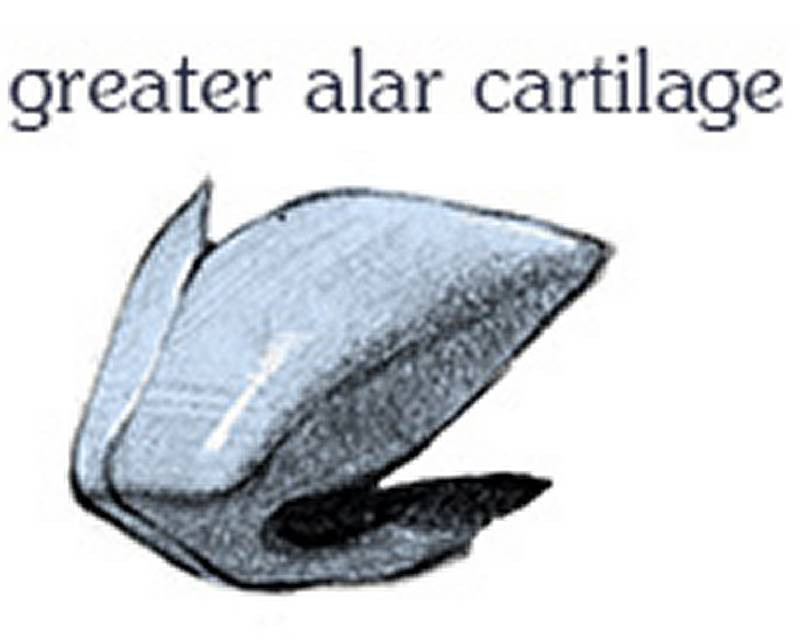
The Ball
Interesting to know that the ball of the nose is actually made up of two pieces of cartilage called the greater alar cartilage. Sometimes you will see the separation between these two pieces and sometimes it will be too soft to see. These two pieces together make a rounded form that hooks in under itself at the septum and you will typically see a bump where it connects to the skull inside the nostrils.
The Wings
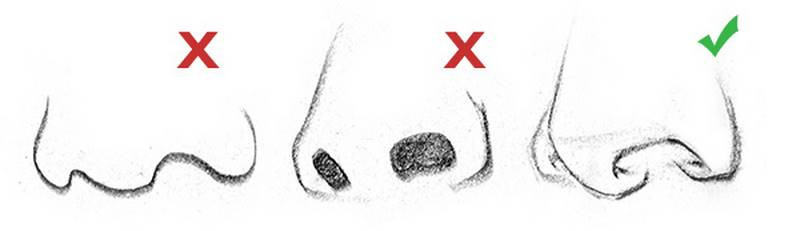
Finally on the sides of the ball, there are two wings made of fatty tissue. These wings also hook around and under. Viewed from the bottom, they connect to the face further back then the septum because of the roundness of the tooth cylinder.
The fact that the septum and wings hook into the inside of the nose is important to avoid drawing a cartoony nose. These are two common mistakes. The first is just a 2-dimensional outline of the nose. The second is focused only on the hole of the nostrils, and lacks any volume of the wings and septum. By focusing on the volumes, your drawing will look much more 3-dimensional.
Minor Planes
You should memorize the subtle plane changes in all the different parts of the nose. These plane changes are usually seen as subtle shapes and edge variations, which to the untrained eye appear to be kinda random and unclear. Once familiar with the minor planes, you can easily identify them and design them to be more clear in your drawing. This gives the drawing a better sense of 3-dimensional form. And this applies to anything, not just to the nose.
The minor planes are basically a simplified and geometric version of the anatomy. So, let’s take a look at the minor planes of the nose.
Minor Planes of the Bridge
The top plane of the nasal bone faces upward and then slightly more downward at the lateral cartilage. From the side, you can see this slight angle change from the nasal bone to the cartilage. The connection between the bone and cartilage is usually the widest part of the bridge.
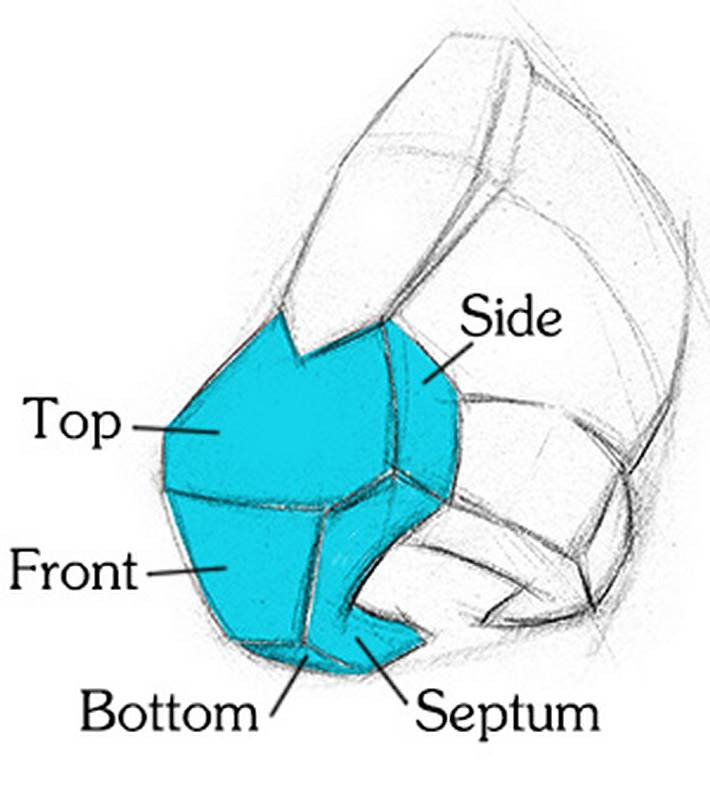
Minor Planes of the Ball
The ball of the nose isn’t a perfectly smooth ball, but has very distinct plane changes. It has a top, front, and bottom plane as the septum curls under itself and connects to the skull.
The side plane acts as a step down to the nostril. It’s also important to indicate the thickness of the septum
Minor planes of the Wings
The wings curl into the nostrils similar to the septum. And so they each have a wide top plane and a thin side plane. The wings are not paper thin, so an indication of the front planes is crucial to give them some thickness.
The shape of the nose varies a lot from person to person. It can be soft, chiseled, wide and bulbous, thin and pointy, and so on.. Next time you’re in public, be a creeper and observe people’s nose shapes.

In the next lesson, I’ll show you step by step how to draw a 3-dimensional nose.
***
Drawing materials provided by Savoir Faire
Thank you to everyone who sent in their photos. In this video: Makai Gomes, Daniel B, Erik Hedlund, Gary Josack, Johannes Nicolaas Peters, Jose a De Leon, Matt Starbuck, Murathan Yalcin, Preston Jackson, Sarai Galindo, Cynara Gillenwater, Gleb Dmitriev, Mac


