


Check out the extended premium video to learn about oblique physique variations, the internal oblique, and more. All the anatomy premium lessons have 3d models and ebooks.
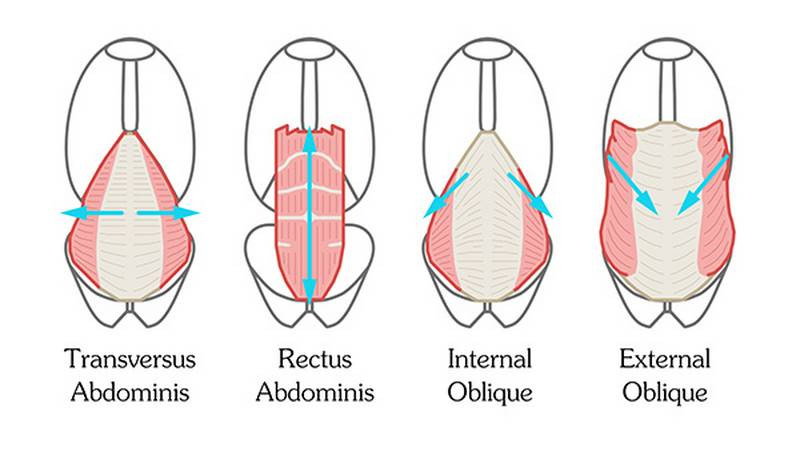
Last time I introduced the 4 muscle layers of the abdominal wall. We already learned about the vertical rectus abdominis. And we learned about the horizontal transversus abdominis in the premium section. Now, let’s learn about the diagonal external oblique.
Beginners often get overwhelmed by the interlocking digits of the serratus and oblique. They draw a bunch of out of control stripes across the side of the figure. That ends today!
Let’s be disciplined boys and girls and start by learning the anatomical basics. Then we can have fun and learn how to draw the forms.
Anatomical Basics
The name "External Oblique" refers to the muscle’s position, being on the outside. Contrary to the Internal Oblique which is on the inside. And it refers to the diagonal angle of the muscle fibers. External means outside. Oblique means diagonal.
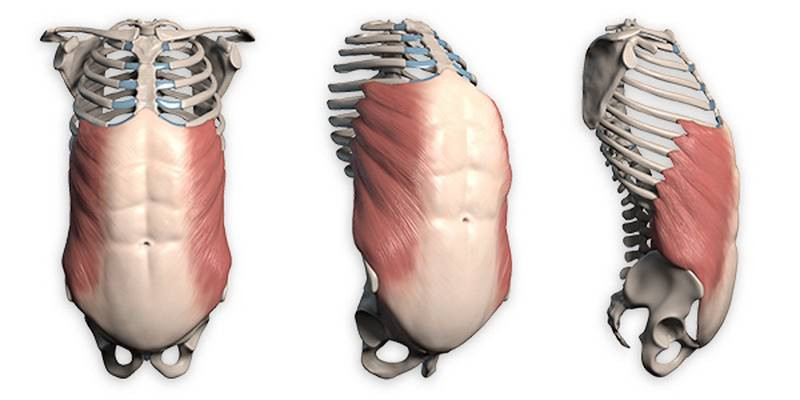
The external oblique is a sheet muscle, which means it’s large and thin, and its muscle fibers are parallel. It sits on the sides of our torso and connects the ribcage to the pelvis.
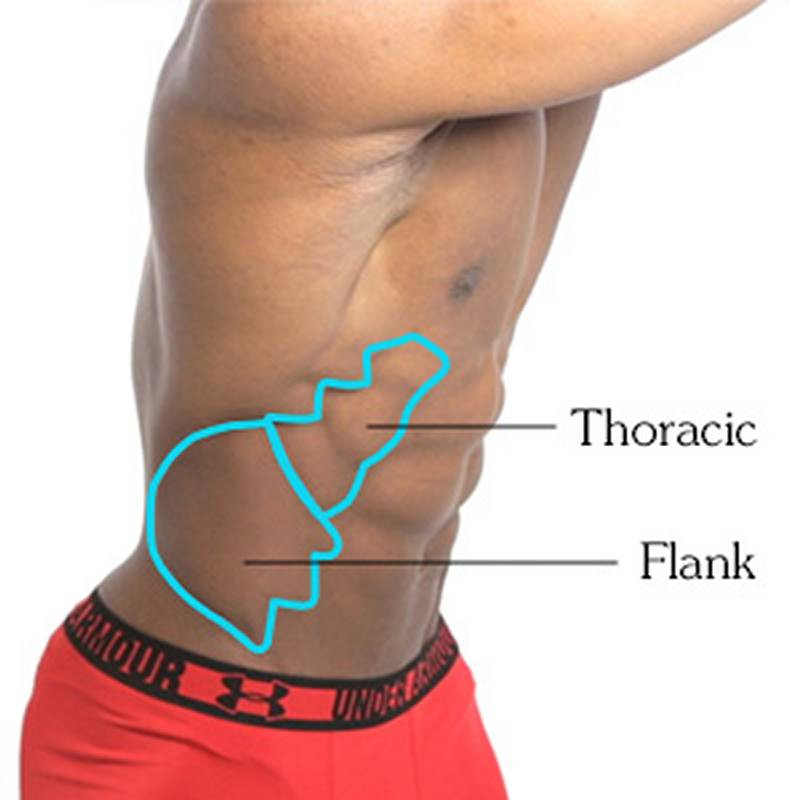
When flexed, the digitation of the oblique is revealed and you see tube-like striations at 45 degree angles on the upper half. This upper half is called the Thoracic Portion and the lower half is called the Flank Portion.
It originates off the bottom 8 ribs, and inserts onto the anterior ⅔ of the iliac crest, xiphoid, linea alba, and pubis. The muscle fibers don’t reach all the way to the linea alba. They attach to their tendon, called abdominal aponeurosis, at the edge of the linea semilunaris. This large aponeurosis covers the entire rectus abdominis muscle.
Motion
The function of the oblique is to bend the spine laterally and to twist it. When both sides work together they flex the torso forward.
Sometimes we’re our own worst enemies... Much like how the external oblique is its own antagonist. When one side flexes, the other side stretches, and vice-versa.
When the oblique is flexed you’ll see digitation on the thoracic portion. The flank portion stays smooth, except maybe a hint of the digitation along the medial edge. The motion that will flex the obliques most is a twisting and bending combo. Basically, the angle of the muscle fibers.
When twisting without any kind of bending, there’s actually little effect on the oblique. The lumbar vertebrae are very limited in their twisting range of motion. You’ll just see a subtle twisting of the muscle.
When bending forward, the compression is in the Abs, as we learned last time. When bending backward, even though it’s a very limited motion, the skin quickly folds.

When you bend to the side, a prominent fold is created at your waist. If the bend is really extreme, it might be a double-fold.
Use the concept of squash and stretch - when you’re drawing one compressed side, exaggerate how the flesh is bunched up, and really stretch the other side! You might even show the bony iliac crest and rib cage on the stretched side to show how tight the skin and muscle are being pulled.
Robo Bean and Anato Bean
Remember the Bean and Robo Bean from the figure drawing course? Well, a lot of the motion we drew for the pinching, stretching, and twisting, was an indication of what’s happening to the obliques. The bean was basically 2 ovals, connected with skin, like 2 balls in a sock. But, I’m more interested in reviewing the Robo Bean because it has hard corners that indicate 2 important skeletal landmarks. The 10th rib of the rib cage and the ASIS of the pelvis. These are so useful for drawing the obliques in motion.

Now, what about the Bucket and Geometric Rib Cage that we learned about earlier in this course? Let’s call these the Anato Bean™. The concept and purpose are similar to the robo bean, but the robo bean is simpler. We can say that the Robo Bean is Beginner and Anato Bean is Advanced.
This edge of the bottom box on the robo bean follows the angle of the oblique. It’s the angle you’ll see on the surface. The bucket is a little tougher and can be counter intuitive. It follows the angle of the front half of the iliac crest and then keeps going.
The bucket is more anatomically accurate if you have a handle on perspective. If you’re struggling with the construction of the bucket, the robo bean can be a good option for you. If perspective is new, try the Robo Bean. If you’re up for the challenge, try the Bucket.
Assignment
Use the images provided in the downloads to draw the Robo Bean and Anato Bean. Then add the oblique with the correct stretching, pinching, or twisting. Think about the motion and how the motion deforms the shape of the muscle.


