Structure Basics – Making Things Look 3D
This lesson has a premium version with extra content. Get it now!
1.3M views
lesson video
Structure Basics – Making Things Look 3D
courseFigure Drawing FundamentalsFull course (57 lessons)
$150
assignments 304 submissions
Mathias Ragnarsson
I face the same kind problem with simplifying the shapes as I do with gesture drawing. It’s a challenge to not think of the contour when drawing gestures, and with this exercise it’s a challenge to not make the shapes more complex than they have to. I realize I’m not using too many primitive forms here, but I want to post this anyway and come back to it later as I progress.
LESSON NOTES

Basic Building Blocks

structure basics 3d building blocks sphere cube cylinder

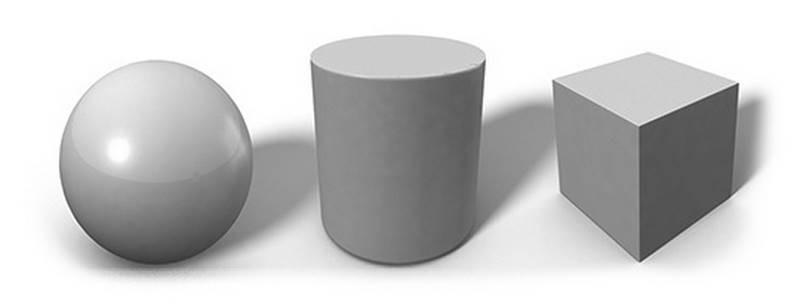
Just like gesture had the three basic lines, csi, structure also has its three basic building blocks. Spheres, cylinders and cubes. You can simplify pretty much any organic object into these three forms or a combination of these three forms.

You can also stretch and bend these forms to better fit the character of the subject. A sphere can be modified to an egg shape, a cylinder can taper thinner to one end like you’d see in a leg. At its extreme, a tapering cylinder would become a cone.

structure basics stretch and bend forms

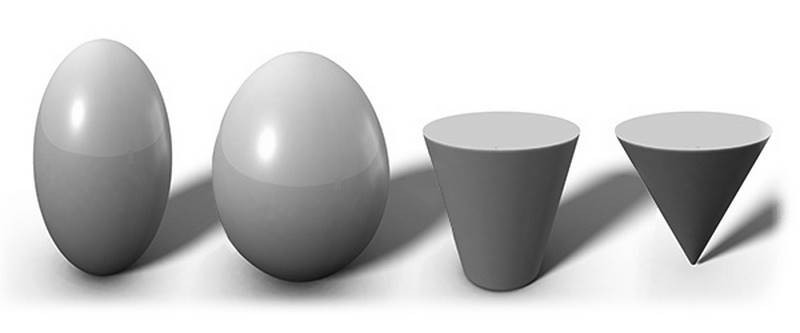
A cube can be stretched to be more rectangular. And the sides don’t have to be the same size. You can taper thinner to one end like with the cylinder, bend it to follow the gesture of the pose, and even twist it. Basically, think of these forms as if they’re made of playdough. You can deform them as you wish.

structure basics 3d stretch bend twist forms like playdough

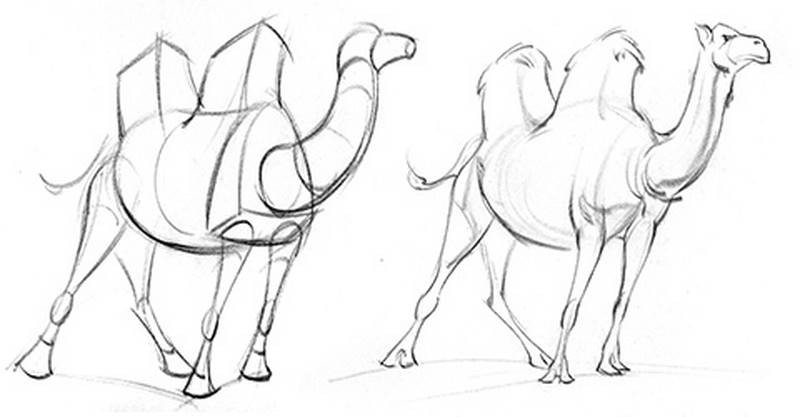
We construct from these basic building blocks because it’s a lot easier to imagine simple forms 3-dimensionally then complex forms. It’s a lot easier to imagine and work out the perspective of this camel with boxes and cylinders. Then add the details of the anatomy. The same could be done with the figure. which I’ll go over in detail in the next few episodes.

basic building blocks for camel

Simplify the figure into basic spheres, cylinders and boxes. This will immediately give the figure a 3 dimensional look. Having established this 3D idea allows you to visualize and construct the finer details of the anatomy in perspective more accurately.

The difference of Spheres, Cylinders and Cubes

So let’s take a closer look at these simple forms.

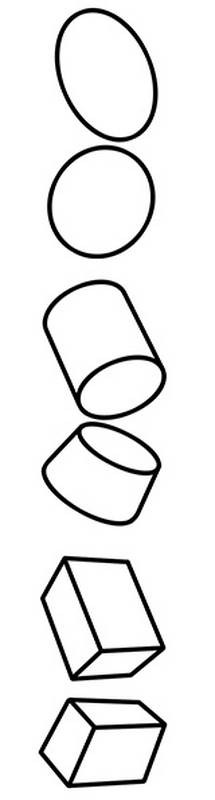
You can simplify the rib cage and pelvis to spheres, cylinders, boxes, or combinations of these forms depending on what you need for that pose. The sphere is really just a circle, since a sphere without tone appears 2 dimensional. So, the sphere is flat when using line. It doesn’t tell us anything about the form and its orientation in space. If you stretch the circle into an oval, now we have one piece if information about its orientation. The oval will only tell us the tilting left or right.

To show any kind of leaning back or forward, we need to indicate a bottom plane or a top plane. That’s where the cylinder becomes useful. It shows the tilting with the angle and the leaning with the bottom or top planes.

We can go one more step forward and use a box. The box has one thing that the cylinder doesn’t – it shows us the edges between front, back and side planes. This shows us the twisting motion.

So now with these three options, we can choose the one that does the best job in describing the form of the pose we’re drawing. Sometimes a cylinder for the rib cage with a centerline to show the twist is enough. Sometimes the addition of the corners at the rib cage and pelvis to show the front and side planes is helpful. It’s up to you to decide how you use these basic forms.

structure basics 3d three basic building blocks sphere cude cylinder

Drawing Cylinders

Start constructing cylinders by finding the angle, the length and width. This establishes its placements and size. If the cylinder is foreshortened make sure to slightly taper the sides thinner towards the far end to indicate foreshortening.

Then it’s time to identify the cross contours. Ask yourself if you’re looking up or down at the cylinder and how much. Based on that, add the ellipses of the top and bottom planes. Make sure to keep the angle of the ellipse perpendicular to the angle of the sides. The common mistake is to make the angle vertical or horizontal.

Another common mistake is when we indicate the cross contour lines, we tend to make them flatter than they really are. The thing about cross contour lines, is that most of their effect is on the sides. That’s where the roundness of the form is revealed. So don’t flatten them and bring them to a sharp corner with the edge of the cylinder, that defeats the purpose of the cross contour line. It should feel like it’s wrapping around the edges.

Drawing Boxes

You should be able to draw a 3d box from imagination at any angle. In the illusion of depth series I talked a little about perspective. A box’s edges will converge to a vanishing point on the horizon line. This works well for structures like a house where the bottom plane is parallel with the ground. When you rotate the boxes it gets much more complex and personally I feel it’s too complex and too mathematical to think about all that stuff when drawing a figure.

converge to vanishing point tilt cube

So, develop a sense for perspective and use your intuition. You’ll get better with practice, but a few tips will get you pretty far right away. The way I approach it is at first I imagine which planes of the box I’m seeing. You’ll see 1, 2 or 3 planes. If you’re looking directly at one side, like the front, it’s just a rectangle. When the box rotates down, you start seeing the top plane. And when it rotates to one side, you’ll see one of the side planes.

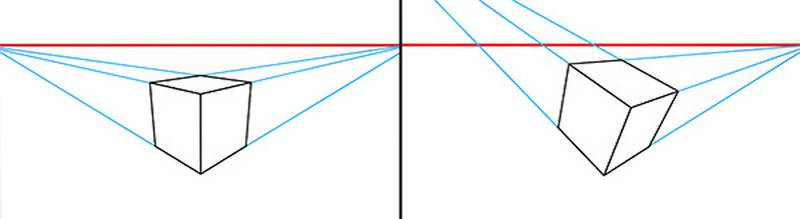
Also, notice that all the lines are converging to create a sense of depth. Look at this box and see if you draw boxes this way... If you draw boxes this way, stop! This is an impossible box. Things appear smaller as they move away from us. So, drawing all these parallel lines removes the perspective from the scene. And if this plane is a rectangle, that indicates we're looking directly at it. If we were looking directly at it, none of the other planes would be visible. In this case, since we're seeing some of the right side, the front plane is starting to rotate away from us. The lines here would converge to the left. And since we're seeing the top plane, the front and side planes are rotating downward. So, the lines would converge down. Now that's a much more 3 dimensional box.

structure basics 3d correct approach to draw a 3d box

Let’s try a step by step approach and see if this helps you. I’ll start with the inside edges of the box. The most vertical one is a good starting point. Is the box leaning to the left or right, and how much? Establish that with the first line.

Then, are you seeing the bottom or top of the box? If you see the top, then the other two inside edges will be attached to the top of the initial line.

How much of the top are we seeing? If it’s a little, the lines will be flatter with an obtuse angle. A lot and they will have more of an acute angle.

Also at this point you’re thinking about how much of the front and right side you’re seeing. The same of each would make the angles of these lines equal. If you see more of the front, that side will be more horizontal and the other side more vertical since its moving away from us more. And vice versa…

This is the foundation. It tells you the orientation of the box. After this it’s really easy. Just go to the end of each line and connect the outside edges with converging lines.

Consider the lengths of the initial 3 lines. If it’s a perfect box then you just need to think about how much each side is being foreshortened depending on how much it’s facing away from you. But if some sides are longer than others, think about that length and foreshortening.

As you can probably tell, this isn’t something that you’ll get right on your first try. It’s a bit confusing so you need to repeat the process many times to get familiar with it. It’s critical that you do get familiar with it if you want to apply these concepts to a complex form like the figure. Next week we will talk about the robo bean which is a 3d representation of the torso. So, go practice your boxes by looking around you for boxy furniture and drawing them from different angles. Then try inventing them from your mind…

practice drawing boxes from different angels

Premium Section

If you want to see more detailed explanation of this video and all the other videos from the figure fundamentals series check out proko.com/figure. For every free video that I post during this figure series, I’m posting additional premium content on proko.com. This week I explain more about the position of the viewer, avoiding flat perspective and how to simplify forms. So far there’s a total of over 3.5 hours of video in the premium section, so lot’s of goodies there.

DOWNLOADS
mp4
Lesson 3a Structure Basics – Making Things Look 3D.mp4
368 MB
txt
Structure_Basics_Premium_Transcript.txt
12 kB
ASSIGNMENTS

Start by practicing cylinders and boxes of the things around you. Here you’re using observation and what you know about structure to draw the forms. Then move on to drawing them from your imagination. Can you imagine a box in your mind and draw it exactly how you imagined it?

When you’re ready, get some reference of animals and try to simplify them into balls, cylinders, and boxes. Avoid flat angles. Try to find dynamic angles of the animals in motion. That will be a much more valuable exercise.

Post your work and participate.

Jessica Mondelus
Here's a second effort at the boxes but I definitely think I need some help. Please let me know how I can improve!
Jake Dota
4yr
Try Drawing through your structures so you can see the entire wire frame (all edges of the planes). For your boxes, break it down to a single flat plane, and just try rotating it like a piece of paper in space. Your lines should feel like they are slightly converging towards a point in the far distance. if you notice the far end of the plane/paper is diverging (getting bigger rather than smaller) than try again, and keep in mind where your intended vanishing point is, and subtly converge the lines toward that point. Sometimes it helps to exaggerate the converging perspective to get the point across to your brain. Sometimes it just won't look right and that's okay. I found it to just do multiple iterations on the same angle you are having trouble with rather than trying to fix the broken lines. It's going to take a couple of tries for your mind to get a grip on where things should be placed. So keep at it, I can see you getting the hang of it.
@pmak22
4yr
Did another quick couple of animals for the night
@pmak22
4yr
As someone who took drawbox lessons last year this one took me back to the 250 box challenge. I def do not enjoy this as much as doing it digitally (which has been my approach with all other assignments here so far). That being said it's good to get back to it. As far as my animals go I want to do another dozen or so. I feel like I'm almost reducing the forms down to structural shapes but could do better to enhance the angles of the animals in motion (aka thinking about the prior bean/gesture drawing. I do find the heads to be the most challenging and could stand to reduce some of the details and focus in on what the main shape should be.
Jesper Axelsson
Hi @pmak22, nice studies! It's great to see you practice boxes and cylinders from different angels, and your animal drawings are nicely simplified. - I would recommend that you continue to practice boxes and cylinders. In the boxes the convergence is often off; the lines are converging arbitrarily at times and you often have divergence, when there should be convergence. The ellipses in the cylinders are really nice, but their openness and the convergence of the sides of the cylinders could be worked on. As you continue to practice, try to explore even more varying angels. - If you find it frustrating to focus on markmaking the same way you did in drawbox, feel free to let go of it. Personally I found the markmaking aspect to be too much of a distraction. I got a bit obsessive about it. It can be good to practice, but I haven't found drawabox's method of markmaking common; I haven't found any pro online except Scott Robertson who spins the page. However, drawing from your shoulder seems to be common practice, so that's a habit I would strongly recommend bringing in (How to Hold and Control Your Pencil ). For this lesson I would focus on getting the perspective right, and not think too much about the lines, if it distracts you a lot. - The animals are nicely simplified, but I think there are areas that could be clarified: in the penguin's right leg (our left) it's unclear to me wheather you have control over that form or not. I think you would benefit from doing drawings where you simplify even more, maybe sticking to unmodified boxes, cylinders and spheres only. When doing this it might help to ignore the connections, such as shoulder and neck. Start with the gesture, then stack geometric forms on top. Hope this helps :) Keep up the good work!
Isaiah
4yr
My attempt, for now. I drew a handful of geometric shapes freehand & judging perspective by eyesight. Looking over them a second time, I could work more on making my convergences accurate. When I started on the frog, I thought it was looking pretty good, and I got carried away. As a result, it is a bit more complex than was the original intent of the assignment. Another motive I had in doing this assignment is that a YouTube art vlogger I follow, Kelsey Rodriguez, is doing a community study challenge for September. I was not intending to do a challenge this month, and so, I do not know how long I will last in the challenge. However, many of the challenge prompts overlap with Proko assignments I've been meaning to do. So, I will try to make good use of my motivation while it lasts... I am counting the frog towards prompt #1: simplification.
@pmak22
4yr
Hi Isaiah, I'd say maybe go back and do a few more reps on the geometric shapes, I can see you are able to do clean and coherent shapes, but I also don't quite see a lot of perspective in them, specifically with the boxes. The frog, yes I think it is simplified but seems to miss the point of the assignment in that there are a lot of complex shapes/details that I would imagine are the next steps after this assignment. There is also a good amount of line work that describes shapes, specifically around the chest of the frog which also feels like too much detail for this assignment. I don't have any context for the art vlogger you mentioned and the study they are pursuing but I think the overlap may be a little less than it appears. I don't want to come off too harsh, but at the same time, I'd advise you to re-watch the video and then go back to the assignment.
@val_val
4yr
first assignement, got carried away at the end. Please let me know if anything looks off or could be corrected ty <3
Tasca
4yr
sphinx cats here. i still do very scratchy line work, i need to work on committing to a line
Jean-François Patenaude
I made a squirrel and a fox. I simply wanted to be sure that I'm on the good path before going further into this exercise. Thank you!
Octavivs
4yr
Seems like you're on the right path. I'd say add some rounded forms with cross contours if you feel comfortable that you're not "cheating" if you do that.
Tono VZ
4yr
There are a lot of squirrels here in my town, might as well ask u to draw them! 😆
@phonk
4yr
Hello! Here are my structure exercises. Any critique would be greatly appreciated! Thanks!
Jesper Axelsson
Hi @phonk, great job! I really like how you managed to maintain the gesture and attitude of the animals and insects, while giving them structure. - The first batch of animal drawings didn't appear as structured drawings to me at first. With a closer look I noticed that you did use simple forms to construct the animals (a sphere for the dogs head, boxes for its paws, for example), but I also found places where the structure feels ambigous. In the bird for example, I can't really tell what forms you've used to construct it. The second batch of drawings is much better. They are clean and the forms are easy to read :) - While continuing with the course, I would recommend practicing boxes and cylinders as a warm up. You still have room to improve the convergence of the boxes, the shape of the ellipse and the placement of the ellipse. Hope this helps :) Keep up the good work!
Varvara
4yr
Hei! My structure practice drawing. critique would be appreciated
@pmak22
4yr
Hi Varvana, I like that with some of the animals I'm seeing attempts at building out the perspective of the overall shapes of the animals, specifically with the cow. I think something that is slightly lost in that process is exploring the dynamic angles of the motion of the animals in motion. They instead feel a little stiff and stuck in a box. I think maybe giving the legs of the animals, either with more dynamic reference images or exaggerating others could help you.
Naama Sh
4yr
Carlos Javier Roo Soto
They look good, you are definitively simplifying to the basic forms without getting distracted by the contours too much. I don't know about animal anatomy but I feel like in the 2nd bear and the big cat of your third page are little stretch out in the zone between their pelvis and rib cages, but without the reference photos I can't know for sure, but in any case you did good job, i think the biggest thing here are the perspective of the building blocks themselves and the proportions, but the perspective would improve when you start actually focus on studying perspective specifically and you'll learn about proportions and measurement later on in the course. Keep drawing boxes and cylinders from life and start practicing drawing them from imagination, maybe watch moderndayjames videos on basic perspective to keep in mind while you do this and maybe do a couple more pages of these animal simplifications. Overall you are ready to move on to the next class.
Dionizio Lopes
Hello everyone , these are my structure pratice drawings , any critique would be very appreciated ,@Jesper Axelsson i would also appreciated your feedback
Jesper Axelsson
I agree with @nothanks, I think you did a great job simplifying the animals into simple forms! And you managed to maintain a sense of gesture (the leopard is a great example). - In the box in the top left corner (image 1), the convergence doesn't seem to be going the right way (assuming that you were going for a box with right angles). The box's left side is facing us, which means that it's closer to us and the lines from it should converge into the distance. But you have the opposite. I noticed this happening here and there throughout the animal drawings, so it might be worth filling another page with boxes to get it down. If you want a more thorough explanation on how to get the convergence right, this reply-thread might help https://www.proko.com/s/3uw2. Hope this helps :) Keep up the good work!
@nothanks
4yr
I think you did a fantastic job turning everything into boxes, I really like the bee. My only criticism is to watch the proportions/poses. They're pretty far off from the photographs in some. For example, if you look at the kitten photograph its paws are nearly touching, but in your drawing there is a very large gap between.
@elkad
4yr
I've done some structure exercises before but haven't simplified to this degree before, any feedback is appreciated, thanks!
@phonk
4yr
Your lines are very clean! I feel that some of your animal structures have lost depth. In particular, the rear ends of the pangolin and the camel push away from the perspective of the viewer, but that is not as obvious in the drawings.
@artanxp
4yr
Hello! This is a practice of drawing cylinders, boxes, and animals. Drawing animals is fun. What do you think? Feedback is welcome. Thanks.
Angiev
4yr
Looking back at what I did when I took this class in 2018. Didn't realize its been so long, no wonder why I've forgotten everything and am now going back over
@civon
4yr
I dont think im doing this correctly.
Angiev
4yr
Good morning I tried for the first time on touch screen and pen this. I traced over the image because I didnt know how to put two images side by side in the program I used. Critique welcome, kindly keep in mind my line quality isnt great for first time with this type of drawing. thank you
@palyo
4yr
Hi! This is my second part of the assignment and i found it quite fun. I had some problems on choosing which form was the best (mostly on the lizard, i drew the legs with cubes but now i think that probably the cylinder would've been better to show the form) . I would really appreciate any kind of critique/advice.
shekina grace
Assignment. I had a difficulty turning the animals to forms. I think I did it wrong because I saw the overall figure rather than dividing it to forms by forms.
Christopher Lebreault
First animals for structure
Angiev
4yr
I like how you used the boxes for the shoulders in the fox. I couldnt get a closer look at the others to see how you designed with shapes, but it looks like you're doing good from what I can see
@jvuozzo
4yr
Hello everyone. I am drawing basic squares, rectangles and cylinders from different angles and I was wondering what you would suggest for easy to start with drawings. I know Stan uses the camel in the video. Do you take basic cartoons of animals and start from there? I am not sure where to begin. Thanks
Jesper Axelsson
Hi @jvuozzo, as a start you might want to draw things that are already clear geometric forms, like furniture for example. A bed is basically a big box and a sofa might be a few boxes and some cylinders. As for animals, you could start with any, I think. I would recommend choosing an animal that you really like :) to make studies even more fun. It might help to choose an animal with short fur, since the anatomical forms appear clearer then. You could use basic cartoons if you want, but there is a risk that you choose a drawing that doesn't have three dimensional qualities. But if you get to see the construction drawings by someone like Preston Blair, for example, you can learn a lot about using simple forms. ( https://www.traditionalanimation.com/2017/advanced-animation-by-preston-blair/ ) For me the most important exercise in this lesson was to practice drawing boxes and cylinders from different angles. It would be great to see some of the "basic square, rectangles and cylinders from different angles" that you have drawn. Having someone else look at your drawings can help you improve a lot faster. Feel free to tag me @Jesper Axelsson in that post :) When I took this course I was pretty confused by this lesson. I learned how to draw boxes and cylinders from different angles, but I found drawing an animal with simple forms too hard. I felt like I needed more guidance. If you feel the same don't worry. I think you should still try doing some simple form drawings of animals, but for me I got the real grasp of using 3D-forms once I came to the robo bean lesson, and later the mannequinization lesson. Hope this helps :) Keep up the good work!
Help!
Browse the FAQs or our more detailed Documentation. If you still need help or to contact us for any reason, drop us a line and we’ll get back to you as soon as possible!