


Get the full version of this video and rest of the Figure Drawing Series
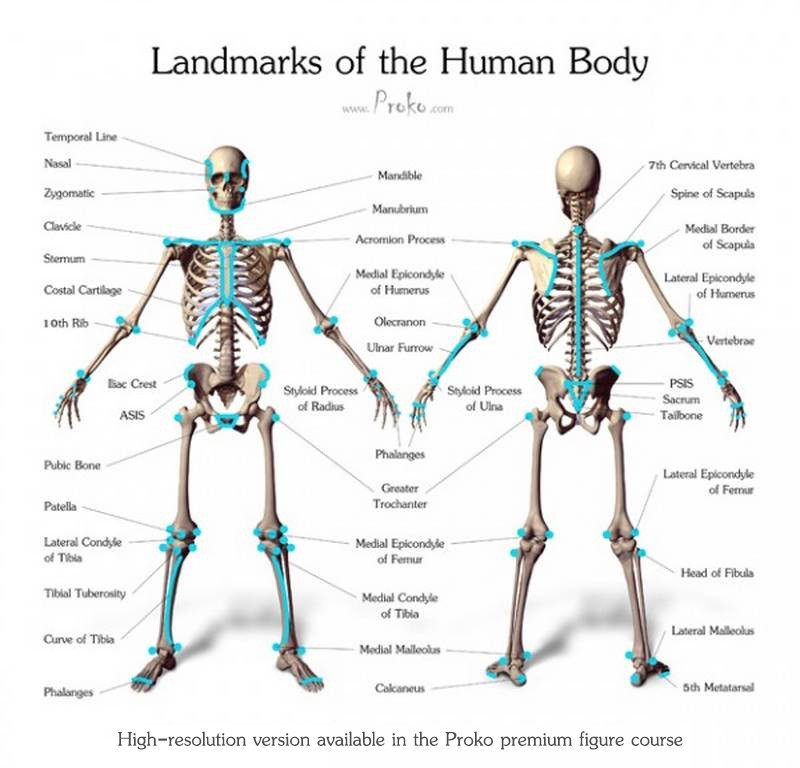
Before we move on to applying structure and proportion to our figure drawings we need to learn the landmarks of the body.
The early stages of a figure drawing usually involve careful measuring and identifying the gesture. To help us with this, the human body is filled with landmarks that give us clues to the gesture and points from which to measure the proportions. These points are bony areas that show at the surface. Bones are good landmarks because they don't change much between different body types. The skeleton structure of a thin, muscular and overweight person stays roughly the same, with some variation of course. It's the muscle and fat tissue that shows the most dramatic changes.
As I point out the landmarks, try to identify them on your own body.
We can use the fleshy points like the belly button and nipples to measure distances and angles while remembering that these points will vary a lot more between body types.
So, let’s go over all these landmarks.
Centerline of the Front
Identifying the core gesture of the torso requires finding the landmarks along the center of the body. At the top we start with the pit of the neck between the clavicles. You'll see a little indentation right above the manubrium. Work our way down to the bottom of the sternum, which combined with the manubrium looks like a neck tie. Below that is the belly button and finally the pubic bone.

These points can be connected with a C or S curve. This usually influences the gesture of the rest of the pose.

Centerline of the Back
In the back identifying the centerline is much simpler. The length of the spine gives you the shape of the centerline, from the top of the neck down to the tailbone.
It's a common misconception that each vertebra has the same range of motion and can be connected with a simple curve. While you can and should do this to establish the gesture it's not accurate to keep it that way during the structure stage and when adding the anatomy. The three sections of the spine have different limits to their rotation, flexion, extension, and lateral motion.
Lateral landmarks of the Front
Next I can use the landmarks across the body to identify the twisting and curving of the torso. Reaching from the back are the bony protrusions of the acromion process which tell you the angle of the shoulders. You can feel the bony area on your shoulders between the deltoid and trapezius. Connecting the points of the acromion are the clavicles, shaped like bicycle handlebars.
While finding the points across the shoulders keep in mind that these points can also move independently from the ribcage. If someone raises one shoulder, the clavicle will rotate from the pit of the neck, changing the angle of the shoulders while keeping the same angle of the rib cage.
The front corners of the iliac crest tell you the angle of the pelvis. These points are called the anterior superior iliac spine, or ASIS for short (Refer to the chart above). As you'll see in the next lesson, these points are great for identifying the box of the hips.
The other points that I frequently use on the front torso are the armpits. I look for the distance from the top of the shoulders and the width of the arms compared to the width of the torso.
Lateral landmarks of the Back
The back of the body also has some landmarks we can use to find the angles, although some can be trickier to find on softer or overweight body types. An average or muscular back has a lot of bumps and is always a challenge for artists.
To create order out of all the chaos, the bony landmarks of the scapula are very helpful. First, the Spine of the Scapula is this diagonal ridge from the acromion process to this corner called the triangular expansion. Like the clavicles in the front, these also resemble handlebars. From the corner the ridge takes a sharp turn downward along the medial edge. These edges are not covered by muscles, so you will see hints of them on the surface.
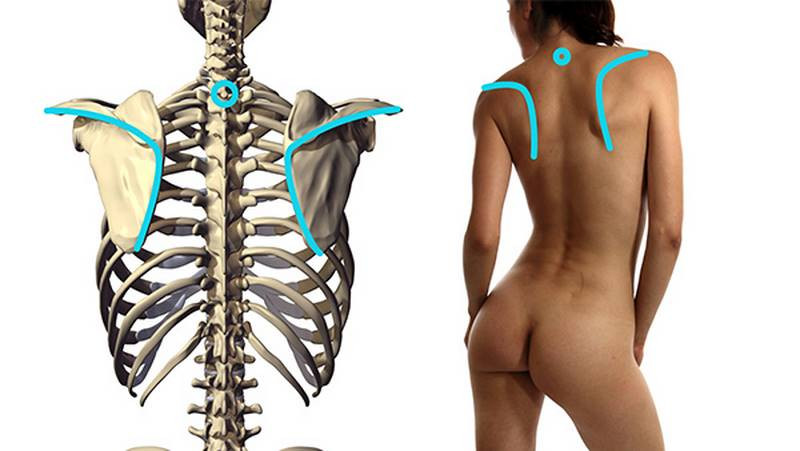
The 7th cervical vertebra is another commonly used landmark.
Moving down to the hip region, we have a major landmark at the sacrum. A triangular shape that connects the tail bone and the two dimples at the Posterior Superior Iliac Spine. Or PSIS..
The Limbs
In the arms and legs, the landmarks are basically the joints.
On the sides of the elbow are the epicondyles of the humerus. When the arm is extended these 3 points are aligned in a straight line. When the elbow is bent, the olecranon (a fancy word for “tip of the elbow”) moves down and forms a triangle.
Follow the ulna down the arm to the wrist. At the wrist, the radius and ulna bones create flat top and bottom plane that are great for showing the rotation of the wrist.
The knee is very complex, so I’ll go over it in a lot more detail during the anatomy series, but to try to simplify it I remember that there are 7 bumps. Two for the condyles of the femur and two more for the condyles of the tibia. A little one on the side at the head of the fibula. One bump for the patella and another below it caused by a combination of the tibia, a ligament and a fat pad.
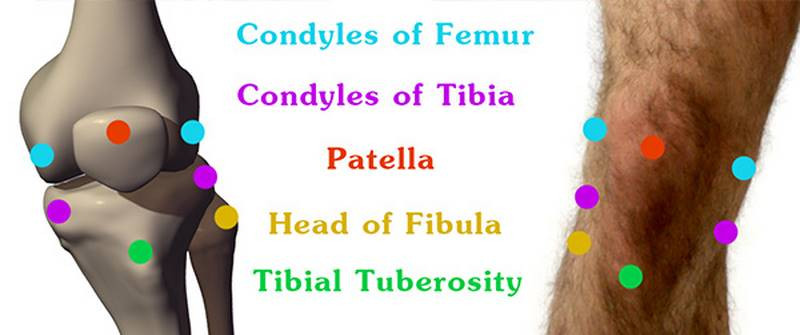
When the knee bends the tendon will pull the kneecap down and under the femur.
The curve of the tibia is very prominent and an important part of the gesture of the leg.
At the ankle, the tibia and fibula form a wrench shape that hugs the foot. The angle between them goes downward toward the outside.
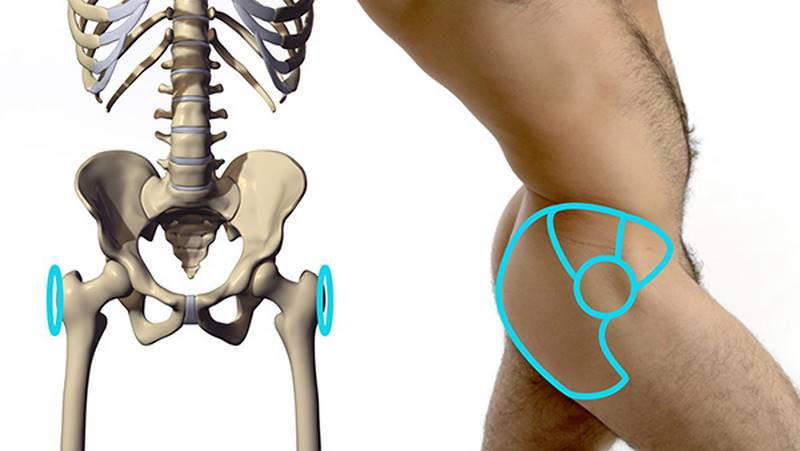
And finally, the Greater Trochanter! A bony protrusion on the side of the hip. All the muscles of the gluteus wrap around it like a donut.
******
So, those are all the landmarks of the body. The best way to learn them is to draw from life or from photos and try to identify them. Use them in the construction of your drawing. If you want to see me draw this figure while applying the landmarks, get the premium access to the entire Figure Drawing Fundamentals Series. In there you’ll also find a downloadable diagram of the landmarks to use as reference, a lot of example videos from previous lessons and expanded version of each lesson.
The best way to learn the landmarks is to draw from life or from photos and try to identify them. Use them in the construction of your drawing. Attempt them on your own before you watch my examples below.
Post your work and participate.


