


This diagram is available for purchase as a Poster or a downloadable high resolution image in the premium section.
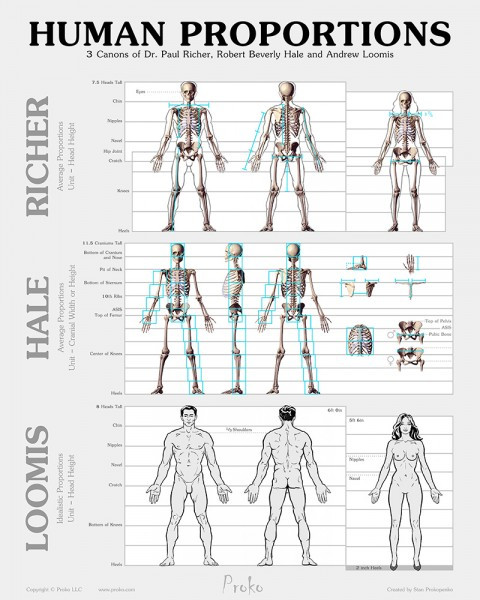
In the last lesson we looked at Dr. Paul Richer's system of measuring human proportions based on the height of the head.
In this lesson we'll take a look at a different approach, based on the same proportions as Richer's, but uses a different unit for measuring. At first glance it seems like head height is the logical unit to measure from.
It's the most commonly used method and the one used by most canons throughout history. If Leonardo DaVinci used it, it must be the best way, right?
Well, that's up to each artist to decide, but although it's not as popular, Robert Beverly Hale's Cranial method definitely gives The Head Height method a run for its money.
Since no method is perfect, you choose which one works best for you.

Hale's method uses the size of the cranium as the unit. This method is used today by artist like Glenn Vilppu, Marshall Vandruff and Michael Mentler.
The advantage of this method is that many important skeletal landmarks correspond to this unit, unlike with the head method that aligns with nipples and navel as landmarks, which vary a lot more than skeletal landmarks. Also the size of the cranium can be measured from any head angle and doesn't change. However the length of the head changes as the jaw open and closes, or as the head is foreshortened. Hale's method seems to be more consistent and more reliable when drawing a person in a pose
"I don't like the head-length system. It's great for straight-on studies like orthos, but it breaks down when you foreshorten anything, especially when you foreshorten the head. Unless you have a full-view of the head, you have no unit to begin. I'm big on Robert Beverly Hale's head-width system for a number of reasons, one is that you can find that five-eyed-ball when the head is in any position - it makes a sphere at back of the cranium, and a sphere never foreshortens. This is a useful system - a consistent measurement that echoes through the body and isn't dependent on seeing the height of the head. If you can draw a ball, you can look at a head and deduce it, then bounce the ball all through the figure." Marshall Vandruff
The Details
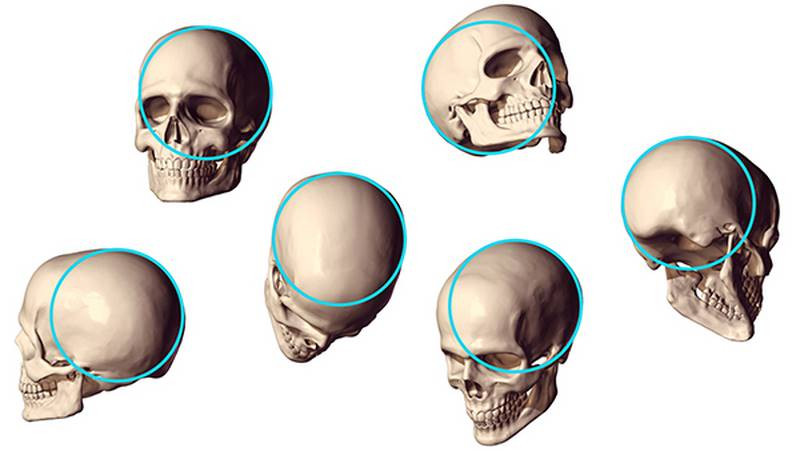
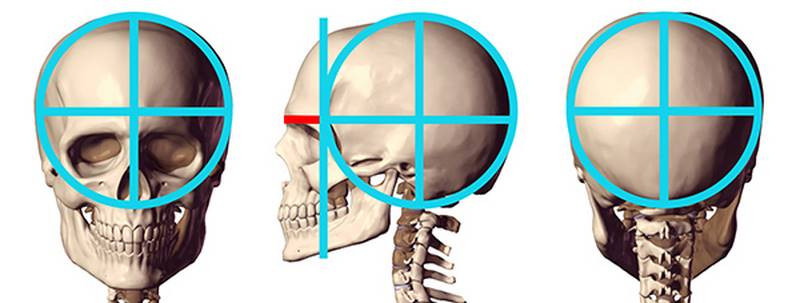
The unit itself can be measured from the back view by taking the width or height of the cranium. From the front you can use the width or the height down to the bottom of the nose. But, keep in mind that the bottom of the nose will only align with the cranium if the head isn't facing up or down. So, the width is more reliable from the front. From the side you should use the height of the cranium, since the width is too long. An additional quarter of a unit is added on to the front. This cranial unit can be measured with the width or height from any angle even when the head is foreshortened because the shape of a ball isn't affected by foreshortening. A ball is a ball from any angle.
So, we'll take this cranial size and think of it as a box unit. We'll use this box to find 3-dimensional placement of the landmarks on the skeleton.
One unit down brings you to the pit of the neck. For the torso let's use a width of two units. The sternum is one unit long not including the xiphoid process. One more down to the corners of the ribcage at the 10th ribs. So, notice how the width the rib cage doesn't quite reach the edges of this 2x2 box. And the top plane of the rib cage, indicated by the oval of the first rib, faces towards the front as you can see from this side view. So, the back of the ribcage is up higher than this 2x2 box.
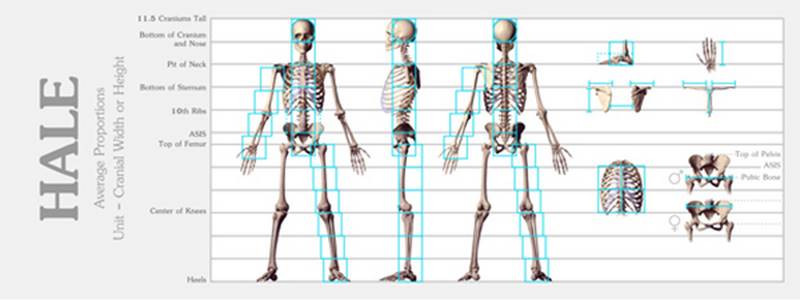
The length of each clavicle is 1 unit. Keep in mind that these units are slightly separated because of the gap at the pit of the n
In the back, the width and height of the scapulas fit into the box. In a relaxed position the distance between the scapulas near the bottom is also 1 unit.

On the pelvis there are also some convenient alignments using half units. The top of the iliac crest is at the halfway mark of this box and the top of the pubic bone and greater trochanters is at the halfway mark here. So, when drawing the front of the pelvis, look for these 5 points and remember their distances.
From the side, the pit of the neck and the ribcage align with the edges. Then the sternum comes out forward and the cartilage continues to come forward past the sternum about half a unit. The depth of the pelvis is conveniently 1 unit.
We've already found the placement of the greater trochanters relative to the pelvis. 3 units down ends at the connection of the bottom of the femur and top of the tibia. Another 3 units to the heels.
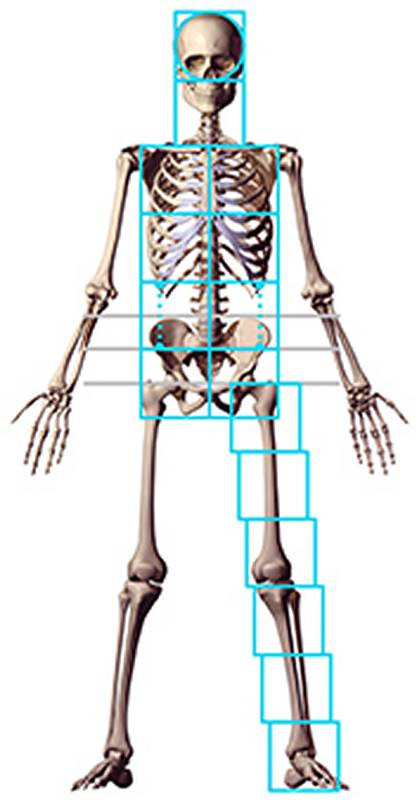
The foot from the side is 1.5 units long and half a unit tall.
Finally the arms. The length of the humerus is 2 units. And from the elbow to the knuckles of the hand is another 2 units. The hand itself is a bit longer than 1 unit.
That's it! Since this system uses a 3-dimensional box for measuring, one of its advantages is that it's manageable when something is foreshortened, as long as you are capable of drawing a box in perspective. If not, then you might need to go back to the structure lesson and practice that again.
So, for example with this foreshortened leg. We know from the top of the greater trochanter to the bottom of the femur is 3 boxes long.
So, if we can draw these 3 boxes in perspective, we can then fit the leg into those boxes.

Conclusion
Ok, so we've explored 3 different systems of human proportions. Like I said, these work really well in neutral poses and as a general guide when you're drawing from your imagination. Sometimes it can come in handy when drawing from a model. But, when you're drawing from a model or photo reference, measuring is much more practical. So, in the next lesson I'll show you how to lay-in your drawing using various measuring techniques.
"You are an artist now, you must make your own decisions. Do you prefer the proportions of Rubens or Michelangelo? Or would you like to leave the ball of the abdomen out altogether, like Henry Moore?" Robert Beverly Hale
I hope you've enjoyed exploring these two systems for measuring human proportions. The premium section has a third system of proportions based on Loomis's idealized 8 Heads tall figure. These proportions are widely used in fine art and illustration. Check out that video and other premium videos from the Figure Drawing fundamentals series.
Study Hale's cranial units
Study Hale's cranial units. Copy them. Then, put the reference away and see if you can draw them from memory!


