Human Proportions – Cranial Units
This lesson has a premium version with extra content. Get it now!
351K views
lesson video
Human Proportions – Cranial Units
courseFigure Drawing FundamentalsFull course (57 lessons)
-20%
$120
$150
You save $30
assignments 17 submissions
@elkad
Hiya, here's my Hale's proportions exercises first image is using a reference and the second is from memory
LESSON NOTES
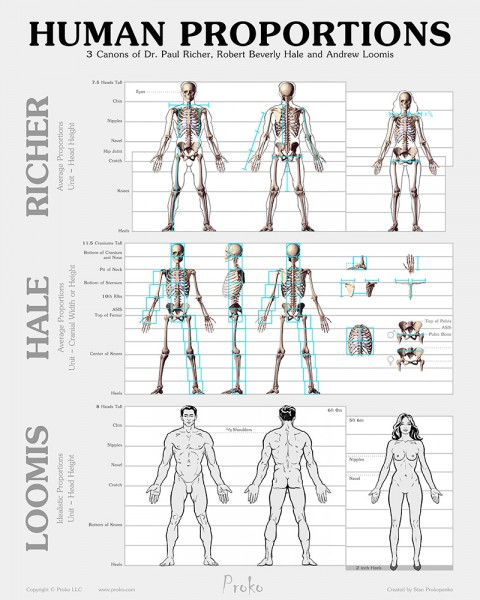
human figure proportions chart

This diagram is available for purchase as a Poster or a downloadable high resolution image in the premium section.

Buy this diagram as a Poster

In the last lesson we looked at Dr. Paul Richer's system of measuring human proportions based on the height of the head.

In this lesson we'll take a look at a different approach, based on the same proportions as Richer's, but uses a different unit for measuring. At first glance it seems like head height is the logical unit to measure from.

It's the most commonly used method and the one used by most canons throughout history. If Leonardo DaVinci used it, it must be the best way, right?

Well, that's up to each artist to decide, but although it's not as popular, Robert Beverly Hale's Cranial method definitely gives The Head Height method a run for its money.

Since no method is perfect, you choose which one works best for you.
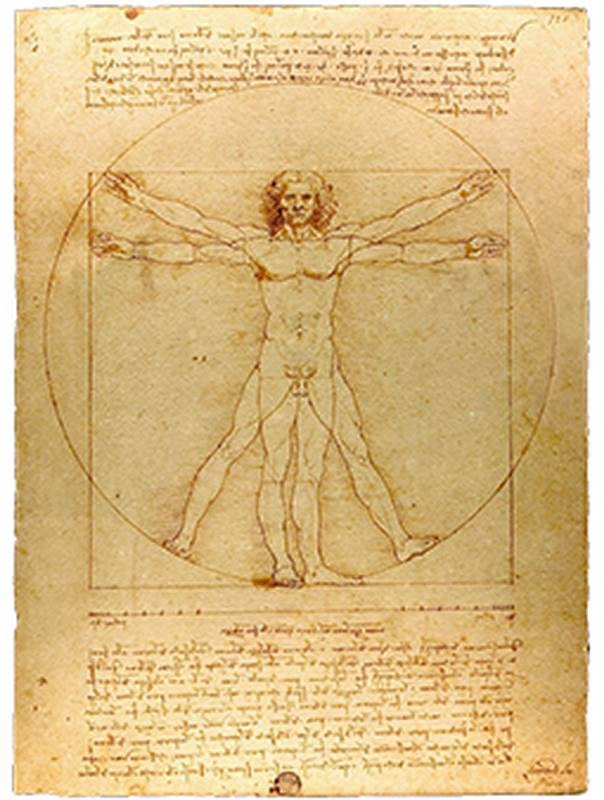
vitruvian man leonardo da vinci

Hale's method uses the size of the cranium as the unit. This method is used today by artist like Glenn Vilppu, Marshall Vandruff and Michael Mentler.

The advantage of this method is that many important skeletal landmarks correspond to this unit, unlike with the head method that aligns with nipples and navel as landmarks, which vary a lot more than skeletal landmarks. Also the size of the cranium can be measured from any head angle and doesn't change. However the length of the head changes as the jaw open and closes, or as the head is foreshortened. Hale's method seems to be more consistent and more reliable when drawing a person in a pose

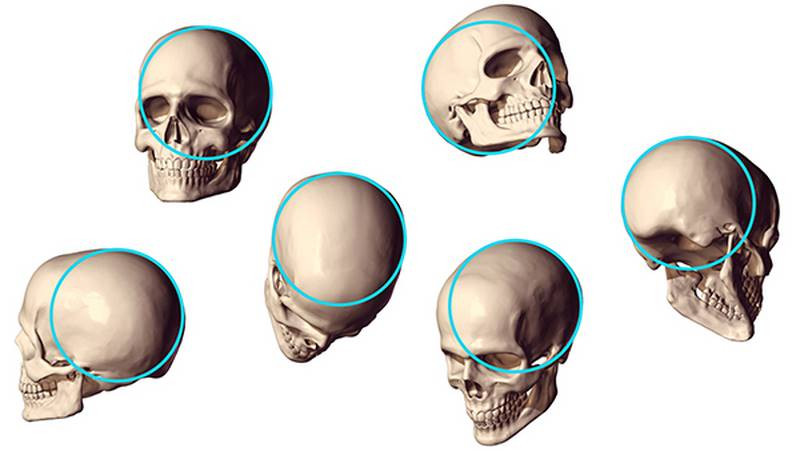
head unit can be measured at any angle

I asked Marshall Vandruff why he prefers it and this is what he said.
"I don't like the head-length system. It's great for straight-on studies like orthos, but it breaks down when you foreshorten anything, especially when you foreshorten the head. Unless you have a full-view of the head, you have no unit to begin. I'm big on Robert Beverly Hale's head-width system for a number of reasons, one is that you can find that five-eyed-ball when the head is in any position - it makes a sphere at back of the cranium, and a sphere never foreshortens. This is a useful system - a consistent measurement that echoes through the body and isn't dependent on seeing the height of the head. If you can draw a ball, you can look at a head and deduce it, then bounce the ball all through the figure." Marshall Vandruff

The Details

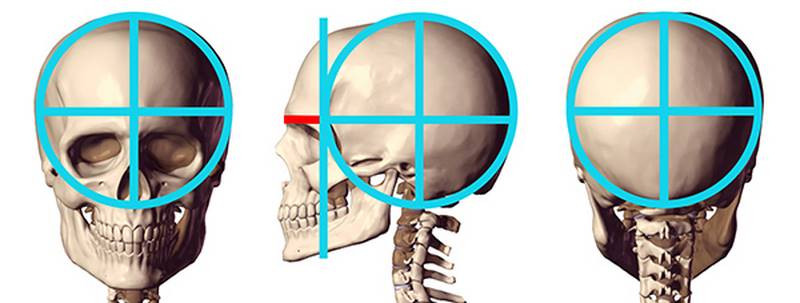
The unit itself can be measured from the back view by taking the width or height of the cranium. From the front you can use the width or the height down to the bottom of the nose. But, keep in mind that the bottom of the nose will only align with the cranium if the head isn't facing up or down. So, the width is more reliable from the front. From the side you should use the height of the cranium, since the width is too long. An additional quarter of a unit is added on to the front. This cranial unit can be measured with the width or height from any angle even when the head is foreshortened because the shape of a ball isn't affected by foreshortening. A ball is a ball from any angle.

measuring units from the side back front

So, we'll take this cranial size and think of it as a box unit. We'll use this box to find 3-dimensional placement of the landmarks on the skeleton.

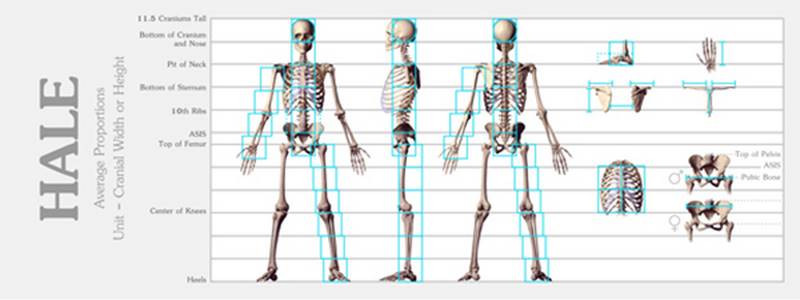
One unit down brings you to the pit of the neck. For the torso let's use a width of two units. The sternum is one unit long not including the xiphoid process. One more down to the corners of the ribcage at the 10th ribs. So, notice how the width the rib cage doesn't quite reach the edges of this 2x2 box. And the top plane of the rib cage, indicated by the oval of the first rib, faces towards the front as you can see from this side view. So, the back of the ribcage is up higher than this 2x2 box.

proportions diagram robert beverly hale

The length of each clavicle is 1 unit. Keep in mind that these units are slightly separated because of the gap at the pit of the n

In the back, the width and height of the scapulas fit into the box. In a relaxed position the distance between the scapulas near the bottom is also 1 unit.
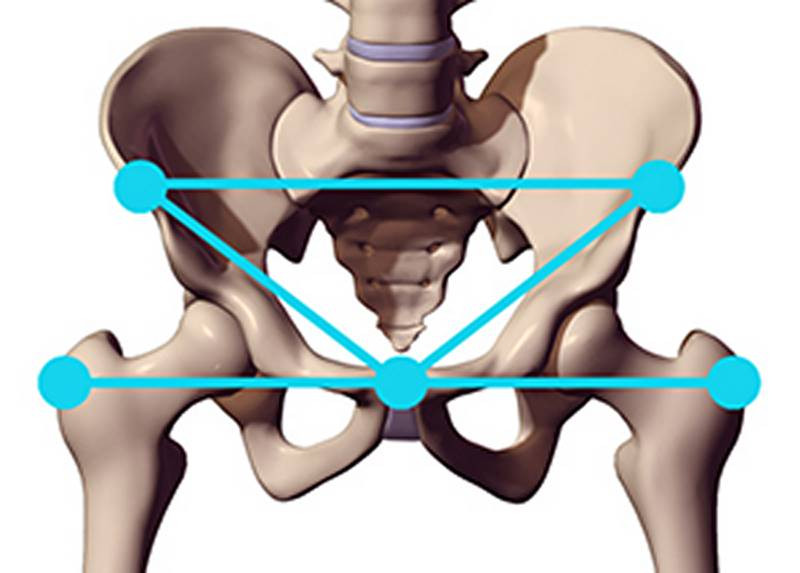
width of the pelvis is equal to the ribcage
One more unit down takes us to the corners of the pelvis, known as the ASIS. And one more down just past the bottom of the pelvis. On a male, the distance between the greater trochanters is two units. The width of the pelvis is equal to the ribcage. The 10 rib and ASIS points also line up. On a female the width of the Pelvis is 2 units and it no longer aligns with the rib cage. The distance between the greater trochanters is wider too.

On the pelvis there are also some convenient alignments using half units. The top of the iliac crest is at the halfway mark of this box and the top of the pubic bone and greater trochanters is at the halfway mark here. So, when drawing the front of the pelvis, look for these 5 points and remember their distances.

From the side, the pit of the neck and the ribcage align with the edges. Then the sternum comes out forward and the cartilage continues to come forward past the sternum about half a unit. The depth of the pelvis is conveniently 1 unit.

We've already found the placement of the greater trochanters relative to the pelvis. 3 units down ends at the connection of the bottom of the femur and top of the tibia. Another 3 units to the heels.
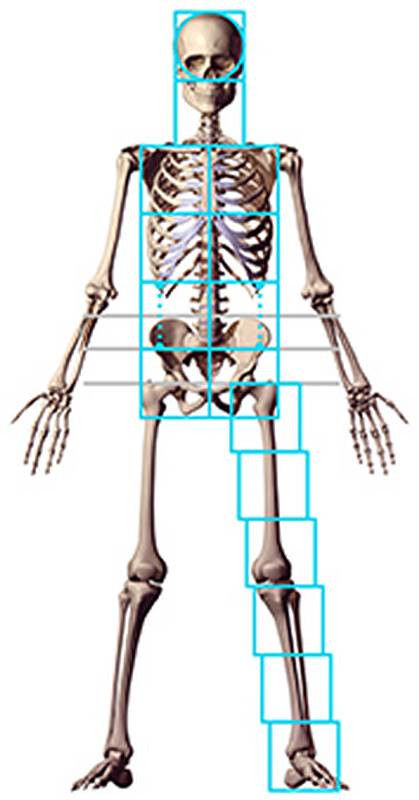
measuring units down the arms and legs

The foot from the side is 1.5 units long and half a unit tall.

Finally the arms. The length of the humerus is 2 units. And from the elbow to the knuckles of the hand is another 2 units. The hand itself is a bit longer than 1 unit.

That's it! Since this system uses a 3-dimensional box for measuring, one of its advantages is that it's manageable when something is foreshortened, as long as you are capable of drawing a box in perspective. If not, then you might need to go back to the structure lesson and practice that again.

So, for example with this foreshortened leg. We know from the top of the greater trochanter to the bottom of the femur is 3 boxes long.

So, if we can draw these 3 boxes in perspective, we can then fit the leg into those boxes.
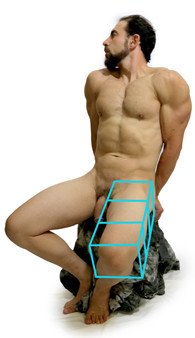
3 units of measurements

Conclusion

Ok, so we've explored 3 different systems of human proportions. Like I said, these work really well in neutral poses and as a general guide when you're drawing from your imagination. Sometimes it can come in handy when drawing from a model. But, when you're drawing from a model or photo reference, measuring is much more practical. So, in the next lesson I'll show you how to lay-in your drawing using various measuring techniques.

"You are an artist now, you must make your own decisions. Do you prefer the proportions of Rubens or Michelangelo? Or would you like to leave the ball of the abdomen out altogether, like Henry Moore?" Robert Beverly Hale

I hope you've enjoyed exploring these two systems for measuring human proportions. The premium section has a third system of proportions based on Loomis's idealized 8 Heads tall figure. These proportions are widely used in fine art and illustration. Check out that video and other premium videos from the Figure Drawing fundamentals series.

DOWNLOADS
mp4
human-proportions-hale-premium-720p.mp4
44 MB
txt
Proportions_Hale_Premium_Transcript.txt
7 kB
jpeg
Proportions-Diagram-300dpi.jpg
5 MB
ASSIGNMENTS

Study Hale's cranial units

Study Hale's cranial units. Copy them. Then, put the reference away and see if you can draw them from memory!

Newest
@romero505
3mo
I want to share my progress with you. I've tried to be precise with the gesture and the structure.
Tommy Pinedo
After studying these 3 methods, I honestly prefer the Hale method. Here are some of my notes I did while studying these proportions. I have a better idea how to construct the mannequin now so I hope my proportions in my next practices come out better lol.
Tommy Pinedo
Also very rough sketch of a person lol.
Paco Boi
1yr
I did a study of hale's method and I'm not sure if I'm doing it correctly or not. Some critiques would be appreciated 🙏
May Berry
1yr
Filippo Galli
Billy Morris
Left reference. Right Imagination.
hArtMann
2yr
Left is from reference and right from imagination. Struggled quite a bit with the side view pelvis from imagination but managed to simplify it.
Jesper Axelsson
Cool! - I might have made the humerus a little thicker. Cheers!
Samuel Sanjaya
This is my study of Hale's Method. I find it easier than the Richer for certain pose. But when drawing sometimes I like to mix them, since Richer's Method is faster for certain poses. I hope i can get some insight on where and when a certain method is best used.
Vera
3yr
Hello everyone. Here are my drawings. I copied the proportions and then I tried to draw them without the reference. Advice and critiques are appreciated.
Jesper Axelsson
Nice work! It's good to take the time to analyze the proportions. Now comes the difficult part of applying it in your figurative work XD. You'll constantly be working on proportions :) It's one thing to have memorized them, and another to get them right in your drawings. You might forget them every now and then, so you'll be refering back to the proportion chart. - I've heard that when the old masters talked about proportion, they didn't only talk about proportions, but also about symmetry. Proportion AND symmetry. This could be something to be aware of when you draw. It's difficult to get right, and I have a lot of practicing to do there, but if you look carefully at your drawings, you'll notice that the arms aren't perfect mirror images of themselves. The skeleton isn't symmetrical. To help with getting the symmetry right, it helps to draw a vertical line, cutting through the center of the skeleton; a symmetry line. By comparing the distances to the centerline you can assure symmetry. This vertical line will also help keep allignments in check, and with making sure that the figure is standing straight. In the drawing to the left of image one, the ribcage and pelvis don't line up, suggesting a crooked spine. This is getting picky, but focusing on accuracy has it's place. You might want to practice trying to draw a perfectly vertical line on a page. Do your best guess, compare with the edges of the paper, which you consider to be perfect verticals. Then measure the distance of the ends of line to the paper edge. If the measurements aren't the same, the line isn't vertical. Make adjustments. Also, place the ruler against the line to see if the line is straight. I've found it benficial to do the same with a horizontal line. Try to get these two to run through the center of the page (forming a plus +), and you'll get some extra practice in dividing things in halves (check if it's a true split by measuring with a ruler.) As you do this exercise, you'll find what your tendencies are. If I try to split a vertical distance in half, for example, I tend to make the lower part longer than the upper. This is probably the reason why I make the legs too long in my figure drawings. When doing figure drawings, one thing that could help with getting the symmetry is to draw the corresponding parts together. So for example, when you've drawn the right upper arm, you go to the left upper arm, trying to make sure they're the same length in space. I hope this helps :)
@kotka
3yr
Hale is my favorite for obvious reasons, but it was extremely difficult to produce an accurate meat and muscle overlay. I haven't started on the anatomy course yet, so I guess it will become easier to see once I start. The hand, and knuckles specifically, are not very obvious to relate to the skull. I have tried matching the wrist to the greater trochanter, but the hands always feel oversized.
Jesper Axelsson
Nice! - Your circles are a bit off. I think I would recommend drawing spheres as a warm-up for a short time. Check their accuaracy with a compass or a ruler. Also try fitting them into squares, that you might divide into 4ths or with diagonals. After having done this a little, your awareness of circle and square accuracy will have improved. You tend to make the circles too wide, and this error spreads into the rest of the figure. Improving the accuracy of your circles and boxes will improve proportions overall in your drawings. In my drawings I tend to make the legs too long. When I've done the exercise of trying to split a distance in half (I draw a vertical line, then decide on a top and bottom, then mark halfway), I've noticed that I tend to put the halfway mark too high. Working on this has improved the leg proportions in my drawings. Hope this helps :)
@elkad
3yr
Hiya, here's my Hale's proportions exercises first image is using a reference and the second is from memory
@nongthimay31797
mine are not so accurate but i still upload
@opaqueapple
Hi everyone, I finished some Beverly Hale cranial unit studies, any critiques would be much appreciated. The final 3 are from recalling. Have a good week everyone!
Alexis Saldivar
These are a little hard to see but they're fairly decent. Watch your proportions. On some of them I notice stuff like the rib cage being too large or the femur being to short.
@fooze
4yr
Hey everyone. here is my copy and from memory drawing of robert bevery hale's cranial units. Feedback will be greatly appreciated!
Sandra Süsser
I never heard of Hale before, yet this method of proportion has quickly become my favorite. Unfortunately though, the cranium doesn’t match up with Loomis method, so I try to combine these two in my own way since I really like the portrait method by Loomis and don’t want to give it up.
@hiflow
4yr
I think I prefer this method over the other one
@willyjohn
4yr
Here is my submission for this assignment. Any and all feedback is appreciated.
Jesper Axelsson
Nice! - Remember that a cranial unit is a sphere. You seem to have given it an ovoid form. Cheers!
CHARLES DEIGHAN
Here's my assignment for Hale's proportions, cranial units. I put these in my sketch Book just for reference.
@omarg
5yr
Robert Beverly Hale human proportions drawn from memory.
Help!
Browse the FAQs or our more detailed Documentation. If you still need help or to contact us for any reason, drop us a line and we’ll get back to you as soon as possible!