


In the last episode, I explained gesture and now I'll show you examples of how to apply it. If you haven't watched the gesture introduction video yet, stop reading and go watch it.
Let's take a look at some examples and find their gestures.
30 Second poses
A process
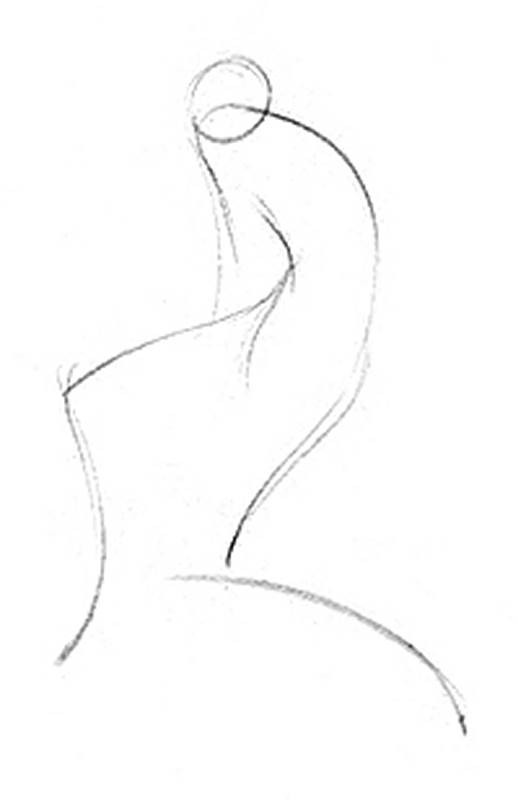
Usually I'll start with the head, but not always. If I'm in the mood to identify the torso first, I'll do that. There are no rules about this.
Then find the gesture of the neck, and the action line to the foot. Looking at the torso, the first thing I notice is that the left side is pinching and the right side is stretching. So, the shoulders will be slanted one way, and the hips the other way. This brings the points closer together on the left side, compressing the forms, and brings the points further away from each other on the right side, stretching the forms.
Find some rhythm lines for the legs... And the arms. That right there is the most simplified version of this pose. It's only a few lines but in 30 seconds it's enough to explain what the pose is doing.
A little longer?
You might feel like 30 seconds is just too quick. In that case there are two possibilities. Either you're brand new at this and you really DO need a little extra time.
You can try 45 seconds to a minute. Or you're really over thinking it. Looking at the contours too much will cause you to draw things that are not necessary to capture the motion and you end up running out of time.
Remember to draw what you feel, not what you see.

2 minute poses
Game Plan
Taking 10-15 seconds to just look and analyze the pose is not a waste of time. It allows you to create a game plan and use the 2 minutes you have wisely.
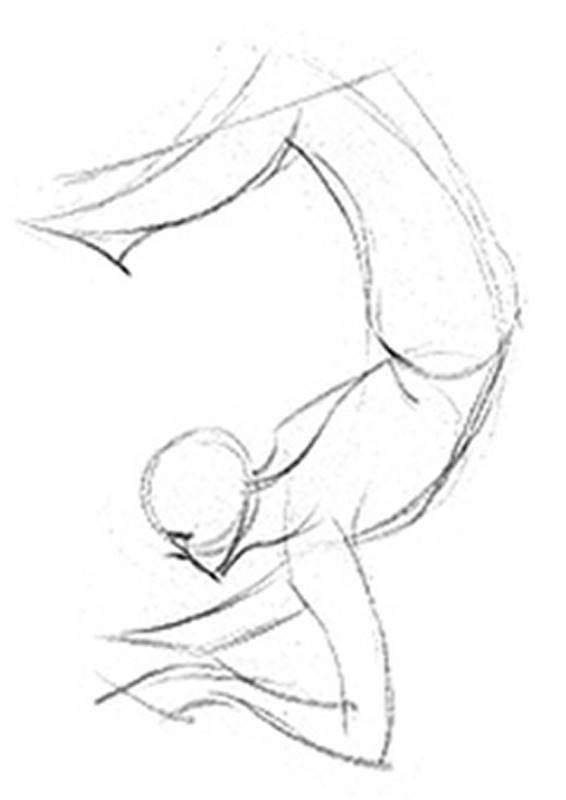
Ok, so again I'll start with a clean oval for the head and then attach the rhythm of the neck following the sternocleidomastoid muscle. Angle of the shoulders and rhythm of the torso using the centerline to determine that curve. From a front view ill start from the shoulder a drop a rhythm through the side of the ribcage to the pubic bone. Get the pinching on the right side and stretch on the left. Two c curves for the gesture of the leg from the front. Indicate the other side of the leg with somewhat parallel rhythm, considering the thickness of each part of the leg. Now I'll find the arm rhythms, remembering to look for the motion not the contour. And an upside down heart shape for the breasts.
For a head in profile, I'll start with a circle for the cranium, angle for the front of the face and jaw. Kind of like a simplified version of Loomis's method I went over in my portrait fundamentals series.
Get the rhythm of the neck and the shoulders. In the torso, I'm seeing a stretch on the left side of the back and a pinch on the right side.

As you get comfortable ignoring detail and seeing the big picture, you can move on to a slightly more structural approach. Now you are giving some love and thought to the forms.
Still not drawing any 3d forms but considering them in the design of the gesture. I'm staying true to the thickness of the form and any kind of tapering from thick to thin, such as from the hip to the knee.
Whereas before, in the 30 second drawings, I wasn't concerned about that at all. I was just drawing the motion.

Limbs as a Snake
If you tend to make your poses stiff, think of the torso and limbs as a snake. Forget about any bones, hard forms, rigid forms. Think of it as a fluid cylinder and try to see the motion. Find the C curves and S curves.
Draw Smart Not Fast
When you do these gesture drawings of 2-10 minutes, the point of the exercise is not to draw as fast as you can to draw as much as possible. If you draw as fast as you can you will have messy, bad lines and the more you do the exercise the more that will become a habit and eventually you're drawing ugly lines whether its timed or not. Instead of drawing fast, draw smart.

Simplify the figure down to whatever degree needed to draw it in the time you have. As the time decreases, just filter out the next least important thing to finish the drawing in the allotted time. With a 30 second or 1 minute pose you only have enough time to draw the most essential elements. But keep your lines clean and accurate.
Look for a rhythm from the arm all the way to the end of the fingers. Unless separating the hand to its own rhythm is essential for the body language, try to find a continuous flow.
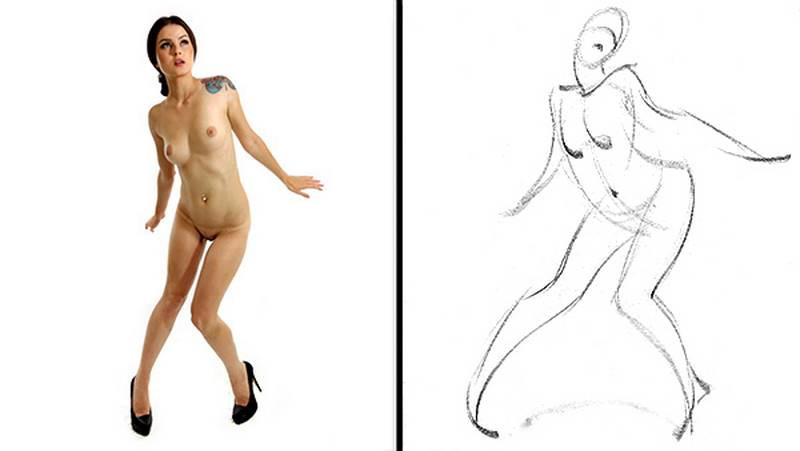
Starting with the head neck shoulders.. And then observing the C curve of the torso. The tendency for many people would be to draw the torso straight because it almost is.
The C curve is very subtle, but important to make her look relaxed. Making it too straight would make her feel tense and stiff.
Rhythm of the breasts
Curve over the breast around the pit of neck. Another from nipple to nipple and also under the breast curving up to show that they're wrapping over the rib cage. This is more important than showing the downward curves of each individual breast. These curves would go against the large form of the rib cage. They're important to show the forms of the individual breasts, but at this phase, focus on the bigger picture of identifying the pose. Anatomical detailed forms come later.
When it's not too important to show the breasts wrapping over the rib cage, like, when the ribcage is vertical, I like using an upside-down heart rhythm.

Again, Curve over the breast around the pit of neck and then under each breast. Make sure the heart is symmetrical and this V shape between the breasts lands on the centerline and follows the gesture.
I'll use a zig zag in the arm, giving the elbow a sharp corner. This will add more tension there, which is good because a lot of the weight of her body is being supported by that elbow. The other arm is relaxed, so I'll use a fluid S curve.
Curve the Shin
Curve the shin out at the tibia and then back in at the foot. It's very common to see a beginner draw this area straight and lose the elegant gesture of the shin to the foot. Make sure to think about this motion as you draw the contour. Or a better way of saying it, think of the motion as you “design” the contours. Because when you're designing something, you're changing it with a purpose.

Exaggerate
Get used to being able to exaggerate the gesture. Push the story to be more exciting and clearer to the viewer. I'll show you a pose where I'll push the gesture REALLY far. As far as I can without breaking it.
With this pose I'm gonna try to exaggerate the motion of the pelvis going back and to the right. So, I'll rotate the head to the right to follow this motion.
Consider the forms as you identify the gesture. When exaggerating you need to exaggerate thinking 3-dimensionally, not just 2d curves. Even though you're drawing 2d curves, you kinda have to curve them in a way that still makes sense 3-dimensionally.
Gesture is like the eyes of a portrait drawing. Eyes give the portrait its life and gesture gives the figure its life.
What's in the premium section?
If you want to see more detailed explanation, plenty of examples and more premium videos check out the Figure Drawing Fundamentals Course. In this free video I showed 7 examples poses. In the premium section I show 41 examples, with more tips on specific areas of figure gesture. That's over an hour of video with about 30 minutes of narration. And we're just at the beginning of the figure drawing series. In the premium section, I'll be posting student work and videos of me correcting those student drawings.
Get a bunch of figure photos and draw 10 to 20 of them every day. I promise you will improve. And rewatch this episode and the previous episode a few times. Remind yourself what you're trying to do. And listen for those things that I repeat several times. Don't copy, don't draw the contour, find the story etc.. Also, try drawing along. Enjoy the process, and realize that you're drawing! It's a treat to just sit down and draw for a while. If you're having fun and enjoying yourself, you'll learn better.


