How to Draw Arm Bones – Anatomy for Artists
This lesson has a premium version with extra content. Get it now!
331K views
lesson video
How to Draw Arm Bones – Anatomy for Artists
courseAnatomy of the Human BodySelected 3 parts (371 lessons)
-27%
$347.25
$477
You save $129.75
assignments 41 submissions
Nanna Skytte
This is some of my observational arm bones drawings i've just finished. I can't wait to do the assignments. I think it's awesome that we can give each other critique after each lesson. Please tell me if i'm posting this the wrong place :) -or just remove this post. ( - I'm just exploring and trying out. :) ) Please tell me what you think, and if I messed up.
LESSON NOTES

Pulling. Lifting. Fighting. Hugging. Arms do stuff… You want the anatomy mastery to draw them freely in any position and from any angle. Then your drawings will have more believable action and expressiveness. In this first lesson I’ll teach you the basic forms of the arm bones and how their joints work together for incredible mobility.

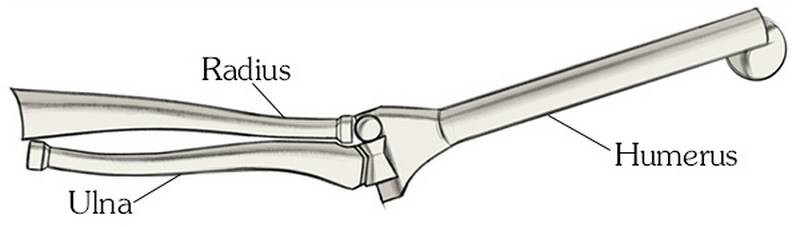
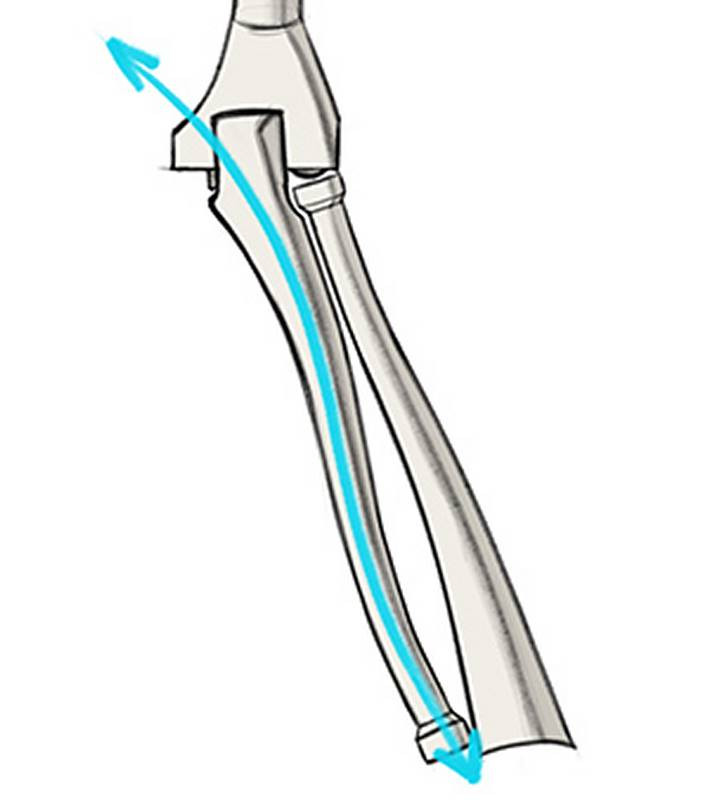
Skelly has three arm bones - the humerus, radius, and ulna. The arm is designed to allow the hand to twist. But it's not just the hand that twists. The motion is spread out through the whole forearm. When twisting, the radius bone rolls across the ulna bone. The ulna and humerus do not move.

arm bones radius ulna humerus

There's two words we should know for this arm-twisty-business. "Supination" and "pronation." Supination refers to the palm-up position when the radius and ulna run parallel to each other. When your arm is soup-inated, you can hold a bowl of soup. When your arm is pronated... You spill the soup and you have a pro-blem. During pronation, the radius crosses over the ulna at an angle, to bring the palm down.

With that in mind, let’s begin at the humerus.

Humerus

That's the bone of the upper arm. It's about the same length as your rib cage, that is, two cranial units long*. If a person is standing with their arms at rest, the elbow will line up with the bottom of the rib cage.

humerus cranial units example

Let’s look at the simple forms. The humerus is like a croquet mallet. Plus the head of the humerus, which is a sphere glued on at the top, on the side and slightly to the back. This sphere pops into the glenoid cavity of the shoulder girdle to make a ball & socket joint, which has the greatest range of motion of all the joint types.

At the bottom of the humerus, is a wide, triangular form. The ends of the triangle are called the epicondyles, which is really just a fancy word for "bump." "bump it!" They're subcutaneous, so they're easy to see at the back of elbow. Once you've found both of them, you can connect the dots to find the orientation of the arm. This is a super helpful trick when you're dealing with perspective of a body part that likes to move around. The medial epicondyle is larger and more obvious. The lateral epicondyle is closer to the center of the arm, but will still create a dimple when the arm is straight or protrude slightly when the elbow is bent. See if you can find them on your arm.

Between the epicondyles is a ball and a bowtie. The ball on the side connects with the radius bone. The bowtie fits into the ulna bone.

Ulna

So, the ulna bone. It's always gonna be on the medial side of the elbow. At the wrist, it will be either medial or lateral as the radius swings around it. But fear not! There's an easy trick to it. The ulna will always be on the same side as the pinky. In fact, that bump you've always had at your wrist. It's not a tumor. It's actually the tip of the ulna.

ulna-is-thicker-at-the-elbow-and-thinner-at-the-wrist

The ulna is thicker at the elbow and thinner at the wrist. This is the opposite of the radius. Together, they're like a puzzle. Also, the ulna has a slight S curve, which is subcutaneous the whole way down on the back of the forearm. It'll appear as a ridge or furrow on the surface. So, watch for that S curve rhythm when you're tracking the muscles.

s-curve-rhythm-of-the-bones
s-curve-rhythm-of-the-arm

Luckily for us, there's another superficial part of the ulna - the elbow. "Ulna" actually means "elbow." The fancy technical name for that bump on the elbow is olecranon.

This is a good landmark, and it pairs with the epicondyles perfectly. When the arm is straight, the epicondyles of the humerus and the olecranon line up horizontally.

When the arm bends, the olecranon lowers, and forms a triangle. Easy-to-see bony landmarks all working together.

Remember the bowtie-shaped bump on the front of the humerus? The ulna grips that guy like a wrench. The olecranon is the back of that wrench. This makes a hinge joint.

Finally, the wrist joint… or rather, the lack of a wrist joint. There’s a big gap between the ulna and wrist bones. This gap actually allows for more hand movement. Try it. You can adduct your hand out pinky-side maybe 50 degrees or so. But the radiocarpal joint is much tighter, so you can only abduct on the thumb side about 20 degrees.

Radius

That’s the guy that swings around the ulna to pronate or supinate the arm. It’s always lateral at the elbow, and always thumb-side at the wrist.

The radius is cylindrical for most of its length, in its upper 2/3s or so. As it gets closer to the wrist, it becomes boxy. That's why you'll typically see artists simplify the wrist to a box. It's thinner at the elbow and wider at the wrist, which I hope by now you've figured out is the exact opposite of the ulna's design. It also explains their joints. The ulna is much wider at the elbow and it's the primary elbow joint. The radius is much wider at the wrist and it's the primary wrist joint.

radial-joints-arm-drawing-example

At the wrist, the radius forms a large ellipsoid joint. Its concave shape holds the hand in place.

In the next lesson, we'll learn about the bones of the hand! I hope this lesson was not only helpful but also a little funny. Wait, no. That's not it... Also a little... hilarious? A little...
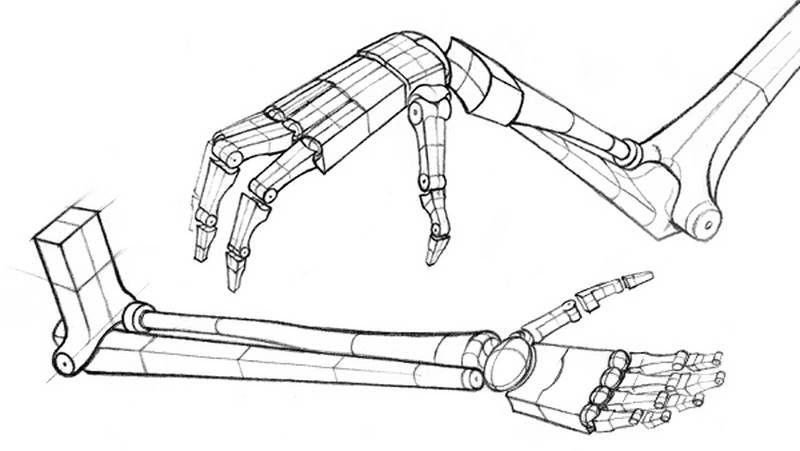
DOWNLOADS
txt
Drawing-the-Arm-Bones-Transcript-Premium.txt
7 kB
mp4
Bones-of-the-Arm-1080p.mp4
212 MB
zip
Arm-Bones-Assignment-Images.zip
3 MB
ASSIGNMENTS

Assignment

Your assignment is to do a tracing over model photos and find the simple forms of the humerus, radius, and ulna. Basically, you’re like a human x-ray machine. To figure out where the bones should go, look for clues from visible landmarks. Be sure to create an account so you can subscribe to the Proko newsletter so you can get a FREE model sample pack to follow along with this lesson.

Newest
Carlos Pérez
i struggle to control the digital line . supination and pronation seem understandable so far but when the radius twists… not so much
Lig ma
6mo
arm tracings for the arm bones assignment. Admittedly I did watch the answer videos before so yea. Critiques are appreciated
@robot0906
1yr
Here are my tracings. Feedback would be great.
Rachel Dawn Owens
Looking good! There’s a piece of the scapulae that you can actually see from the front. It’s something that surprised me when I first learned about it. Hope this helps! Keep up the anatomy tracings! You will learn so much.
Jonatan
1yr
Did a bunch of these, already went to the critique video but wanted to post them here cuz I feel it would be more likely to be seen here, I think I more or less got the right idea but the gesture of the ulna and radius itself is a bit confusing still, I hope I got them right or close in these, any critique is greatly appreciated!
Jonatan
1yr
Noticed I missed drawing the epicondyles in this photo, hopefully it's more correct now
Alejandro
1yr
Theese are my assigments for this lesson
Mark Manthorpe
A collection of arm bones. I think they went well. Tried to keep it simple, no elaborate shapes which use to show up on older arm bone studies.
Ezra
2yr
Found it difficult to find the bony landmark of the radius
Shannon Stone
The tracing assignments, along with some other studies from this module.
Samuel Sanjaya
I think i simplified some of this the wrong way, should have just sticked to cruquet mallet shape instead.
@palyo
2yr
Hi everyone ! These are my drawings for this lesson's assignment . It took far too long to complete because i couldn't understand well the form of the radius, especially the S curve, when doing both forearm motions, now i think i've figured it out but the form still isn't the best. Anyway , i would really appreciate any kind of critique/advice.
@palyo
2yr
I've made some minor adjustments to the drawings
Camellito
2yr
Hello everyone!! I made this drawing to better understand the bones of the arm.
Camellito
2yr
MORE ARMS!!! I had problems with some arms. I appreciate the criticism.
Camellito
2yr
finally at the arms!!!! Here are my assingments.
Madelyn Kuipers
Assignment 01 - Attempt 2 - Arm Bones Giving it another shot based on feedback and the example videos. Any feedback is welcome and appreciated!
Madelyn Kuipers
Assignment 01 - Arm Bones Getting back into anatomy, forgot how much problem solving is required! Any feedback is welcome and appreciated! Thanks!
@jamesofthejungle
For the number 5 arm, Stan outlines what that should look like in either the assignment videos or the submission critique video. The humerus needs to be longer.
Jesper Axelsson
Hi @Madelyn Kuipers, solid studies! You show a good understanding of the arm bones; they are correctly constucted for the most part. - In #1 you've place the radius medially at the humerus, when it should sit laterally - I would study the scapulae with the humerus. You tend to get the head of the humerus slightly misplaced. In #2 for example it's too high up, making the humerus too long. In #4 it should sit more laterally. One thing that has helped me has been to find the head of humerus, and acromion process on my own shoulder. - You get this right for the most part, but in image 4 you've attached the head of the humerus laterally to the shaft of the humerus. The head of the humerus should sit medially to and posterior to the shaft. - In #5 you've place the epicondyles of the humerus too high on the upper arm, making the humerus too short. I think it will help to identify these points on your own arm. It will increase your knowledge of their placement and it can also help you use your imagination to find them on the model. You could ask "where does it feel like I would have my epicondyles if I stood in the same position as the model?". Or you could imagine touching the reference. Since you've touched the epicondyles on you own arm, you can kinda guess where you would have felt them on the model. - In #4 I might extend the radius and ulna a bit longer. See paintover. Again, finding the bones on your own body helps. Hope this helps :)
Lenserd martell
@viny
3yr
I left this exercise with a headache, it's very difficult to know where the bones are when the arm is pronated, and the way you see them also changes if you're looking at them from above or below.
CC TV
3yr
CC TV
3yr
I can only draw on the computer with the mouse, so the effect is not very good. I feel these like these are some bad perspectives picture
Samuel Parker
Arm Bones Assignment
Margaret Langston
I did the arm bone assignment on my own first, trying to use the Skelly app and the bone models. I got completely lost in trying to draw BONES. Did it anyway. I then watched the SP examples, then did the SP examples along with him.
Margaret Langston
I did something super weird in example 3 :\
Help!
Browse the FAQs or our more detailed Documentation. If you still need help or to contact us for any reason, drop us a line and we’ll get back to you as soon as possible!