


Ron Kempke
Somewhere over the rainbow
I am not a monkey. This is my cousin's photo.


@awkodiak
added comment inProject - Learning to Sketch from Observation
1mo
Asked for help
I like this little guy! I made him a little fizzy in the face so it looks more like fur.

Ron Kempke
1mo
Nice attempt but have you tried superimposing your drawing over the reference image to see how your proportions differ from it? It's a very good way to train your eye to see more accurately, if that's one of your goals.
Show all replies (1)
Show 1 more replies


1mo
Asked for help
quick study of one of glen keane's ariel drawings!
1mo
Interesting how a slight change in head proportions completely changes the facial expression.
Show 1 more replies


1mo
Asked for help
2024/4/6. Good morning everybody. Here's my latest long drawing: "Girls Just Wanna Have Devilish Fun". Pencils (Hi-Uni, Faber Castell Pure Graphite 2900, Staedtler Mars Lumograph Black) on Kent Paper A3 size. Thanks for any comment or critique. Have a good day.
1mo
Fine example of a slick, photographic impression but I prefer an image that expresses more of the individual who drew it.
Show all replies (1)
Show 2 more replies


Asked for help
Managed to draw the level 1 hand suprisingly quick. Left in original lines of changed thumb which wasnt quite right.
1mo
Try building this pose using modified blocks to shift your focus from its contours to its solid forms.


1mo
Asked for help
I started with the simple toy like cars, going on to the monster truck (which I found challenging) and onto the tanks. I learned that I know little of tanks :) Also I doodled a couple of cars before I saw this project online. I guess it's a common thing to think of when you're working on boxes and cilinders!
For me, drawing the boxes for the tires first worked better than to start with the body of the vehicle. Still I thought it was tricky, especially to find the right size of a wheel on the 'backside' of the vehicle. Also, many lines everywhere. It was hard to keep my lines clean, I certainly felt the urge to scribble. Quite a challenge this one!
1mo
Paying closer attention to the correct roundness/skinniness of your ellipses will make a great improvement.
Show all replies (4)
Show 1 more replies


4mo
Oh, g-dddd. Please, someone help! I know that there is 2-pt perspective in this very rough drawing. This is an alt-2 for our kitchen renovation. Showing an existing wall on the right, with extra cabinetry in the event we cannot take the wall down (X-ray.) I drew and redrew the corners of the cabinet several times because I got very confused by the perspective. .
1mo
Indicating your horizon line (your eye level) will show you where your vanishing points should be.
Show all replies (1)


2mo
Hi guys, one point perspective was easy :) Could someone explain me pleas why books I drew doesn't look like it's laying flat on each other? I thought as long as vertical axis is perpendicular to horizon it should look like it's flat on one another but apparently it's not enough. And how to figure out correct second vanishing point for the desk in my drawing after all?
1mo
The near corner of the desk is too far below your tilted horizon line. Right angles should not appear as acute angles, as does your desk corner. Your books are drawn correctly but the pile looks like it would fall over because your horizon line is tilted. Rotate the paper to make your horizon line horizontal and notice the improvement.


Excuse me Mr. Teacher .. didn't you tell us to make it in 3 point perspective? Also ... why do I feel like the proportions of your boxes are a bit ... wonky? ^^
1mo
It may be because you haven't drawn enough squares in perspective to have internalized their appearance from any angle. My suggestion would be to cut a square out of cardboard and inscribe a circle on it. Set it up at various angles and distances from yourself and draw it many, many times until you can draw it accurately without looking at it.
Show all replies (1)
Show 6 more replies
2mo
Asked for help
MY one and only attempt (very busy with work this week).
Based the SUV around the boxiest vehicle I know. The Honda Element. The spare tie on the back and the moon sink are part of an optional package :)
I am REALLY having trouble constructing a cube or even a rectangle with a single squared faced in 3D. I tried to look at cubes in real life and even did some print out of a transparent 3D cube out of blender and tried to practice, but it didn't seem to help. Given that making a square for the wheel to sit in KIND OF essential for this project, advise would be appreciated.
2mo
Cut a square out of cardboard and draw it from all angles. Then inscribe a circle on the square and draw the combination square/circle from all angles. It takes lots of practice drawing it before you can visualize it without a model.
Show 1 more replies

2mo
Asked for help
Having a lot of trouble seeing the proper tilt for the ellipse as well as extruding it into a 3d cylinder. And it shows, even with this highly simplified drawing.
Show 1 more replies

2mo
Asked for help
Level 1 - old race car ‘inspired by’ Maserati 250F. Level 2 - a made up tracked vehicle that puts out fires instead of starting them (echoing @Johannes Schiehsl re tanks!) inspired by Antarctic tracked vehicle.
2mo
Most of the ellipses on the crawler are misaligned with their axles. Just remember that an ellipse's long axis must be perpendicular to the axle. A perpendicular to most of these long axes points up to the left instead of aligning with the axles. Rotating these ellipses slightly counter-clockwise will properly align them with their axles.
Show all replies (1)
Show 3 more replies


2mo
Asked for help
Hey guys. Here are 3 drawings. An F1 car (Go McLaren), a bulldozer, and a Sherman Tank. I had a hard time with the tank getting the wheels/ ellipses to feel right. I don’t know, the angulation of the axis felt weird and I had to re-sketch and erase a hundred times. I also started with 6 wheels but somehow ended up with 8 because the proportions felt better. Lots of fun little details though, probably went overboard. Fun assignment!
2mo
Placement angles of ellipses is not a problem if you remember that the ellipse's long axis is always perpendicular to the axle. Roundness decreases with distance from the viewer; the farther away they are, the skinnier they become. How skinny they are is a matter of judgement for now, but it can be determined by measuring-point construction, which Stan will probably introduce in a later lesson.
Show 3 more replies
2mo
Asked for help
Hi everyone, Couldn't figure out how to place tv perfectly in the middle of tv unit..
2mo
Here's how you can check the tv's location: Draw a horizontal, across the top of the cabinet, from the cabinet's center rail to intersect the bottom of the tv and extend a vertical up the tv screen from that intersection point. Use an "x" on the tv screen to locate the tv's center point. Does that center point fall on the extended vertical? If it does, the tv is centered on the cabinet. If it doesn't, move the tv either toward or away from its vanishing point until its center point does lie on that vertical.

2yr
Hello Stephen,
Great job. I just finished watching the entire series of real-time videos and I got a lot out of it. You gave lots of good ideas about technique and things to think about while creating a portrait like this. But... at the very last moment of the final video, there's a bit of a surprise.
In the image below, the left side shows how your drawing appears throughout the real-time videos. Then, on the right side, we see the final drawing in the "Thanks For Watching" screen and it is much darker with more contrast.
Can you please tell me which one, left or right, best represents the final image? I actually like both, but I'm about to try this portrait myself and I want to mimic your approach as much as I can. But now I'm not sure what my end-state is supposed to look like.
Thanks
Rich
Show 1 more replies
2D profiles are easy but the hard part is visualizing what happens to those 2D shapes in 3D. Can you show us that?
Show all replies (1)


1yr
Asked for help
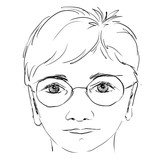
From page 70 of Drawing the head and hands by Andrew Loomis? Can you spot the mistakes?
1yr
I can understand you're wanting to produce a likeness but, by focusing on reproducing the features before you can demonstrate a clear understanding of the 3-dimensional form and structure of the head, you're guaranteeing yourself disappointment. Take it from one who's been there, done that.
Show all replies (1)
Show 2 more replies
1yr
After hearing Stan, I'm not sure this is the right course for me because I had hoped this course would provide exercises to help improve my observational accuracy. That doesn't seem to be Stan's objective and I suspect that AI is the motivating factor for his choice of topics.
Show all replies (3)
1yr
Bravo! We've been justifiably chastised. Maybe if we follow Stan's sage advice, we may actually see our drawing skills improve. What a novel idea!


One of my own hiking boots. Perspective of the toe seems a bit wonky, but to be fair, I have pretty small feet.
Show all replies (2)
Stan, you've clearly explained how we can use only 5 values (3 in the lights and 2 in the shadows) to indicate the form of a single object but, when we are faced with multiple objects that have different local values, how do we use those same 5 values to describe their forms if we want to show their local value differences?
Show all replies (1)