
$200
$250
You save $50


Bundle discount Each additional course part in your cart adds 3% off all courses, up to 15% off.
Full course
Learn how to bring your artwork alive with realistic light & shadow in this course by Dorian Iten.
$200
$250
Give a gift
Give a gift card for art students to use on anything in the Proko store.
Or gift this course:


Former program director at Barcelona Academy of Art. Passionate about teaching craft and exploring the inner game of art.
assignments 86 submissions


I would have preferred to do this traditionally but I had no printer and my Photoshop subscription just ran out. While doing the assignment, I felt that I was finished a lot of times but decided to stick with it, trying to exaggerate and improve even more on the AO placements and characteristics. Trying to see what more I could "show". This is a very educational exercise regardless of which method.
LESSON NOTES
Check out the "Assignments" tab to get the assignment details and share your work!
ASSIGNMENTS![]()
![@romero505]()
![]()
![@arminwidmann]()
![]()
![@samanthelle]()
![]()
![@arminwidmann]()
![]()
![Aubrey Hannah]()
![]()
![IcedOutVoltron]()
![]()
![Aubrey Hannah]()
![]()
![Morif]()
![]()
![Aubrey Hannah]()
![]()
![Maria Bygrove]()
![]()
![Dedee Anderson Ganda]()
Overview
Now it's time to take the Ambient Occlusion (AO) Study to the third dimension! In this project, you'll take an existing image and shade it again, using only soft ambient sky light.
Materials Needed
- One of the project images (see downloads section) or a reference image of your choice.
- You can do the occlusion study in any medium. Choose the medium you are most comfortable with.
Steps
- Select an image you love or download the project image.
- Either A) print the image or B) open it in your preferred digital painting application.
- Create an "ambient occlusion pass". This means you shade the subject as if it were lit only with ambient light, like an overcast sky. Shade your subject as if it were made of white plaster.
- Upload your study alongside the original image.
Duration
This project should take 1–3 hours to complete. Go for high quality.
Examples


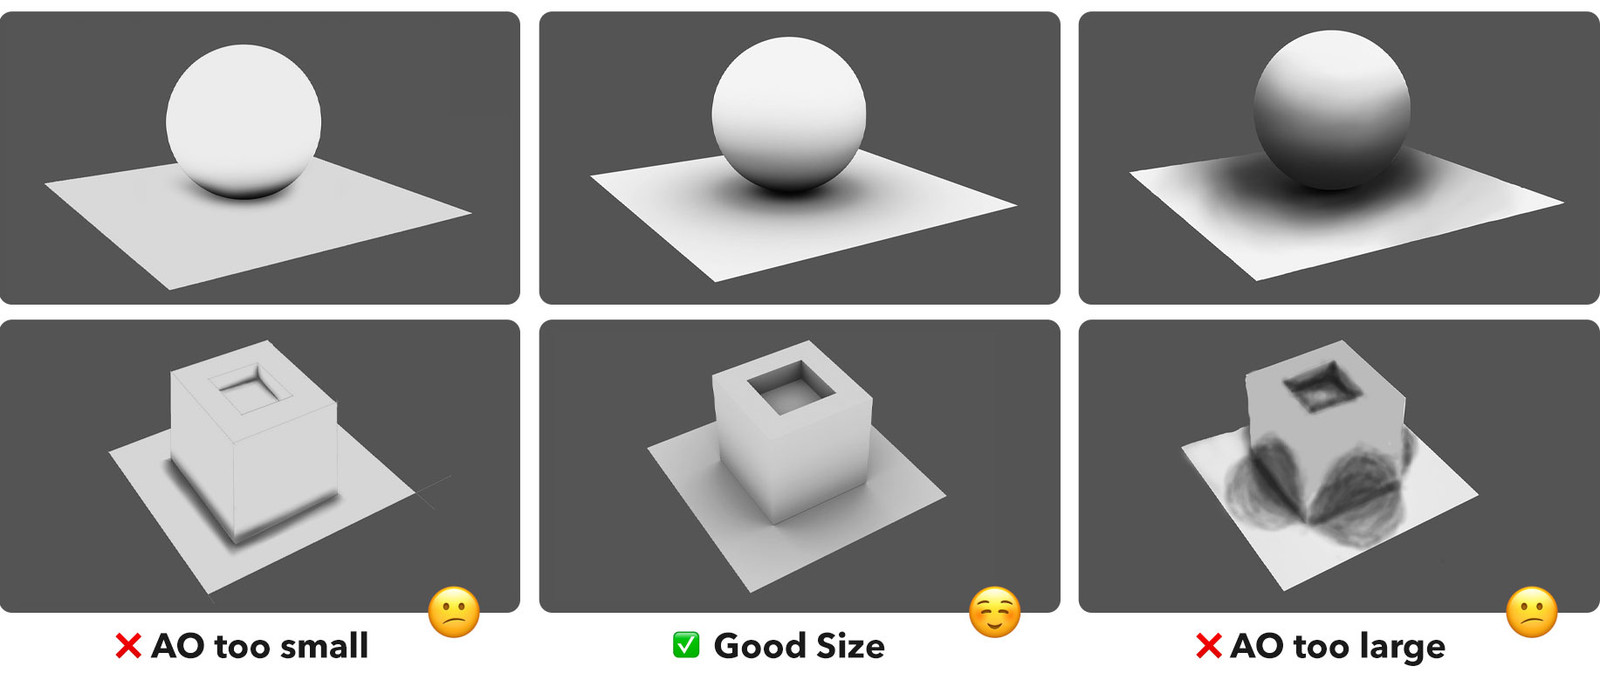
Common Mistakes
1) Making Ambient Occlusion too small or too big
2) Making Ambient Occlusion too light or too dark

Tips: Ambient Light vs. Key Light vs. Fill Light


PLEASE HELP.
Could someone give me some feedback and advice on how to improve ambient occlusion?
I would really appreciate it.
How many values should be used for ambient occlusion?


difficult assignment: ambient occlusion: AO study 2 and 3. i chose the disney animal as an own object - thinking about it i guess i did too much shading rather than actually only focussing on the ambient occlusion....drwing the fisch took very long . espicially at the fins I wasn´t really shure if I see the ambient occlusion right. I would be happy about any replys andyour own experiences. Please Dorian give feed back.


First attempt and second one (analyzing other students´ submissions). I still think it looks a bit muddy.
To me the second assignment looks quite "good" - but I myself am still fishing in the pond and trying to figure out things...my understanding is - that ambient occlusion occurs on a "cloudy day" . light hits the object. the light rays reflect from the object to bsp. the ground or a surface on the object and back to the objec again...occuring only where there ist possible shadow. where the fish is cut through can there be so much ambient occlusion?????? (on top and sides of the fish I mean) - (this would be interesting how dorian would answer these thoughts)


This was certainly more challenging for me than the previous assignment. It took me a good while to understand which areas had occlusion because of how complicated the shape of the model was. I think my weakest point in shading thus far is my ability to shade smoothly. Quite often the graphite I use in my values seems to come out rough. I seem to be correct in my assumption that shading is a slow and methodical exercise.


Yours looks pretty good to me, especially on the Lego minifig. The fish was definitely difficult for me too. I'd say, maybe make the occlusion on the bottom of the fish smaller? Or just add some lighter tone in the outer areas.


This was definitely a challenging assignment for me too. It looks like you tried too hard to shade every area. Try to remember some of what you learned about ambient occlusion in previous videos and only shade parts that you're confident have occlusion.

I find it sometimes difficult distinguishing between Ambient Occlusion and Form Shadow but it was a fun exercise :)


Fiuhh, its harder than I thought.
At first its real slow and I'm afraid of messing up.
On the third attempt, I start to brush faster and in more confidence

