


Drawing the Spine
Last time you learned about the anatomy of the spine. In this lesson you will learn how to draw the spine in motion along with 3 assignments to practice drawing the spine.
We’re going to draw the spine as a simple cylindrical shape. This will help us focus on the motion of the spine rather than trying to render the details. Rendering the details of the spine will help you get better at rendering, but that’s not the priority of this lesson. Let’s stick to learning the mechanics of the spine. That will be much more beneficial to your understanding of the human body and how to draw it. It will help you invent poses from your imagination.

Proportions of the Spine
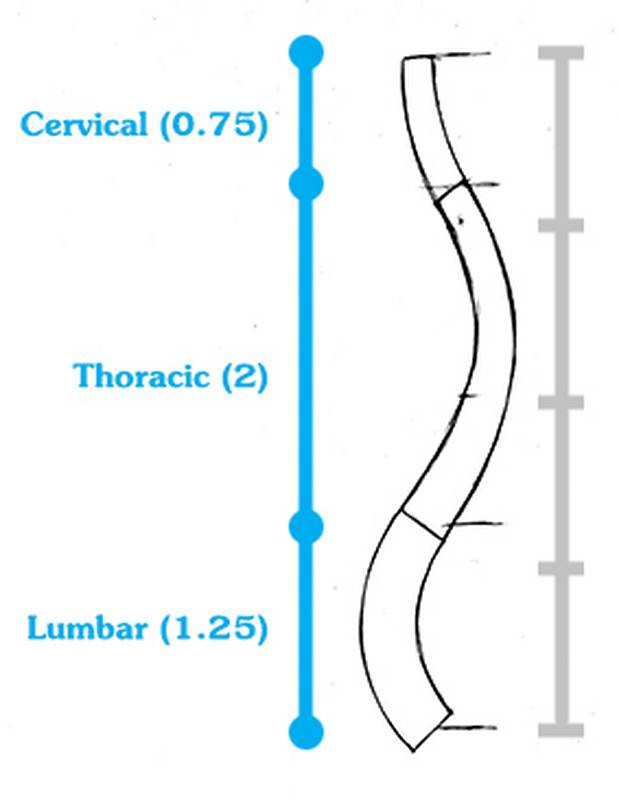
Before we get into posing the spine we need to learn the proportions. So, let’s start with a drawing of the side view. I measure out 4 equal units.
The Lumbar section is 1 ¼ units.
The Cervical section is ¾ of a unit.
And that leaves 2 units for the Thoracic section.
I know that’s kind of technical, so you can remember that the cervical is a bit less than 1 unit, lumbar is a bit more than 1 unit and thoracic is exactly 2 units. Everybody’s individual proportions will vary a bit anyway.
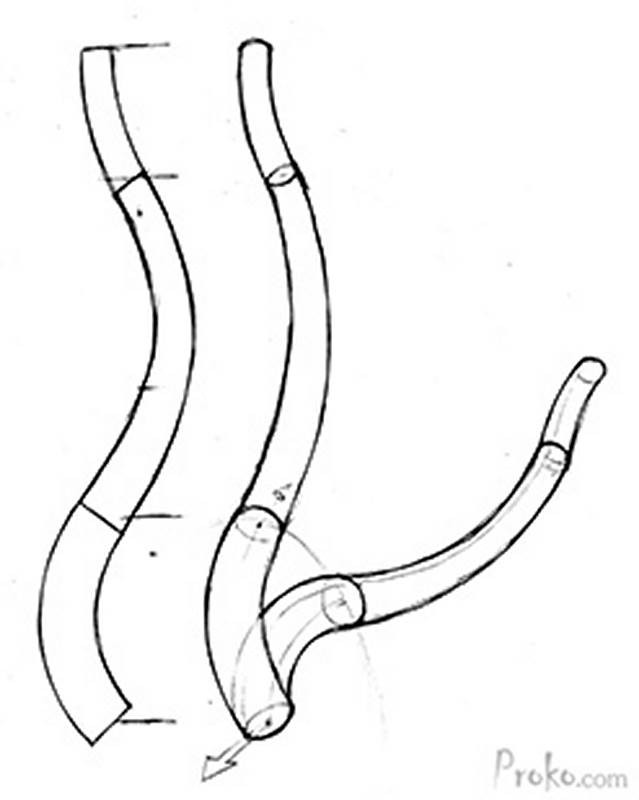
A thick curvy cylinder for the lumbar section. This section is not tilted forward or back in the neutral position. The top and bottom will be aligned vertically with a forward curve between. Now, of course this is only in the neutral position. When the spine moves, they won’t be aligned vertically.
The thoracic section however is tilted backward. So, the top will be farther back than the bottom, resulting in the backward lean of the ribcage. And again, this is for the neutral position. The thickness of the cylinder will get thinner as we get closer to the top.
Finally the cervical section. It’s the thinnest and straightest of the sections.
If you really want to challenge yourself, draw the spine in various positions. This is really helpful to imagine the spine moving in space. If you don’t have experience with perspective this will be a challenge. But it’s a good challenge. Keep that in mind and do your best. If you struggle with it, the best way to improve is to keep working at it.
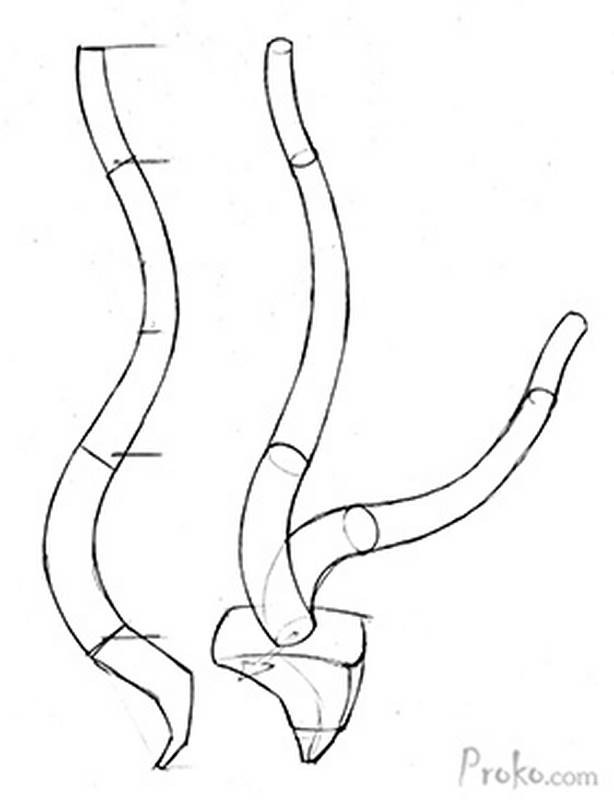
Now, let’s add a sacrum to these spines. The height of the sacrum is about ¾ of the Lumbar section. The bottom is farther back than the top. The sacrum is very curvy. It starts thicker at the top and thin at the tailbone.
The 3 major masses


One of the most important things about the spine is that it moves the 3 major masses - The head, rib cage and pelvis. So, it makes sense to include the 3 masses while you practice drawing the spine.
In the next lessons, on the pelvis and rib cage, I’ll show you how to construct more descriptive volumes. For now you can just stick to a cylinder for the pelvis (which is narrower at the bottom) and an egg-like shape for the rib cage. Remember, the ribcage tilts backward and the pelvis tilts forward.
Let’s put a head on this guy. I’m a big fan of the Loomis Method, so I’ll put a Loomis head on there. If you don’t know what that is, check out my video called How to Draw the Head from Any Angle. And check out the Premium Anatomy Course for extended anatomy lessons and more examples of the assignments.
Exercise #1 - Draw Skelly
Download the 5 images of Skelly in various poses from the downlaods tab. The challenge here is to simplify the bones into the simple volumes that I just showed you. This will help you get familiar with the shapes and their relationships.
Exercise #2 - Trace Models
This is very much like the Anatomy Tracing assignment we did earlier in this course. Except this time, instead of analyzing the surface anatomy, we will be finding the skeletal structure underneath all the surface anatomy.
So, in Exercise 1 you got familiar with the shapes and relationships of the Spine and the 3 major masses. Now, with the real models, those shapes are not so obvious. You have to think a bit. Figure out where they are.
Exercise #3 - Draw Models
Very similar to Exercise 2, except this time we’re not tracing! You have to find the masses while keeping track of proportions and gesture. Do you remember those from the Figure Drawing course?
This exists under the surface of this. But can you see it? Well, probably not at first. It's not going to happen on your first try. You need to keep trying, keep searching for those masses and slowly your ability to see under the surface will improve.
If you like this lesson, share it with your friends, and if you want to be updated about new lessons create your free account to sign up for the Proko newsletter.
Assignment: Draw the Spine
There are 3 assignments. "Draw Skelly", "Trace Models" and "Draw Models". Go ahead and download the assignment images from the downlaod tab. Post your drawings in the anatomy discussions.
Check the Lesson Notes for instructions on the three assignments.
Once your finished continue on to the next lesson.


