


Hey guys, so I want to introduce you to an exercise that I really like doing, and it's something that's very important. And it's going to be in a lot of the assignments throughout this course, and that's tracings. We're going to be doing tracings over photographs, and the reason this is important is because it tests your knowledge of the muscles. If you don't know what the forms are that you're looking at, all those bumps and striations, then you don't know the anatomy of that area. So you need to go back and study it. So doing these tracings is really good to expose our weaknesses, and it's also just good practice of identifying the muscles and the bony landmarks and all the forms you're seeing on the surface.
So this is the example I'm going to show you of the exercise, and then in the description of this video I'm going to have a link where you can download a few more photographs. And your assignment for this week is to do the same thing that I'm going to show you here. Just do a tracing. You can do it in Photoshop, like I'm doing in this video, or you can actually print out the photo, put a piece of tracing paper over it, and just draw right on top of it. That's fine too. And if you want to post it online or get a critique of it, just scan it. But obviously the cleanest way is to just do it in Photoshop, add a layer on top of the photograph, and just draw right on top of it. So let's go ahead and get started.

I know I haven't taught you any anatomy yet, so for now, you'll have to rely on my examples or diagrams from books or online. Throughout this course you'll be doing these quick anatomy studies, and as the course progresses, you'll be getting more and more familiar with all the parts. Right now, I just want to introduce you to this exercise and have you try it, so you can document where you're starting from.
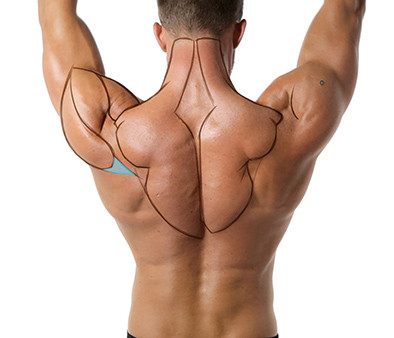
So you can see that I'm starting this one at the top with the trapezius muscle. It's a good one to start with in a back study because it's so large and usually easier to see the borders of the muscle. You can see pretty clearly on this guy the outline of the trapezius. Right in here, though, right by where it connects to the scapula, it gets a little confusing. The bumps kind of all just end in this general area. So right there where I was indicating the beginning of that line, that's the corner of the scapula, and that's kind of where things start to turn. So to the right of that that I just drew is the attachment of the first head of the trapezius, and then I'm doing it on the other side. And all of that just attaches along the spine of the scapula. And then as soon as it gets to about right here to the corner where the spine of the scapula meets that inside border, it takes a sudden turn, and that's where the muscles divide.

So right there, see that part? That's the border of the bottom head, and as soon as it reaches the scapula, you're going to have a tendon right there. That little line right there, that's a tendon. So that part is going to be flat. You're not going to see a bump of the muscle, so the muscle ends right there, right there, and then it continues and connects to the spine of the scapula on the bottom with a tendon. So that's why you're seeing a corner there. It's because there's no meaty part of the muscle. It's just tendon.

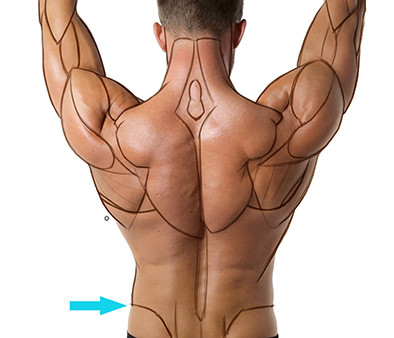
Okay, so moving on to the deltoid. The deltoid also attaches to that spine of the scapula. You can see the bottom portion points right at the tendon of the trapezius, and it swings around and goes all the way to the lateral side of the humerus and then swings back around to the front and attaches to the clavicle. So the deltoid actually has three heads to it as well. It's got the front, the lateral, and the back, so I like to identify the three heads when I'm outlining the borders. So that lateral head, you can see it attaches to the end of the spine of the scapula, and then the front and back heads, they extend a little bit further to attach to the clavicle and the scapula.

And same thing in here, see how after the bump, the meaty part of the deltoid, ends, there's still a tendon that extends to roughly about the same spot as where the tendon of the trapezius attached to. Okay, same thing on the other side, see right there? There's the tendon area, and it swings around to the front. There's a separation of the front and lateral head, and there's the ending of that meaty part at the beginning of the tendon. And right there I'm just indicating an edge for that spine of the scapula and just kind of creating a ridge where everything connects.
Now I'm moving on to the teres major and latissimus, which is really stretched out in this pose. He's lifting his arms, and it's stretching out the teres major all the way up there. So it's very thin, and also the scapula is rotated forward so you're not seeing all of it. So it's very subtle, but it's enough to still create this bump of the lat that goes over it. So you can see how on the bottom, then, there's an overlap. The lat swings in and under the trapezius to the spine. There I'm indicating the border of the scapula because that's where the teris major will connect, right on that bottom corner, some directional lines for the infraspinatus.
Okay, moving up here you got the seventh cervical vertebrae, and I'm seeing a few bumps there. So I'm actually seeing the seventh cervical and a very subtle indication of the first thoracic as well, and that's pretty common. Sometimes you'll see the two kind of merge together in one large bump, and the bump is so large that it's obviously not just one vertebrae. It's a grouping of them, but they're all softened out by all the stuff on top of it.
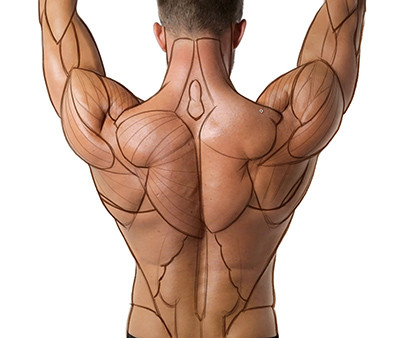
You got the ridge muscles of the arm and the brachialis right in front of that bicep, same thing on the other side. And then the tricep, and I'm actually seeing the lateral head and the long head of the tricep there with a tendon that connects to the elbow between the two. Okay, a little gap in there, that's where you got the spine, and then at the bottom, you can usually see the erector group. They're like two pipes in the lower back going down to the tailbone.
Okay, right there I found the iliac crest of the pelvis, and I found that because you can see where the oblique muscle on the side kind of comes to a corner at the bottom, and then it becomes a gluteus. So I knew that that little point was the iliac crest, and then I just extended the lats down to the crest more towards the middle. You can see the lat muscles, pretty large. It covers probably about half, maybe a little less than half of the back, but you can see things underneath it, like the erector group that I was talking about, the little pipe like muscles in the middle of the back. Those are underneath the sheet of the lat, but you can see the volume poke through because the meaty part of the muscle actually ends right where I'm drawing right now. And then after that it's just a thin tendinous sheet.
Okay, and then the erector group actually has this volume that comes out from the sides as well. Not seeing too much of that there, but I think I see a little indication of it. So I'm just adding it in.
I like to add some lines to describe the direction of the muscle fibers. It looks cool, just makes the drawing look a little bit better, and actually just shows that you know where the muscles attach and insert because if you just know the shape, well, it's going to hurt you when you start to shade in some of the half-tones or just become spots instead of just actual indication of fibers or... And also just knowing the direction of the fibers helps you to understand the muscle function. So I like to add that. You can also, instead of doing the fibers, you can try doing just cross-contours of the volume. So that's good too to show that you're understanding the actual volume. Is this a round shape, or is this more flat or more squarish? But for this one, I'm doing the muscle fiber direction. It also helps to show the volume, too. The cross-contour will definitely help with that, but the muscle fibers in a way are kind of a cross-contour. You're wrapping those lines around the volume, so you should show some curvature depending on which way that muscle wraps. If you're just doing straight lines everywhere, that's going to flatten it.
Okay, so now I'm going to be adding some white areas. I like to make it clear what's muscle and what's tendon or some kind of sheet. So I added another layer underneath the lines, the muscle lines that I drew, and above the photograph, so it's in between the two. And I just got a white color, and I'm just shading in those areas. This is bone of the scapula, and you can see it really helps to pop the muscles, too. So that's the spine right there, all the tendinous area from the trapezius and inside that. I was about to shade it, but then I remembered that's muscle underneath there. That's the rhomboids. And then give this one a direction, the tendon from the lat. And then just a little line, show the ridge, the border of the scapula, little ridge there for the iliac crest of the pelvis. And I'm just doing a little bit of cleanup work, make it look nicer. And right there is the tendon from the deltoid.
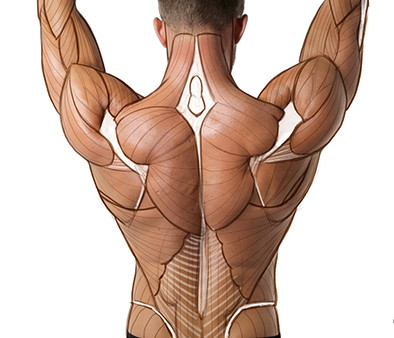
And that's how you do an anatomical tracing. Go ahead and download the images provide so you can do the assignment for this week.
And that's how you do an anatomical tracing. Go ahead and download the images provide so you can do the assignment for this week.
Assignment
Download the assignment images and do your own Anatomy Tracing.


