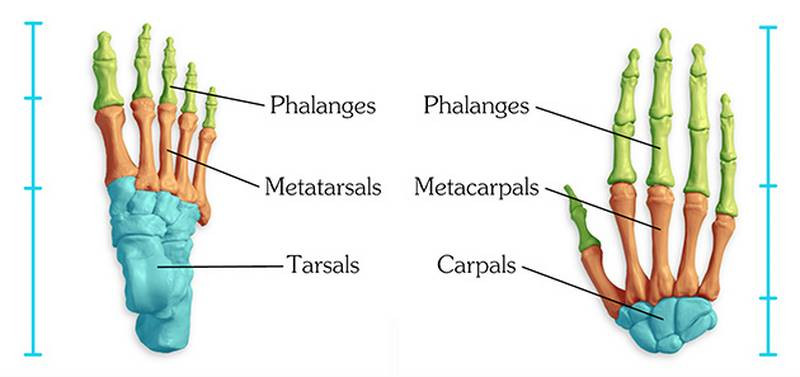
How to Draw Feet with Structure – Foot Bone Anatomy
This lesson has a premium version with extra content. Get it now!
226K views
lesson video
How to Draw Feet with Structure – Foot Bone Anatomy
courseAnatomy of the Human BodySelected 3 parts (371 lessons)
-27%
$347.25
$477
You save $129.75
assignments 24 submissions
Kianna Peppers
Took a year-long break so a bit rusty, but finally finished the foot bones!! Can't wait to move onto the leg muscles! - - - All previous and current assignments are available on my FB page here. Critiques are always welcome, thank you! https://www.facebook.com/saved/?list_id=4730838993696368&referrer=SAVE_DASHBOARD_NAVIGATION_PANEL
LESSON NOTES

Bones of the Foot

If you've been following my Anatomy for Artists course from the beginning, you've learned how to draw almost the whole skeleton. We've worked our way down the body, all the way to the foot bones.

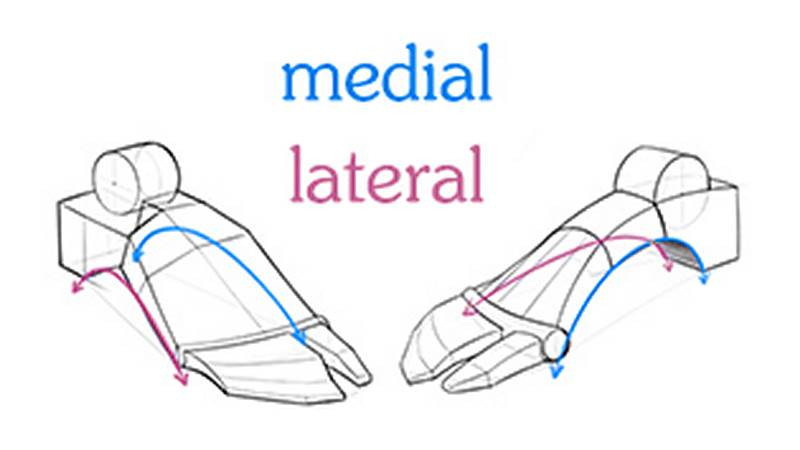
The foot is challenging to draw for a number of reasons. It's flexible - much more than you might think - and contorts itself into different forms for every pose. It's asymmetrical. You have to keep track of what's medial and what's lateral, which can be confusing if you don't have a way to simplify. Finally, the foot will, very often, be on the ground. That means you have to be confident about ground planes and perspective.

Fortunately, the bones are a great way to study the foot. Since the foot is so bony, knowing the inside anatomy directly helps you draw the outside surface. This lesson will focus on the overall design of the foot, and the form, proportion, and mobility of the individual bones.

medial lateral sides foot foot ground plane

Strong, Flexible, and Springy

The foot bones are a lot like the hand bones. Their distal sections have near-identical designs. But the proportions are very different. The hand's three sections are organized from small to large for maximum dexterity; the foot is organized from large to small for maximum stability. You'll notice a similar naming scheme too. Instead of carpals, the foot uses "T" like "Toes:" tarsals, metatarsals, and phalanges.
foot hand comparison
foot hand comparison labeled

There's another design difference as well. The foot is built with arches. This design allows the foot to bear the weight of the body. Have you ever tried to squeeze an egg? It's surprisingly difficult. The arches distribute the pressure and make it strong. It's why we use arches for doorways, bridges, and other structures that need to be strong. A foot's arches make it strong enough to bear the weight of the body.

Another benefit of this design is shock absorption. Your foot flattens when it hits the ground - it literally spreads out so it's wider and longer and flatter. When you lift it up again, it springs back to its tall arched form. That flexibility lets us adapt to uneven surfaces.

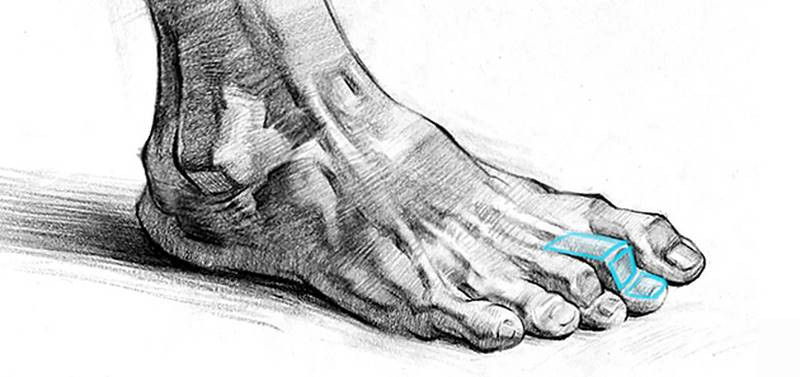
Artists can take advantage of the foot's flexibility, and even exaggerate it to show springy, tall, skipping feet; heavy, squashed standing feet; and even hyperextended toes digging into the ground as the foot pushes off. The zigzag pattern shows the tension.

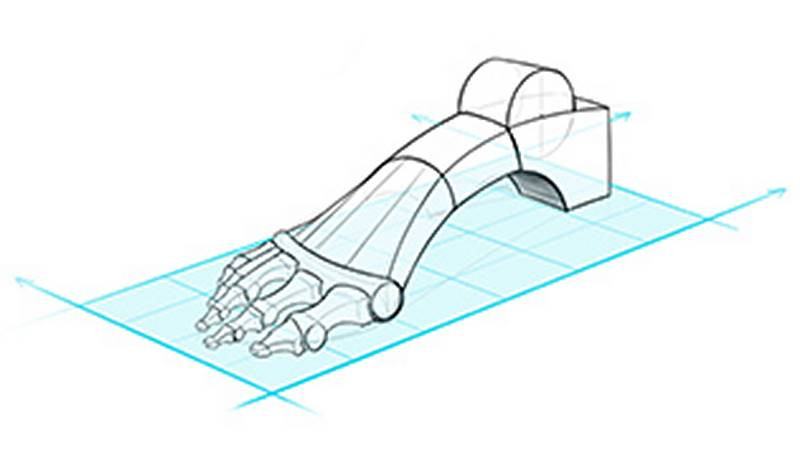
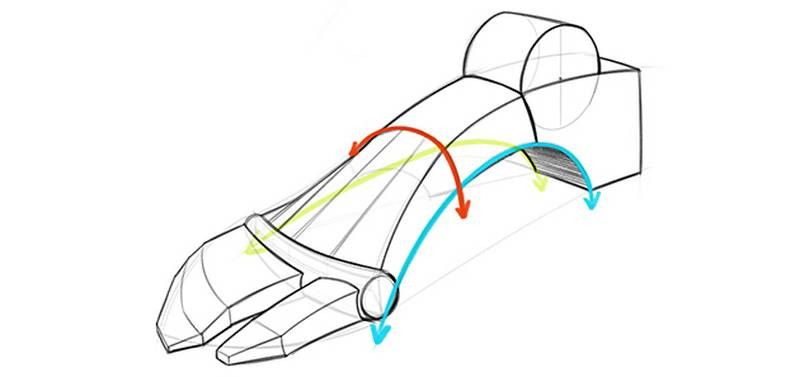
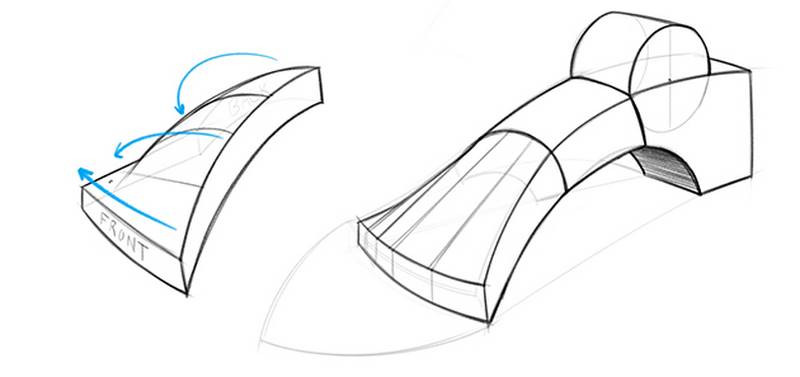
The form of the foot is made of 3 arches, but This 3-arch form of the foot is kinda complicated. So we need something simpler to start with. The height of the foot is about ⅓ the overall length. It's also about equal to the width of the foot. So, you can start with 3 equal boxes and you'll have a pretty good proportion guide. Within this container we can draw an elongated pyramid-like form with toes in the front and blocky heel in the back that extends past the ankle.

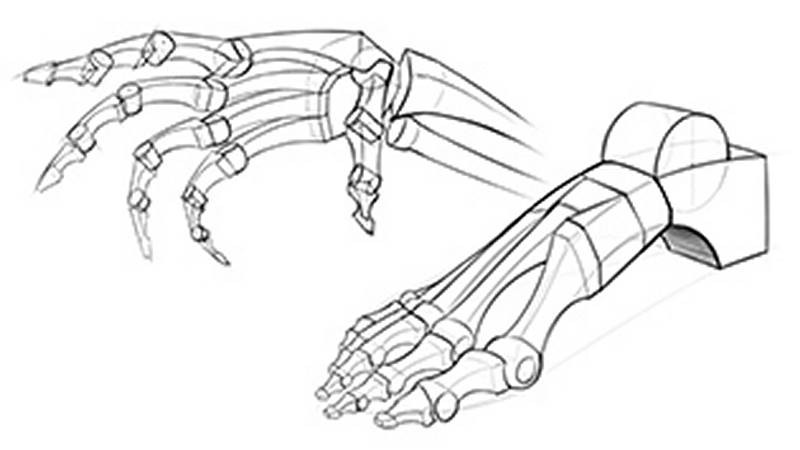
Then we can apply those 3 arches and some other stuff that makes the foot more real. But we went through that too quickly. To be able to simplify the foot like this, we need to dive in and first learn the complex forms that these simple forms represent.

 foot arches mailchimp

The Tarsals

The tarsals are the ankle bones, seven bones in two rows. They take up almost half the length of the foot. Even though they look like stacked bricks glued to each other, these bones are not static. The joints between the tarsals invert and evert, and flex and extend.

foot bones tarsals labeled
The calcaneus is the heel bone. It's a huge, blocky bone - the biggest bone of the foot. You can feel it on the back of your foot, below the Achilles tendon and above the soft padding of the heel. The calcaneus bears most of your weight, so it makes sense that it's offset towards the lateral edge of the foot, which is the flatter, more weight-bearing side of the foot.
The Calcaneus is on the lateral side of the foot for load bearing

On top of the calcaneus is the talus bone. It's a wheel that the tibia and fibula grab onto to form a hinge joint. This wheel shape makes it easy for the foot to bend up and down but difficult to rock side to side. That side to side motion happens at another joint - between the talus and calcaneus. It's a rather complicated structure. The calcaneus has 3 platforms for the talus and they meet with this S curve. And basically, they allow the foot to rock side to side.

The last bone in this row is the navicular. It's named after a boat because it has a boat-like shape. The concave plane of this boat is the socket to the ball-in-socket joint that it forms with the talus. The head of the talus is the ball. It's basically a buffer between the talus and the next row of bones. It plays along with inversion and eversion. When the head of the talus dips under the navicular towards the ground, the foot "pronates," or splays out, and the arch of the foot flattens.

navicular bump and boat shape

The important thing is the bump seen above. You can see it on the surface of the side of the foot, especially during inversion.

he second row of bones is easier. There's four bones here: three of them are named "cuneiform," and the last one is named "cuboid." They fit together with varying shapes. Let's look at them from the front. This is the transverse arch. It's designed like an old stone bridge to carry the weight of the body horizontally across the foot.. The inner two wedge in tightly between the outer two.

The transverse arch

And those are the tarsals. Let's review before moving on. The heel bone is a big block. Sitting on top of it is this wheel that's gripped by the wrench of the tibia and fibula. There's that boat shaped bone, and then the second row, the old stone bridge. Now let's move on to the next row.

Metatarsals

he metatarsals meet the tarsals with plane joints.

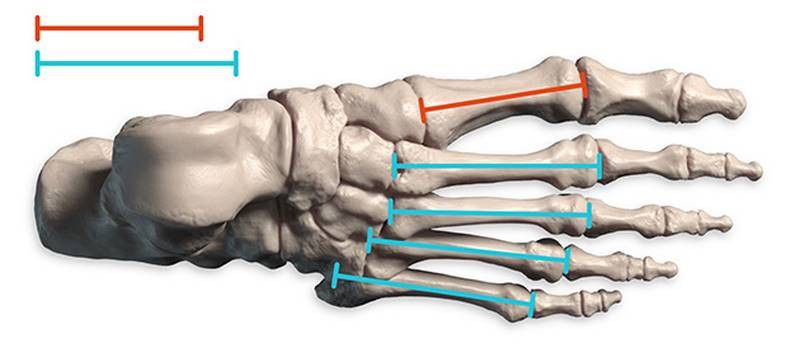
The metatarsals of the foot have the same design as the metacarpals of the hand. They're long and slender, with a base, shaft, and distal head. The metatarsals are all about the same length, except for the big toe. It's a little shorter and much thicker. Its medial edge is actually subcutaneous; try feeling it.

metatarsal length
Let's look at them grouped into a simple form. It's an extension of the arch of the tarsals that twists and becomes flatter towards the toes. The front plane is curved forward and up, just like the knuckles of the hand. Except on the foot, the second metatarsal is the peak of the curve, not the middle like on the hand. Also the front plane is rounded, because the ends are joints. Each metatarsal has a round head at the end that the phalanges rotate around. These round heads pop out when you flex your toes.
metatarsals simplified

Phalanges

The metatarsals articulate with the phalanges through ellipsoid joints. Lots of wiggling happens here: flexion, extension, hyperextension, abduction, and adduction. We have really good dexterity with our fingers, but horrible dexterity with our toes. Try holding a pencil and drawing with your foot... Our toes are important for both mobility and balance, especially the big toe and pinky.

Along with the heel, they create a tripod structure, and these three points balance the whole weight of the body. So, a human foot is built for mobility and balance. Walking upright, running, that sort of thing. Other primates like gorillas and monkeys have feet that seriously resemble hands, because their feet are built more for dexterity.

Like the fingers, the toes each have three phalanges with strong convex curves. Each is like a bridge. A stable structure.

Like the thumb, the big toe only has two phalanges. But those two are thick and strong. There are sesamoid bones tucked under the big toe that give its flexor muscle some leverage.

different toe lengths

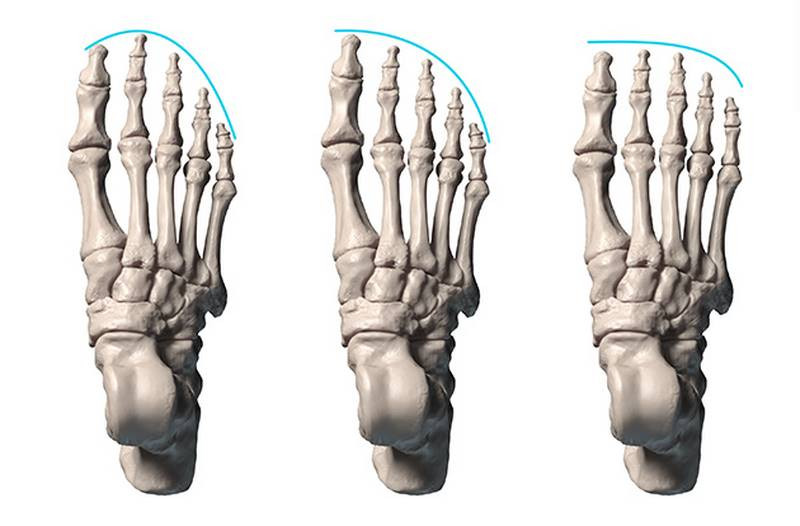
The other four toes are much thinner. The second toe is usually the longest toe, though some people have longer big toes, called an "Egyptian" foot. Some might be more squared off with all the toes a similar length. There's gonna be variety as with every part of the body. Capture that how you want, or idealize it by using this curve with the peak at the second toe. The "Greek" foot.

The pinky and the two adjacent toes curl when at rest or lifted off the ground. You can draw them with a horizontal line, then a step down, then another horizontal to show the toes planted on the ground. Think of stair steps. The pinky toe is dramatically rounded, sometimes even tucking underneath it's neighbor. Sometimes you'll see the pinky pointing inward much more than the rest of the toes. And sometimes the angle of the toes changes progressively.
stairstep toes

These subtle differences in shapes and angles can make the toes look interesting to have more character and motion. And that's it for the skeleton of the body... You did it! Pat yourself and get ready to put some flesh on the legs.

In the premium version of this lesson I go into more details about the forms and motion of the foot. I’ll also demonstrate how to do each pose in the assignment.

DOWNLOADS
txt
foot-bones-PREMIUM-transcript.txt
12 kB
mp4
Bones of the Foot - PREMIUM.mp4
482 MB
zip
Foot-Bone-Assignment-Images.zip
941 kB
ASSIGNMENTS

Assignment

Your assignment is to simplify the foot bones into their basic forms. Draw from life using your own feet or draw from the 3D models I provide you. You'll find still images of foot bone poses in the download below.

Post your work and participate in the discussions tab.

Newest
Kassjan (Kass) Smyczek
I am in a different country so I can‘t use my scanner. But i tried to take a good picture: Here is my foot bones assignment.
Samuel Sanjaya
foot bone construction.
Stephen Clark
Nice!
Ezra
1yr
Had trouble capturing the gesture + proportions, especially the thinness of the heel bone. Had to use 100% of my brain to focus when doing the toes as well haha
Samuel Sanjaya
my attempt at feet bone. this is hard. harder than the hand
Kianna Peppers
Took a year-long break so a bit rusty, but finally finished the foot bones!! Can't wait to move onto the leg muscles! - - - All previous and current assignments are available on my FB page here. Critiques are always welcome, thank you! https://www.facebook.com/saved/?list_id=4730838993696368&referrer=SAVE_DASHBOARD_NAVIGATION_PANEL
Jesper Axelsson
Hi @Kianna Peppers, these look really cool! - The proportions of the overall foot and the pieces of the foot vary a bit from drawing to drawing, so that's something to pay extra close attention to in the simple lay-in. It could be valuable to study drawings of feet by animators, to see what simple forms they've used to draw the feet (Mowgli for example. Or Tarzan.) I mention animators, since one thing they have to be good at is keeping the pieces of the body consistent as they move the characters around. - It might also be valuable to practice drawing feet from imagination. - The angle of the ellipses on your cylinders tend to be slightly off. On a true cylinder, the minor axis of the ellipse alligns with the major axis of the cylinder. - In #2 the structure of the toes is a little unclear; they feel a little soft. The digits haven't been drawn as clear separate pieces, but rather merge together. - I'm not a 100% sure, but the crossections you've drawn for the metacarpals (2-5 (five being the pinky)) in image #3 might be incorrect. The crossections suggest that the thickness of the metacarpals is taller than it's wide, but I think it's the oppsite, like you've done it in the other drawing on the same page; drawing the metacarpals like bridges. I hope this helps :)
Vue Thao
2yr
Lenserd martell
It would have been difficult without Robobin. Training with the box seems to have made this possible.
Jesper Axelsson
These drawings look really nice! Great gesture and strong forms! - Try to use line variation to communicate more clearly. You could for example, make the outer contour thicker to give the foot a more cohesive look. You could also clarify overlaps with line weight. If one form is in front of another, give it a darker contour. Stan talks a lot about line in the Drawing Basics course. Ask yourself: What do I want to say with my lines? What's the story of the pose? Then try to communicate that as clearly as you can. Hope this helps :)
Phattara Groodpan
Samuel Parker
Foot bone exercises, trying to wrap my head around how the Tarsals interlock when Inverting and Everting.
Anubhav Saini
Jesper Axelsson
Nice studies! Good gesture and structure! - I would keep an extra eye on proportion. You tend to make the foot too wide, especially the talus (and the lower leg bones hooking on to it). - In image 3 I like how you captured the feeling of the foot being pushed against and dragged along the ground plane. In image 2 and 5, try to make it feel like the toes are being pushed against the ground more, in the drawing. - I would encourage you to practice drawing figures, and the anatomical area of focus, from imagination. It's a great way to test & deepen your knowledge. I like following this routine: 1. Draw from imagination 2. Check were I'm off, with reference. Studying the part I got wrong. 3. Draw again from imagination. Hope this helps :) Keep up the good work!
Tsotne Shonia
This was by far the toughest lesson I've done so far I couldn't even progress on it without watching Stan's demos and applying his solutions 😅
Jesper Axelsson
These look good! - Keep an extra eye on proportion. You tend to make the foot a bit narrow - In #4, try to show more of how the toes are being pushed against the ground. - In #2 the foot feels a bit flat. Try to capture the transverse arc more accurately; it's higher medially. - I would highly encourage you to practice drawing the foot bones from imagination. You might follow this routine: 1. Draw it from imagination 2. Check were you're off, with reference. Study the part you got wrong 3. Draw another one from imagination. When you have gotten to know the foot better, drawing from reference becomes easier. Hope this helps :)
CHARLES DEIGHAN
Here's my foot bone assignment, sorry for the faded quality. Critiques welcomed, thanks.
James Paris
Here is my assignment for this exercise ! I think this was the first time I was happy with my line quality !
Jesper Axelsson
Looks great! - I would keep an extra eye on proportion. Look back and forth between the drawings and the reference, and see if you can spot any differences. In #1 for example, the talus feels like it's too far down. - In #5, I don't think we should see as much of the bottom plane as you have shown. It starts below the tuberosity of the 5th metatarsal. Cheers!
@abrahan13
3yr
i tried thinking in 3d, any feedback is appreciated
Dylan Gabriel
These look really good. Maybe some cross contour lines would help keep the volumes consistent. Also a ground plane can help you see the depth of the shapes in space. Looks like you're on the right track.
Alexis Riviere
This is not really about the foot bone, but now that we went through the whole skeleton, I tried constructing it all. I first did one clean tracing over a photo reference, and then some sketches from imagination. But I'm unhappy with the one made over the model. I feel like I messed up the pelvis (too wide) and the lombar potion of the spine (too long compared to thoracic part). It's like I got distracted by some very bad readings of the boney landmarks, but I'm not sure where.
@viny
3yr
the gesture helps a lot in the construction
@viny
3yr
another study
Jesper Axelsson
Nice work! - You might be making the hinge joint a bit too wide. Keep it up 💪
Thieum
3yr
Hi everyone! My foot bones assignment.
Sadie Ward
3yr
Here is my attempt. I'm proud of my attempt at it given its difficulty, but would really love some critique so I can improve even further.
Anthony Leckie
Your sense of the fullness of form is very nice. I would recommend trying to see if you can retain the fluidity of the gesture while you're developing the forms.
🎀  𝒵𝓊𝓏𝓊  🎀
I think it looks great
james Illingworth-Kay
Would appreciate some feedback if anyone has the time! Have learnt so much from this course. Massively grateful!
@xander
3yr
Here's my attempt, any feedback is much appreciated.
Jesper Axelsson
Hi @xander, nice studies! Well simplified and nice flow! I'll do my best to help you further: -In #2 you have the foot going from wide at the heel and talus, to narrow in the front. Usually it's the opposite; the foot is narrower in the back and wider in the front. I'm a huge Tarzan fan 🤩🤪 and if you look at Tarzan's feet in the Disney movie, you can see this clearly exaggerated . -In #4 the foot is twisting; we see the outside of the heel, but the inside of the toes. You're showing the medial plane of the toes, but remember that when we do that we no longer see the lateral side. - Just a thought: I looked through your album to see if I could give some macro guidance rather than just some anatomy tips. I noticed that you haven't posted any of the assignments from the Figure Drawing Fundamentals course. Have you taken it? (or anything equivalent to it?) If not, I strongly recommend waiting with the anatomy course. The things taught in the figure drawing course, like gesture and 3D-forms, are crucial for being able to execute the exercises in the anatomy course well. You could think of it as the Anatomy 1 course. Here´s a little story from my life: A few years ago I dreamed of being able to draw Tarzan. The Disney movie had been my favorite since I was a baby. I really wanted to learn anatomy, I found proko´s course, and started taking it, but I soon felt that something was lacking: I didn't know the fundamentals well enough. It was difficult to realize that, because it felt like my goal of being able to draw Tarzan was miles away, but I decided to take the figure drawing course anyway. I´m so glad I did! It gave me exactly what I wanted!; being able to draw gestural 3-dimensional figures, from imagination. I learned the most important part of drawing Tarzan! And to my suprise my figures felt quite accurate eventhough I didn´t know anatomy. It was like I had learned the pattern of the human body. I realized that rather than thinking of the figure drawing course being a obstacle in front of the anatomy course, it is more like the Anatomy 1 course. Hope this helps :) Keep up the good work!
Help!
Browse the FAQs or our more detailed Documentation. If you still need help or to contact us for any reason, drop us a line and we’ll get back to you as soon as possible!