

Martin M
Estonia
Used to draw in high school. Picking it up again now at the age of 35. Started taking courses online September 2023. Super excited!


@pedrobranco
added comment inCritique - Blob to Box
17d
I took Patrick's approach to this assignment and did a quick 10 pictures 1 minute practice. I'm still not clear on what I'm looking for here. The way I understood this assignment is that we're supposed to make circular shapes and fit a cube in perspective inside or roughly within the limits of our defined space. I'm still more comfortable just putting down the cubes especially with the time limit and a model. I can also make these from imagination if need be.
I feel like I'm skipping something important and given my shortcomings I can't allow that.

Martin M
17d
If you feel like you can immediately draw the box and are happy with the result then there may not be a need to draw the blob first. But if you feel like your boxes are not perfect then the blob approach offers the advantage of going through the observation steps one at a time:
1) Drawing the blob gives you rough size and shape of the box
2) drawing the oval onto the blob makes you focus on one side of the box and the size of that side WITHOUT committing any final lines
3) Adding the first edge of the box. This single first line of the box will do many things:
a) it establishes one of the vanishing points for the box
b) it will establish the length of the box
c) it sort of cuts the blob in half and thus you are making a decision about how much of other side planes are visible
4) Adding the following lines will now be a process of locking in the rest of the vanishing points and the size of the box and it's planes.
So this blob to box process helps to split up the many decisions you have to make to draw a box. And if the end result is not good enough and you are able to distinguish what's wrong then you know which step of the process requires more focus or practise.
Show 1 more replies
18d
I really enjoyed the "monologue" about all the different art topics represented as a web of knowledge instead of a linear progression tree.
Learning something and coming back to it months or years later seems to have value. At least I notice a lot of artists saying "I am brushing up on my fundamentals" or "Going back to the fundamentals".
So it definitely seems like one can not master an entire topic like perspective in just one go. Better to learn the basics and get to start applying perspective in your drawings and projects in order to start training that muscle.
This annoys the completionist in me as I realise that I can never say that I have completely finished learning perspective as I will have to come back to it in the future.
BUT at the same time it is liberating because this tells me that I need to keep on learning different things and jump back into a topic later once my knowledge of other topics around it has improved enough. As in I am never blocked, there's always something else to learn or practise.
Overall this removes some frustration around not seeing improvement or progress after practise sessions. If some topic stops improving then jump to another topic that is somehow connected and improve there instead.
This drawing skill as a web of topics just feels very different to some other fields where the topics to learn are sets of very specific rules that you learn in the linear order (looking at you engineering, comp sci, med, etc). Sure there's intuition in those fields as well, but specifically the learning process in art requires you to loop back and forth A LOT MORE instead of considering a topic DONE.
Thanks again for this monologue. Felt like a really insightful podcast episode.
Show all replies (1)
1mo
Asked for help
Really good exercise. I feel like my brain is working hard and I am doing many attempts before I feel like I am happy with a line placement. So this clearly is a process where I am experimenting and learning a lot.
Show all replies (1)


2mo
Asked for help
Well, I wanted to keep going with this one, but ended up running out of time. I used 2-point perspective because I wanted the camper to straddle the horizon, which made things easier. I also used guidelines this time instead of eyeballing it! As you can see I went a little overboard. Very grateful to be working digital - my hat goes off to those of you working traditionally.
I managed to sneak a lot of ellipses into this practice - like the fringe of the canopy - but more than anything this exercise taught me the importance and power of construction. I feel like I could keep adding details forever!
Awesome submissions everyone. This was a great assignment!
Show all replies (1)
Show 1 more replies


2mo
Asked for help
This was challenging for sure. I tried my best to do the method shown in order to draw the wheels. Any feedback would be appreciated.
2mo
The boxes convey the perspective and the shape of the car. Good job!
The wheels seem to be attached in the wrong direction. I added arrows to indicate rotation of the wheels in reference photos and in your drawings.
As for the ellipses: the top and bottom have some sharp corners. Rounding those out would help to create a more cylindrical shape.
Show all replies (1)


2mo
Asked for help
MY one and only attempt (very busy with work this week).
Based the SUV around the boxiest vehicle I know. The Honda Element. The spare tie on the back and the moon sink are part of an optional package :)
I am REALLY having trouble constructing a cube or even a rectangle with a single squared faced in 3D. I tried to look at cubes in real life and even did some print out of a transparent 3D cube out of blender and tried to practice, but it didn't seem to help. Given that making a square for the wheel to sit in KIND OF essential for this project, advise would be appreciated.
2mo
Moon sink! Love it!
Some tips for how to improve freehand drawing of boxes:
1) Before drawing a line make sure you know where the vanishing point is or roughly is. For example: "about half a pencil length up from the corner of my page"
2) Ghost the line before drawing it on the paper - hover pen on the paper and practise the stroke of the line from the start to the vanishing point
3) You can also mark the beginning and the end point of the line before drawing it. This way you split the task. One task being to decide where you want the line to be (marking the points) and second being the task of drawing a perfect line from point A to B. This also helps you understand if it is more difficult to decide where the line should be or if the drawing process is wobbly and you just place the lines incorrectly
And finally practice. Draw freehand boxes on the paper and then check your work afterwards with a ruler. Using the ruler to extend each edge of the box to the vanishing point. You will then see which specific boxes, rotations or angles are most hard for you as their edges don't converge to the same spot.
This is just something that has helped me a lot.
These tips have stuck with me from the "Draw a box" lessons.
https://drawabox.com/lesson/1/roughperspective
It's tedious practise and the pacing of the lessons can cause burnout (I hate the 250 box challenge...), but I saw significant improvement in my understanding of perspective as well as improvement in free handing perspective. Bye ruler, won't be needing you again.
Show all replies (4)
Show 1 more replies
2mo
Asked for help
I feel like my hands are just too dumb to do what my brain knows... Trying on procreate which i;m not used to but it's not clicking on a fundamental level. I tried a basic toy car but moved to a robot after getting disappointed with how ugly the car was.... Still nothing is even on the robot, the cylinders don't look "real"
2mo
I think you are on the right path. The robot clearly looks like a robot with shoulder joints and everything!
"my hands are just too dumb to do what my brain knows"
This is such a perfect example of discovering something and starting to practise it. The brain has taken a step forward but your muscle memory has to catch up now. Your brain is now able to judge the outcome and give your self critique (which is useful).
You just need to practise more!
I think the cylinders look real if you view them individually. But they might look off if compared to the rest of the objects around it. So try NOT to rush through the initial box phase and make sure that the box aligns correctly with the other boxes around it.
Use the ruler if you have to. In Procreate you can draw a line and leave your pen on the tablet and hold it still. After a few sec the line will become straight as if drawn by a ruler.
You can try drawing something by first making sure that the boxes are correct. Mark specific vanishing points on your canvas and draw all the lines straight to the corresponding vanishing points. You can later erase them or create a new layer on top of it.
You can soon start skipping some steps of this tedious process once you build up muscle memory.
2mo
Asked for help
Level 2 - Stan said "More guns!"
Show all replies (1)


2mo
Asked for help
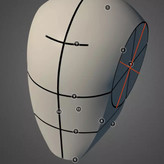
This is a weirdly proportioned truck but I think the construction of the boxes and ellipses is correct...?
I think I understand how the minor axis of the ellipse works - it dissects the middle of the square and is perpendicular to the plane of the ellipse and the square and so it leads towards the third vanishing point.
But how do we know where to place the major axis? It crosses the minor axis at a right angle, ok, but at which point? Or is there no way of constructing it before actually drawing the ellipse? Should we be drawing the ellipse by connecting just the four tangential points and only then checking if it's correct by looking if the two axes cross at a right angle and in the middle?
2mo
I deleted my previous reply.
I thought it was through the centre but now I rewatched the previous video. The major and minor axis don't seem to cross in the centre of the square plane.
This is a very good question.
Show all replies (2)
2mo
Asked for help
Level 1 - BOX CAR!
I had a lot of fun with the boxes here.
Will try to focus more on the cylinders for lvl2
Show all replies (5)


2mo
Asked for help
Some boxes. What am I doing wrong 💀🫵
2mo
It’s tricky to evaluate these because the boxes are hard to make out. Try to take a picture where the paper is more evenly lighted as half of the page is in the shadow. Also the camera is at an angle to the page thus distorting the boxes, try to take the photo more directly of the page. It would also help if you number the boxes corresponding with the head number. The bottom right box is the only one I can make out clearly and it looks like an ok box.
Show 2 more replies
There really should be a link to the store page or info about where to order the sketchbook in the video description section.
Show all replies (1)
3mo
Level 2 - rotated hand nr 2. I think I will try more with different view angles. This "along the palm" angle is great for figuring out how steep of an angle each finger joint box should be. BUT this angle sort of removes all the side planes.
So this is a great view angle to study foreshortening by making a lot of the boxes use 2 point perspective (almost). Having less vanishing points makes you focus more on the few lines that are converging. So if each joint of one finger is rotated more than the previous joint then the angle of the converging lines will keep on getting steeper (or more parallel).
3mo
Asked for help
It's going to be tricky to meet the deadline of 1/15/2024 (which is the date the video was posted on) @Stan Prokopenko
Show all replies (1)
4mo
Ok, so I spent waaaaay too much time on this, went down a countless rabbit holes but and in the end it turned out to be pretty simple. So there, a cube rotating in place in two point perspective :)
Show 3 more replies


4mo
Asked for help
Level 1 and Level 2 combined.
Show 5 more replies


4mo
Asked for help
3 digital, 3 traditional. This was very hard. I did one more which I then overlayed over the photo, but kept it out of the set, because I wanted to get feedback from the community and not myself. So I have both.
4mo
Good idea to overlay with photo later! Will try it out as well.
Your boxes look correct to me. I am jealous of how you managed to capture the likeness of the models with so few lines.
The only "mistake" that I can see is with #3.
Largest plane of the box (which is representing the back of the head) in your drawing has its left edge along the ear. But I think that should be roughly middle of the side plane of the head. The back plane of the box should thus be a lot smaller.
4mo
Asked for help
This exercise seems really good for challenging your brain to wrap something into a box and establish its vanishing points.
I have spent time learning Asaro head and Loomis method so I thought that this exercise will be easy. Just take what I know and put a box around it and done. But it is surprisingly hard.
I keep on redrawing the box after drawing the head to fix it. This means that my initial guess for the box and its vanishing points was incorrect.
So this is a GOOD exercise as I found something that requires more practise. I considered that I had mastered the box and vanishing points, but I clearly can't wrap objects I see into a box correctly from my imagination. Easy to do it digitally, but not in my head.
4mo
The more I do these the more I seem to be slowing down(starting to measure a lot) in the box drawing phase. I can feel when the box has incorrect angle or proportions, but only after I put down the lines. So I need to draw a lot more of these boxes to develop the sense for it.
As for the heads, I seem to struggle with the eye sockets. They need to be a "cavity" but some parts of them feel flat. Especially the edge between eye sockets and the cheekbones area. Not really part of this exercise, but something for me to dive into later.
Show 2 more replies
5mo
I've beed drawing the warmup boxes and my goal was to try and make them look like cubes (all sides square) rather than any random box. And I've been failing miserably! So I thought I'd try to draw one cube in procreate and rotate it, to see in the animation what I'm doing wrong. And I still can't figure it out :(
I'm rotating the cube around one constant edge and this edge's height doesn't change. So why does it look like the cube is getting shorter when rotating away from the 1 point perspective? What do I need to do to get the illusion that it's one constant cube turning, rather than turning and getting squished?
Seems like it should be obvious but...
Can anyone help?
4mo
Very cool side project!
Your cube is rotating correctly around it's front left edge. So as the box rotates around that edge it will go behind it and get "squished" because its going farther away from us.
What you have drawn is correct, but from your description I gather that you would like the cube to rotate around it's central axis (which is imaginary as no line on the drawing currently represents such central axis through the cube).
That is more difficult to draw and even trickier to animate. Instead of starting your cube drawing from one of the edges and then extending other edges towards the vanishing points, you will now have to put down an imaginary vertical line (or some construction line to erase later) and start to draw the box around it.
To be honest, I don't really know how to do construct boxes around central axis reliably. I have attached some steps for how I would try to do it, but it still involves guess work. So the size of the box will not remain constant throughout the rotation due to guessing errors.
(not sure if images will attach in the correct order, but they have numbers on them)
Show all replies (1)
5mo
Can someone help me here with what to do when the box is not between the two vanishing points? Where do the lines on the other side vanish towards?
4mo
This is only hinted at in the current videos, but likely will get covered in future videos. I will try to give an explanation anyway.
Short answer is that you can't place an object outside it's vanishing points. The box shape gets so deformed that it breaks the 3D effect of your drawing. So for current exercises consider the vanishing points to be the edges that you can still draw objects on, but don't go past them.
A bit of a longer hint for what's likely to come: Stan already showed an example of stacked books. These books got their own set of vanishing points because they were rotated compared to each other. Once we learn more about different objects having their own sets of vanishing points THEN you will be able to place an object outside of some vanishing points and "generate" new vanishing points for that specific object.
What I mean by this is that currently we use two vanishing points for the entire drawing BUT in the future you will use vanishing points per object. Some objects will share vanishing points if they are aligned like a set of houses on a street. Some objects will have their own set of vanishing points because they are rotated compared to the houses like a car parked diagonally in front of the house.
By that time you will likely think about your vanishing point placement for the entire scene AND decide if the next object you are about to draw will need its own set of vanishing points. This may sound like a lot of work to do for every object, but as Stan said: you will develop a feel for it and you can totally eyeball it OR you can go super mathematical if you want maximum precision for your technical illustration (likely would need perspective specific course for it)