How to Draw the Pelvis from any Angle

Anatomy of the Human Body

How to Draw the Pelvis from any Angle

417K
Mark as Completed

How to Draw the Pelvis from any Angle

417K
Mark as Completed

This method of constructing the pelvis from nothing is most useful when you are drawing from imagination. That’s really the goal of this whole course - to set you up to be able to draw the anatomy of the body from the vision in your mind. You’ll be able to construct the forms starting with the skeleton and build the muscles over that.You want to get this construction down well enough that you can do it in your sleep. Ok, so let’s get started.

***

Step 1 - The Bucket

I’m imagining a ¾ front view, pointing to our right. It’s not tilted up or down. It’s in it’s neutral anatomical position. Let’s start with the ellipse of the top cap – the lid of the bucket. The roundness of the ellipse will be based on how much of the top plane we are seeing. The angle of the ellipse will depend on the long axis of the bucket. The long axis is the line from the center of the top to the center of the bottom plane. The angle of the ellipse on a perfectly round bucket is perpendicular to that long axis. Now find the sides of the bucket and cap off the bottom of the bucket.


Step 2 - Cut out a Wedge

After establishing the simple bucket, we need to cut out this wedge shape from the front top half of the bucket. The edges of the wedge align with some of the landmarks, so the placement is not ambiguous. I like to find some more construction lines to get the placement of the wedge precise.

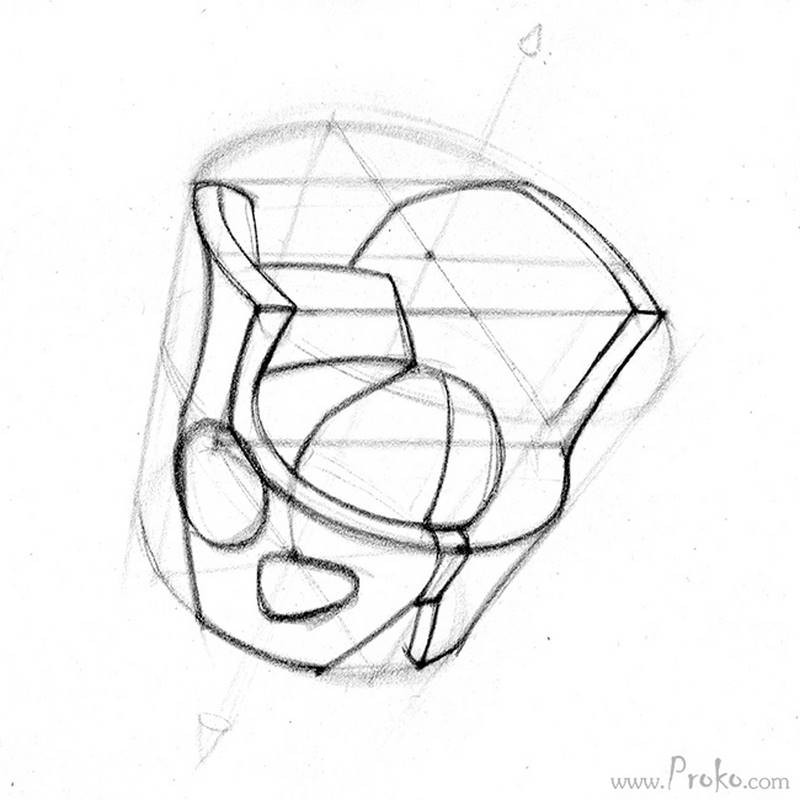
I’ll start by gridding out the top plane. Put a dot in the center of the top plane. Find an angle from side to side. In our case it’s horizontal. In some cases, when the pelvis is tilted or when the horizon is above or below the pelvis, this angle will not be horizontal.

Then find an angle from back to front. I like to continue these lines all around the bucket as if they are rubber bands. Even ghost them in the back planes a bit lighter. Ok, so now these lines will help us take out the wedge. The top corners are the ASIS points. That edge between the ASIS points is ⅓ of the way down from the center to the front.

Put a line parallel to the horizontal line and now we have the ASIS landmarks. The pubic symphysis is halfway down the front plane. From there, wrap a rubber band around the bucket. Drop 2 vertical lines from the ASIS down to that rubber band. Connect those two corners, and there you go. You’ve cut out the wedge. Similar to the front edge of the iliac crest, I want to find the back edge. This one is halfway between the center to the back.

Now, these 2 dots represent the vertical peak of the iliac crest. From there, the crest drops down toward the PSIS points behind the Sacrum. So, this section of the top ellipse represents the front half of the iliac crest. Not, the entire iliac crest.

Step 3 - Draw the rest of the %#$@&* pelvis!

Let’s start from the top and work our way down. The iliac crest has some thickness, so I’ll indicate the top plane. From the back edge the crest drops down toward the sacrum, so let’s find the sacrum. The top of the sacrum is ⅓ of the way down the back plane. This vertical line I drew earlier is the back plane. Now we can drop the iliac crest behind the sacrum.

From this point of view the left side is very foreshortened and the right side is not. This wedge shape we found is pretty much the final shape. Just round off the corner a little bit to make some more room for the acetabulum. From there, go about a ⅓ of the way down for the height of the cartilage.

And then a v shape for the pubic arch. Follow the bottom edge of the ischium around for a bit and then up toward the iliac crest. The side plane of the ilium is concave. Widening at the top to the iliac crest and at the bottom to the acetabulum.  The acetabulum is the socket for the femur bone. It’s really round and deep. And down here, since we’re looking at the inside of this form, we’ll see this side plane that shows the thickness.

A softened triangular shape for the hole (Obturator Foramen). Let’s add the sacrum in the back. Draw a rectangular shape representing the top plane of the sacrum. This top plane tilts forward more than the bucket itself. The line from back to front will be more vertical than the line of the back to front of the bucket.

From the top plane, let’s extrude a curved triangular form for the rest of the sacrum. The tip of the coccyx should touch the base of the bucket right in the center. From this front edge of the sacrum, extend a curve around the inlet and connect it to the pubic symphysis. And finally, through this hole of the inlet, we’re going to see the back edge of ischium.

There you go! A manageable construction of the pelvis. This pelvis has accurately simplified forms, accurate placement of the landmarks, and accurate perspective. Basically, this method of construction enables you to manage the complex forms of the pelvis, while keeping everything where it needs to be.

how to draw a pelvis

Once we are able to do this same thing for the entire skeleton. We will be able to pose the skeleton as we wish from our imagination. Then, we can attach the muscles to the appropriate origins and insertions, and we’ll have a complete body. All from our mind. How cool is that?

draw a man

Critiques

For additional help, watch my critique session on the pelvis. I go over student submitted work and provide insights on how they can improve their assignment examples.

Course in Parts
hide course parts
View course details
Give a gift
Give a gift card for art students to use on anything in the Proko store.
Or gift this course:
About instructor
Founder of Proko, artist and teacher of drawing, painting, and anatomy. I try to make my lessons fun and ultra packed with information.
Help!
Browse the FAQs or our more detailed Documentation. If you still need help or to contact us for any reason, drop us a line and we’ll get back to you as soon as possible!
Your name
Email
Message