Huda
Huda
Earth
Huda
Another great video, thanks Stan! Absolutely love this course. Looking at my CSI drawings again - I know I need to work on confident lines and practice making my straight lines...straight! My snail is sitting on a slanted wooden ledge :S Looking forward to the next lesson all about drawing confident lines :)
Write reply...
Drop images here to attach them to the message
Edo Moya
Who's in for another round of boots after watching this? 🖐️
Write reply...
Drop images here to attach them to the message
Huda
1yr
Totally! I'm in :)
Reply
Liza W
Omg, I’m so glad you put that lace in the wrong hole too lol. I was like, oh pants now what am I gonna do 😀😏
Write reply...
Drop images here to attach them to the message
Huda
1yr
Same here! That was comforting to see :D
Reply
Huda
Thanks Stan! I only watched the critique on the boots, since I still need to attempt the snail, and don't want to 'cheat' :) Learned so much from that critique - between the lay-in, simplifying the laces, adjusting when you make a slight mistake instead of erasing what you already put down, and breaking things down. All in all, that was an awesome video, yet again! Can't wait to attempt the boots again on my own, taking away what I learned watching this video. Really loving the pace and content of this course so far!
Write reply...
Drop images here to attach them to the message
@bofner
Here are my efforts. Snail wasn’t too bad. Boots were a pain. The laces are a little chicken scratchy, but I tried to tidy them up.
Write reply...
Drop images here to attach them to the message
Huda
1yr
Great job! They both turned out great. Impressed by your laces; I struggled with those!
Reply
Huda
Hi everyone! 
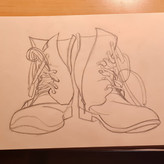
I found the boots challenging. It was a great challenge though. I had trouble simplifying the shoelaces; I felt like I was literally getting tangled up in them as I sketched this! That was my queue that it was time to stop! When I stepped back and took a good look - I immediately noticed proportions were off; I drew the boots much wider than the photo. I also find my lines can be 'scratchy' at times, and not as confident/solid as I'd like them. I'm sure that will come with more practice. Btw, love the photo choice! Looking forward to seeing the critique video for this one! Would love to know how to approach this one, and more than anything...simplify sketching shoelaces :)
Write reply...
Drop images here to attach them to the message
Huda
Thanks for this, Stan. I’ve already learned so much and I’m only 15 mins in! When it comes to shading, you mentioned shading with the “tip” of the pencil. I found that I ran into the same problem as the example you critiqued, where the texture was coming through. What I found when shading with the tip, the pencil dulls out so fast. I noticed, in your video, I was able to clearly see the lines where you shaded with the tip of the pencil - not sure if it was actually the pencil or if it was the paper quality or the technique of application. Question - would I need to constantly sharpen my pencil to avoid getting that textured look / dullness with the pencil? That is one of the things I am currently struggling with.
Write reply...
Drop images here to attach them to the message
Theresa
Stan, I love your format for the class…giving us a chance to draw with minimal instruction and then giving us the full teaching and demo after we have had a go. This is a very eye and mind opening process that I am fully embracing. Thank you for your wisdom as a learner and an instructor; a powerful combo.
Write reply...
Drop images here to attach them to the message
Huda
1yr
Well said, Theresa! 🙂
Reply
Evelien Picavet
My second attempt at the portrait. This time i tried turning my drawing and the reference upside down. This way, I could really focus on shapes instead of drawing a face. Not sure if it's a good method, but maybe this works for some of you too. Feedback is welcome.
Write reply...
Drop images here to attach them to the message
Huda
1yr
Wow! Never heard of that approach, that's a good idea. Will give it a try at some point :) Your portrait turned out great - love the distinct geometric/simple shapes!
Reply
Eric Lindau
"Imagine the fruit to be sculpted out of wood with a big chisel."
Write reply...
Drop images here to attach them to the message
Huda
1yr
Love this! Very interesting approach :)
Reply
Huda
Hi all! This is my first attempt for the 3 pear reference photos that were provided in the lesson. This was fun, yet challenging. I am a beginner; I have never come across using geometry and a more simplistic approach when it comes to shading. I really found it helpful and not as intimidating to get started. I will be attempting these pears again, but for now I wanted to post something on the community page to get out here with the rest of you! I welcome any feedback - thank you! :)
Write reply...
Drop images here to attach them to the message
Dan Stevens
Hi guys, This is a digital materials related post. Since starting the course, I have been experimenting with the default charcoal brush set on Procreate. I have a few charcoal pencils at home, but for the sake of portability, convenience, and lack of a mess (along with a one year old baby), I found this to be the most appealing medium for now. This piece was done entirely with the 2B and 4B compressed charcoal brushes and an eraser. The lay-in/ preliminary sketch was done with the 2B compressed on roughly 50% opacity and 5-10% size, to keep the lines nice and light. Once the features were established, I realized the face was too wide so I erased it down and redrew it. Same for the mouth, which was initially placed a little low. This is something I’m always struggling with. From there I switched to the 4B brush for the rest of the piece. This was at 100% opacity and varied in size between 2-10%. Values were controlled with applied pressure with the Apple Pencil, just like an actual pencil. Generally I tried to work for large to small. And tried to simplify at first (which is also something I struggle with greatly). I started by blocking in the shadow family of the face. Then half tones and progressively refining from there. I then framed his face with a large blocked in dark area for the hair. There were several tweaks needed to get his face shape corrected. The hair was blocked in with solid medium/dark value and I then found the next biggest, darker, general shapes, progressing to medium and smaller sizes. Then it was really all eraser from there. I used a standard round brush eraser at 25% opacity. I find that this gives me the most simulated feel to an actual eraser and I can control it with my hand pressure. Same idea as before, just inverted. I found larger to medium light areas, then progressively added lighter forms and highlights. I just wanted to share. I love seeing all the various posts and mediums used and am very excited to start working on whatever assignments come next. It’s such an awesome community and I’m looking forward to learning and growing with everyone.
Write reply...
Drop images here to attach them to the message
Huda
1yr
This is great! While I haven’t ventured out to digital, as I’m trying to get comfortable with traditional mediums for now, I love seeing these types of posts - seeing the steps leading up the the finished product!
Reply
@wowstylus
So hyped up! Doodling right away sire, dum dudu dudum
Write reply...
Drop images here to attach them to the message
Huda
1yr
Nice!
Reply
Rui Pedro
I’ll stick with the most basic of basics, a sketchbook and a HB pencil. I’ve found that focusing in the materials distracts me from the fundamental core concepts, and I want to go sketch out in the open, and it doesn’t get easier to carry around than paper and pencil
Write reply...
Drop images here to attach them to the message
Huda
1yr
Great point Rui - very smart! Wish I saw your post years ago when I bought a million art supplies and didn’t know how to use them (and still don’t lol!) 😬
Reply
Dillon
6 attempts later I think this turned out the best. Feedback always welcome :) Off to try some different fruits now!
Write reply...
Drop images here to attach them to the message
Huda
1yr
This is great!
Reply
Help!
Browse the FAQs or our more detailed Documentation. If you still need help or to contact us for any reason, drop us a line and we’ll get back to you as soon as possible!
Your name
Email
Message