Assignment
Alright, if you’ve just been watching, it’s your turn now. Draw an egg. Make it the most 3D, round, volumetric, realistic egg you have ever drawn! And don’t just go at it all at once, try using the drawing stages I recommended earlier! Use the medium you are most comfortable with. Then do another one in a medium you are less comfortable with. Post your drawings on social media with the hashtags #proko and #eggdrawingchallenge.
Hey, I’m Dorian. In this episode I’m going to teach you how to improve your shading!
Planes
Drawing is difficult because the world is complex. But as we study nature, we see principles at work that we can understand and make use of. One such principle describes how light interacts with form. You might think you understand this. But chances are that you are wrong in a subtle but remarkable way.
Let’s simplify this head into flat planes. Can you see that each plane has a particular brightness? Artists call this brightness the “tonal value” of a surface. Or “value” for short.

Inclination & Brightness

If we rotate this plane so it faces straight up, the angle of incidence is 0 degrees. The light is hitting our plane with full force. So the brightness we get on the plane is 100 percent. Now, let's rotate the plane away from the light source. As the angle of incidence increases, the brightness decreases. Finally, at ninety degrees, the light no longer hits our plane and the surface falls into shadow. So at ninety degrees of inclination, we have zero percent brightness.
Quiz
Now, here is my big question to you. How much brightness will we have at eighty degrees of inclination? If we rotate this plane towards the light by ten degrees, how much brightness do we gain? We go from 0% to what? You will only learn the main lesson of this video if you actually stop and think about this.
Ready? Ok, here we go. At eighty degrees of rotation, we have... forty-five percent brightness. Yes! Really! When I did this exercise the first time I estimated that we would have ten percent. Maybe something between ten and fifteen percent. That’s intuitive. But what actually happens in nature, is this dramatic jump.

This, my friends, is Lambert's emission law. It is named after Johann Heinrich Lambert, a Swiss polymath. (Fun fact: I am also Swiss! but... I’m not great at math.)
Comparing Linear Scale and Light on Form Scale This image shows a linear value scale with even steps going from 100% to 90, 80, 70, and so forth, until 0. That’s what we would expect. But what happens in nature is this: 100, 99, 97, 94, 89, 82, 73, 62, 45, 0. We can call this a Lambert scale.


Here is what this means for us. In shading, the tones change very slowly near the lightest lights. They begin to darken more dramatically as they approach the terminator. The terminator is the border between light and shadow. You can see how subtle the value change is in the lightest area on this planar sphere.
You can see how subtle the value change is in the lightest area on this planar sphere. In fact, if we place our two scales on top of the sphere, you can see how the linear scale gets way too dark way too early.
Check out this graph. The tone changes slowly as the form turns away from the light. But the closer we get to the shadow, the faster it darkens. This curve follows a cosine function. On the other hand, the linear scale progresses from light to shadow in a straight line. Don’t worry if you don’t know about cosines. You’ll still be able to apply this principle to your drawings.

This might give you a new appreciation for some artists. It is possible to communicate a tremendous amount of form change with a limited range of values. This requires sensitivity and control. You can develop both of these through practice. Here are a few of my works from my student days. You can make strong drawings from observation even without knowing about Lambertian Falloff. I didn’t know, back then. But if you do know about this, you can save a lot of time. Instead of guessing your shading, begin with the most noticeable value change. Right next to the terminator.

Two Common Shading Mistakes
The second mistake is to not make the dark halftones dark enough. When you do this, you will see a light ring or a halo next to your terminator. Watch out for this in your shading. It means that you haven’t drawn the dramatic drop of value just before the terminator. The way to fix it is to darken the values of the dark halftones until the light ring disappears. So here is before and after. See how much more round and convincing the drawing looks when the dark halftones are dark enough?

This next mistake isn’t related to lambertian falloff, but I want to throw it in because it’s so common and so destructive. The third common shading mistake is to make reflected lights within the shadows too bright. When we draw from observation, we are often tempted to draw the reflected lights too strongly, too brightly. When we do this, the illusion of form is lost because the reflected light starts looking like halftones. So a good rule of thumb is to draw the reflected lights a little more subtly than what you see in front of you. Or what you think you see in front of you. Here is before, and after. Remember that rule that Stan has mentioned so many times. The lightest dark is darker than the darkest light. Check out that lesson here.

Demo
Alright. Let’s put this into practice. One difference between a professional and an amateur is that the professional has a process. Here is the process: establish the major proportional relationships. Separate light and shadow by identifying the terminator. Tone in the shadow family with a flat value. Then shade the dark halftones first. When you get to the lighter halftones, keep the value change very subtle. Finally, make sure that your reflected lights are not too strong.
Alright. Let’s put this into practice. One difference between a professional and an amateur is that the professional has a process. Here is the process: establish the major proportional relationships. Separate light and shadow by identifying the terminator. Tone in the shadow family with a flat value. Then shade the dark halftones first. When you get to the lighter halftones, keep the value change very subtle. Finally, make sure that your reflected lights are not too strong.
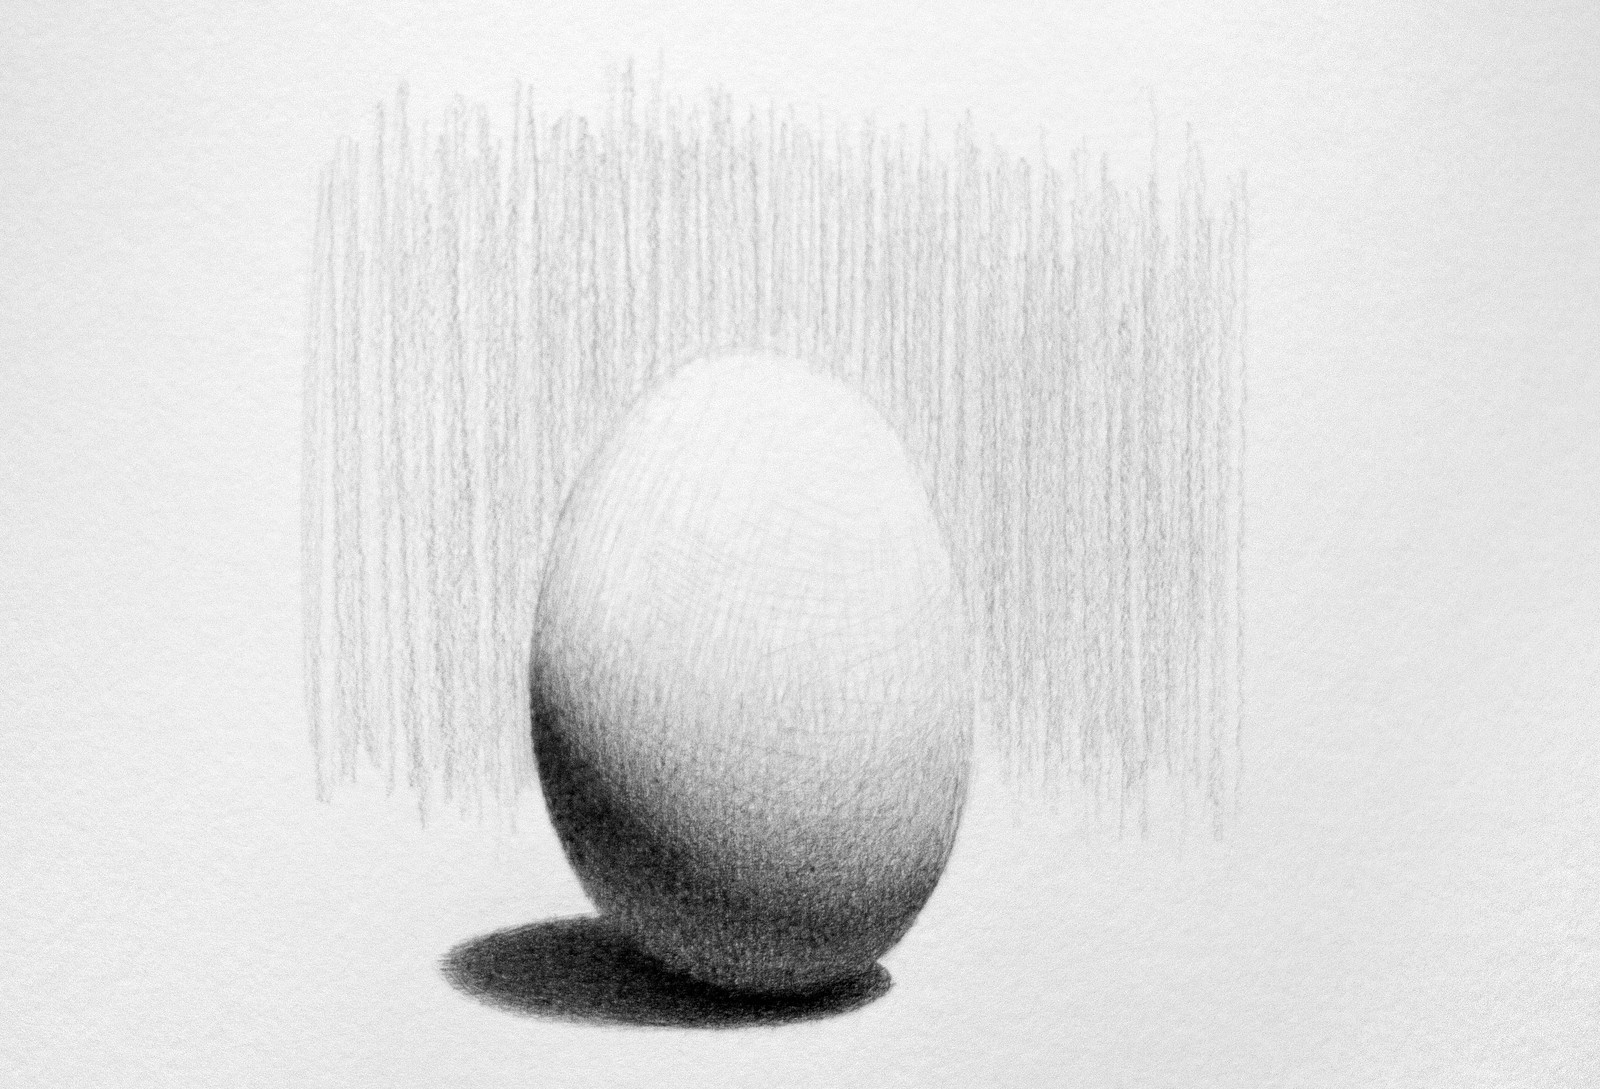
A head is, in essence, an egg shape. If you can’t shade an egg well, you won’t be able to shade a head well. Build a strong foundation. Let’s draw an egg! You can follow along.
Begin with an oval. It doesn’t have to be perfect. But keep your lines light. To begin shading, separate light from shadow. We do this by drawing the terminator. Great. Now we can fill in the shadow. Alright. The most important addition we can make to shade this egg is to add tone where the value change is most dramatic. Where is that? Right next to the terminator, in the dark halftones.
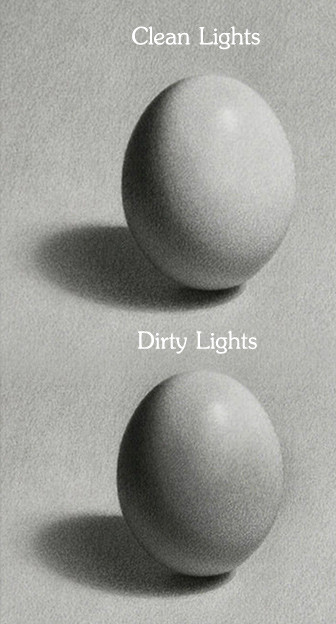
Remember the common mistake? Not making the dark halftones dark enough. Let’s make sure we don’t have the halo effect. Now we can move into the lighter halftones. Keep your lights clean! We must change the value, as the form turns. And we must do so with more and more subtlety as we approach the lighter halftones.
To add the reflected light we could lighten the shadow with an eraser but that's usually a bad idea. It's easy to erase too much. That's exactly the problem we're trying to avoid! So instead, it's much better to create the reflected light by darkening the rest of the shadow. Keep it subtle!
And here we go. A nice, solid egg.