


In this lesson you'll learn how to draw the forms of the neck. All the anatomy knowledge in the world won't save your art if you're putting muscles on top of a bad initial drawing. So I want to take a step back and make sure you have an accurate base to work on.
The basic form of the neck is a cylinder. The axis of this cylinder is tilted forward to counterbalance the angle of rib cage. The cervical vertebrae have a slight curve, which is reflected in the overall shape of the neck. Note that the neck is lower in the front and higher in the back. Also, the top of the neck is slightly wider than the bottom from a side view.
Now we have an accurate simple form to work with. It's simple enough that you could move it around and light it just in your head, so you don't always need to have or follow your reference when you're drawing. Think about this form when you're sketching the figure for an accurate quick start, and then you can add muscles and other details on top of it.

The Adam's Apple and Friends
Let’s start breaking down the cylindrical neck into smaller components starting with the throat. The throat can also be simplified to a cylinder. On females, that’s usually enough. On males, there’s some more bumps.
First, the thyroid cartilage aka Adam's apple. It sits just below the hyoid bone, on the front of the throat cylinder. It's a very angular piece of cartilage. From front view, you'll see a V shape or a little birdie created by the top edge of the Adam's apple. From the side, you'll see another V shape with a 90 degree angle. I mentioned last time that men and women both have the thyroid cartilage, except on women it's smaller with a more open 120 degree angle.

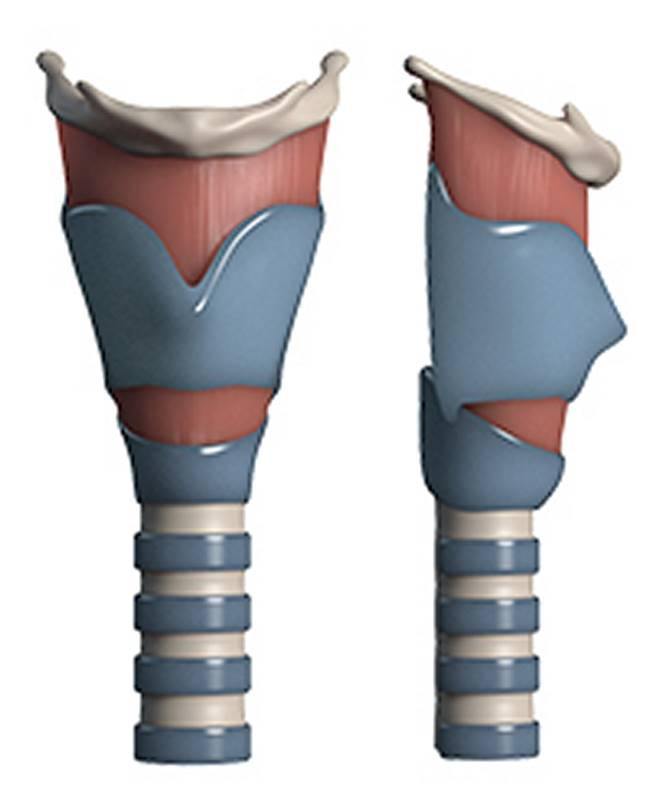
The Adam's apple has a few friends. There's a smaller and rounder bump right underneath it called the cricoid cartilage with the thyroid gland on top. The cricoid isn't as visible on female necks, because it's covered up by their larger thyroid glands.
Drawing Neck Muscles
The sternomastoid is larger and superficial throughout its whole length, so it’s really important to be able to draw it well.
Overall, the sternomastoid is also a cylinder. At the attachment to the skull, it's broad and thin. The thickest part of the sternomastoid is at its center. The center is also about where it starts to split into the sternal and clavicular heads with a triangular gap between them. The sternal head turns into this cord-like tendon where it inserts on the sternum and pops out when the head turns to one side, especially when the head also tilts. I mean, it really pops out.
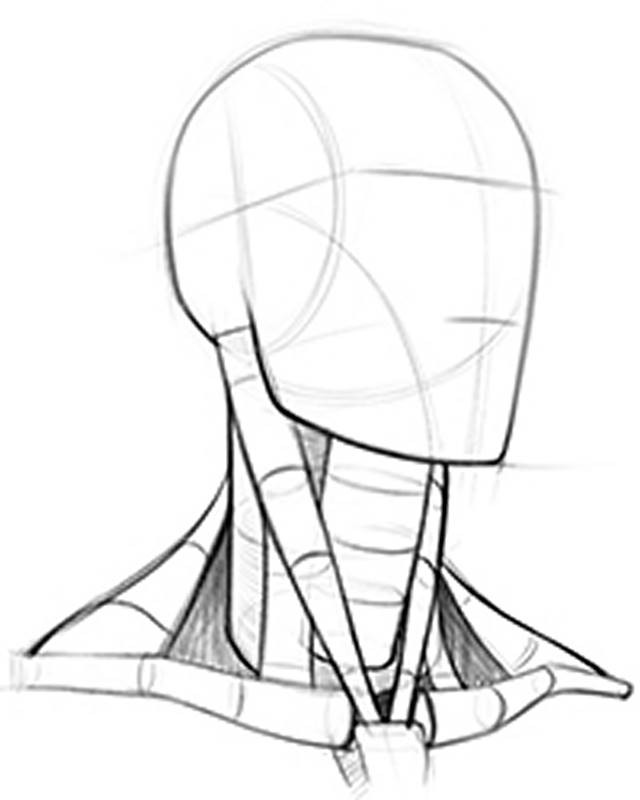
Overall the sternal head is more prominent than the clavicular head, but when the head…as in your whole, actual head… is flexing forward, the clavicular head of the sternomastoid pops out to say “Hello.”
Very often, I’ll use the sternomastoid when laying in a portrait drawing. The clavicular head serves as the side of the cylinder. The sternal head serves as a great gestural line that connects the skull to the rib cage.
Movement
The neck has an incredible range of motion in all directions. As the neck twists or crunches, wrinkles form where the skin is being compressed. You see this all the time on the back of the neck. If the neck is in an extreme pose - show it! Use squash and stretch on each side of the neck to push the gesture. Add in skin folds on the squashed side, and really lengthen all of the muscles on the stretching side.

Normally the division between the head and the neck is obvious, but when you’re drawing a person from the front and they tilt their head back, things get tricky. It can be hard to understand the structure and planes of your reference. Let’s break it down.
Placing the bones will help you understand how to fill out the form. The jaw bone is pretty obvious. The hyoid bone can be a little harder; you can use the Adam’s apple or a tensed muscle attaching to the hyoid bone to find it. Once you’ve marked the mandible and the hyoid, you know that everything in between them is the underside of the jaw.
There's attachments on the chin that soften the transition underneath there, but the sides and back corner of the mandible are usually pretty bony. The hyoid bone marks the plane change from the underside of the jaw to the cylinder of the neck. Draw in the clavicles and you can connect the remaining muscles down to the bottom of the neck. There's still the challenge of drawing the face tilted back, of course, but I've got other videos about that if you need help.
Assignment
Your assignment is to do quicksketch drawings of the head, neck and shoulders. Focus on which muscles are active and show their form and motion. You can purchase reference photos found in the Tool or get a free sample pack by signing up to the newsletter on the homepage.


