


Vincent Ruggiero
added comment inProject - Simplify from Observation
7d
Asked for help
Hello everyone! I wanted to share my first attempt at drawing a pear before watching the demo. It's been years since I last picked up a pencil to draw! As a beginner with no formal training, just some art classes in high school, I'm excited to be part of this program and eager to grow as an artist. Comments and feedback are welcomed—I believe that's how we learn and improve. Huge thanks to all the instructors for their guidance!

4d
Hi there! I think you're off to a great start. You have a wonderful clarity, both in your simplified shapes and in your rendering of values. The thing I'd suggest is to push your value choices to reflect the idea of a light vs a shadow side. The darkest area on the pear serves as a mark for this division, with the right side being hit directly by light and the left side cast in shadow. Lightening the 2nd lightest value can help emphasize this idea, as well as using only the 2 darkest values on the left side to emphasize the darkness of the shadow. That way, there's more three-dimensionality of the pear. Hope this helps, and welcome to the course! :)


Asked for help
Hello everyone! Here is my attempt at completing the assignment. Feedback/critique is welcome. Please and thank you. :)
4d
Good observational skills! I'd just suggest to lighten up your 2nd lightest value, slightly more towards the white of the page and less towards the middle gray value. That way, there's a more even progression between the value steps, allowing for more clarity. Hope this helps! :)
Show all replies (1)


7d
Asked for help
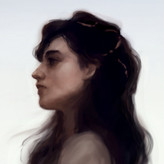
Hi all! My attempt before watching the demonstration. Much love.
4d
Beautiful shapes and shading control! The one thing I'd suggest is to try reaching a darker tone, which can be achieved either by further layering with your pencil or using a softer pencil lead. Especially on the dark side with your two darkest values, being able to reach a darker range can really make your drawing feel more complete and three-dimensional.
Show all replies (1)


8d
Asked for help
This is my second time drawing the pear from the picture he provided any help is very welcome! I have barely any experience drawing.
4d
Nice simplification! Just be careful that you don't start out with your light grays being too dark. I would recommend lightening up the second lightest value so it's closer to an almost white. That way, there's more change between the values and more clarity as a result. Hope this helps! :)


10d
I like how you're simplifying, finding the most essential parts of the image and boiling it down to a pleasing design. I would recommend to try out this out using shapes, rather than lines, as another form of simplification. Basic shapes like triangles, squares, and ovals can go a long way as building blocks, though always feel free to push and pull to find new ways of breaking down the image. Plus, it can be lots of fun! :)
Show all replies (1)
Show 1 more replies


10d
Asked for help
My try at all the tasks Level 1 to Level 2, before watching the demo, any feedback is appreciated!
10d
Nicely done!
Show 2 more replies


10d
Props to you for trying it out from real life reference! I like simplicity of your shapes, though there seems to be a larger difference between the 1st and 2nd darkest tones than the rest of the tones. Try darkening the 2nd darkest so the two can be more equally distributed. Also, there seems to be a fair amount of texture from the paper causing white spots throughout, I would recommend either going back in to fill it in completely, so the values are more clear and solid, or use a smoother paper, if you're using something textured like a heavy watercolor pad. Hope these tips help! :)
Show all replies (1)


10d
Good stuff, you have nice accuracy and boiled down the line work to the level of simplicity needed. It would help to work larger though, even using a full page for each drawing if possible. That will allow you to get a full range of motion with your hand to form good line habits, and not be as limited in your choices by being confined to a small area. You don't also have to add extra details like shading, as the line work itself is key. You're on the right track, keep up the good work! :)
Show all replies (1)
1mo
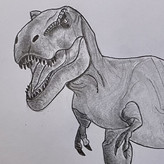
For this lesson, I found these easier than the boots. Really struggled on the spine of the skeleton. Any feedback would be great! :)
12d
They're great drawings! Though you could go a bit simpler, especially with the skull. Smaller details like the crevices, the teeth, or the small ridges on the nose could all be smoothed out in favor of the larger overall curves. Even something like the spine could be simplified into two curves swooping down, with perhaps some horizontal curves across, rather than getting into all the individual bones. Practicing simplicity can help you gain more accuracy and find the essential elements of a picture more easily, which is an important step in the art process. Hope this helps! :)
Show all replies (1)
12d
I notice a bit of a tendency to feather lines, meaning going back and forth in short strokes. Try aiming to complete the entire CSI line in one stroke -- even if it's in the incorrect place, having the confidence in your linework and developing the habit for a loose, sweeping hand is more important. Plus, you can always redo the line on top until you find the correct one :)
Show 1 more replies


25d
Hallo my camel and skull. Cheers, pity I'm late for the critique. Ah well, love you all.
12d
Great simplicity and line confidence! It even has an elegance to it.


My before-demo skull, after-demo camel (I really struggled with this one for some reason), and a little fun after watching Dune 2 (gosh, the spaceships are stunning...).
I'm still trying to practice the confidence of my marks, which are still lacking a bit. I did a much better time this time with the skull, sketching out larger shapes then going in for contour.
12d
Awesome!


12d
Look for angles that go towards one another ever so slightly, as this is key to establishing the box into correct perspective. It helps to give labels to each direction of the box, such as X, Y, and Z, to keep track of which lines need to be converging into the same direction, as I know all the different lines can become confusing when you are first starting out. You got this!

15d
Asked for help
These are my level 1 attempts. The first 3 were made before watching the demo and the last three were made after.
I struggled with the first two, everything is a bit off, and there is not much going on. I had zero inspiration as I was just trying to do some boxes. Then it started to get better with the third one which is loosely based on a house I used to live in (so I enjoyed doing it).
The fourth one is not strictly a room I guess, but I was inspired by Stan’s tube station and my daily commute. The fifth one is also loosely based on a house I went in. And the last one is my daily commute as well.
I went from struggling a lot, to doing some research to include some details, and be more accurate. It was easier to do these when I felt “connected” to what I was trying to draw. On to level 2 !
Any comments or feedback welcome ;)
12d
Awesome work! It's great seeing you push yourself and finding fun in the assignment, the dedication really shows through.
On a more technical note, ensuring that the objects have thickness to them can really elevate a drawing to become more believable and grounded. Objects like the shelves, stair steps, backing of the chair, and window pane bars may be thinner, but still have a thickness that is worth noting. In the 3rd image, the couch on the right appears in 2 point perspective, as the lines that would appear horizontal in 1 point are instead diagonal -- something to be aware of. With the sign for TUBE, the bottom plane will not be visible since it lands on/just under the horizon line.
Overall, solid work, I think you show a really good grasp on the concept of perspective. With the few things mentioned above to keep in mind, you're off to a great start. Keep it up! :)


Asked for help
Level 1 and a half. I added a coffee machine to play a little bit with the level 2 project.
12d
Nicely done!
16d
Asked for help
Hello everyone, Here is my first attempt at rhythm ! Do you guys have any advice before i start the other drawings ? :)
12d
Wonderful :)
Show 2 more replies


14d
Asked for help
Hiii
at first I did a very rounded buffalo, so i did a very squared one as a second option.
I also tried to do a wolf, and I was impressed to find those “dangerous” triangles in its shape.
For the puma I tried it two times, i feel like pumas are very “wise” looking and intimidating, my first try was too cute, the face was too tiny and maybe rounded too, tried a second face with more edges and I tried to find the rythim in the internal lines, I think the personality is closer to my feeling..
I would love to have feedback!
12d
I love how you were thinking about the personalities and shape language for these -- it definitely shines through! I do also really like the shape exploration especially with the buffalo, which I think as you reached the puma, started becoming a bit lost in favor of realism. Try thinking back to the most basic shapes you can use as building blocks for the animal's faces. Breaking up the detail in the nose bridge or the cheekbones into a shape can be something fun to explore and play around with :)


16d
Asked for help
The first image is my hierarchy version and the second, the light and shadow. I wanted to keep it simple and not vary the shape of the lines. I found it difficult to convey the sense of light and shadow without the addition of shading but I was impressed with how impactful the line hierarchy method was.
12d
Nice! You definitely got down the understanding of this lesson, with great mapping of lights and darks in line weight. If you want to take it a step further, try tapering your lines as to transition them from heavy to light weight and vice versa. This practice will put you on the track of using variety in your linework as you sketch, making it a very useful tool. It can also help you utilize a middle weight in between heavy and light, which can be useful as you build a hierarchy of importance, with certain areas more important than others but not as the most important area overall.
So much value in this part about line weight! Here's my try.
12d
Solid work!


12d
Good start! Try sketching snakes from different angles and poses -- that can really help you get a good grasp on the basic shapes that make up the animal, and later help you create your own poses. Have fun exploring! :)