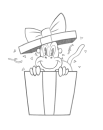
Well, hi everyone! I’m Marco Bucci, and if you're interested in painting, chances are you want to turn this into this.

Visually, the difference is pretty obvious, but let's quickly discuss what's fundamentally going on here... Both these pieces accurately convey form. Lines usually do it by defining each form's silhouette shape. The silhouette tells us where exactly the form turns away from the viewer. I’ll show you what I mean with this 3D head model.
Here's a line defining part of the silhouette. Now, as the head rotates, that line changes. When it changes, it's telling us where the 3D form is turning away and therefore no longer visible to us. The form on this side of the line we can see, the form on the other side of the line we can't.
The space inside the lines can be left totally blank and our brain still interprets it in 3D. It's a pretty sophisticated illusion when you think about it.
Now, if a line drawing is a shorthand for reality, the painting provides the information we actually see in real life. Three-dimensional information in real life is delivered without lines. So, it stands to reason that our painting also will hold up without lines. Now, this extra information allows the painting to deliver something that line drawings often don't, lighting information.
Planes and light
So, when it comes to representing light in our art, we need to know about 3D form. Here's a simple 3D form, a box. A box has six faces that are oriented in space. Now, painters call these faces "planes". From this view, only three planes of the box are visible to us.
Now, planes are the secret to understanding how to paint and add light to your drawings. Without the lines, this box just looks flat.
Now for the plane facing away from the light, lets give it a dark value. This is an average shadow value representing the shadow family. And because objects cast shadows, let's use that same average shadow value for the cast shadow from this box.
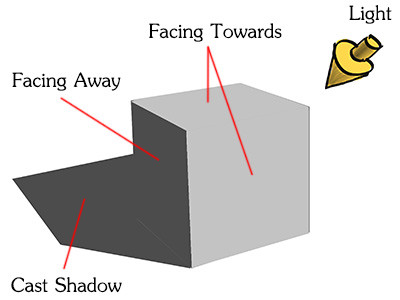
And by the way, the term "value" simply means a shade of gray on this grayscale chart. And you see these two values we've used, one for the light and one for the shadow? These are the two most important values you will ever use, because they deliver the most information about the most planes.

I’ve personally built my career off of understanding planes and implementing these two values. They form the basis of all my paintings really, and they help make this whole art thing much less of a mystery.


Okay, so, planes and their corresponding light and shadow values essentially do what the line drawing does. In the same way that lines indicate where form turns away and is no longer visible to our eye, in a painting, planes and values tell us where the form turns away and is no longer visible to the light source.

And check it out, I can take this drawing, apply knowledge of the planes of the head to it and boom, instant lighting options. But okay, okay, enough showing off, let's back up and break this down a bit.
Planes of the head - breakdown
So, I’m going to take our line drawing here and build the planes and values on top of it. Here's our painting so we know what we're trying to accomplish and here's the Asaro head for plane's reference.
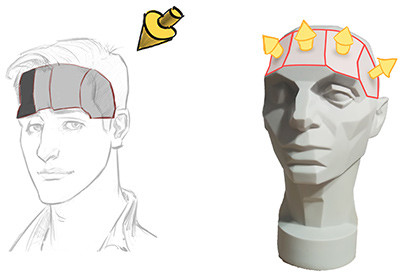
If the head is like a box, the temple plane here is clearly the side of the box. Then we have a series of simple planes at the front of the box forming the gentle curve of the frontal bone of the skull.

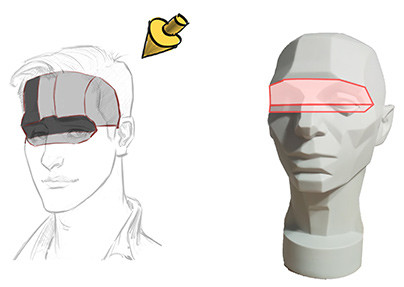
The zygomatic has a bottom plane too. It looks something like this... Now, this is a tricky plane change in my opinion. It's narrow but there is a definite sculptural quality of the form here. We'll deal with its implications a little later in this lesson.
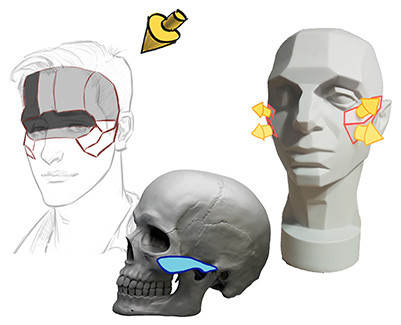
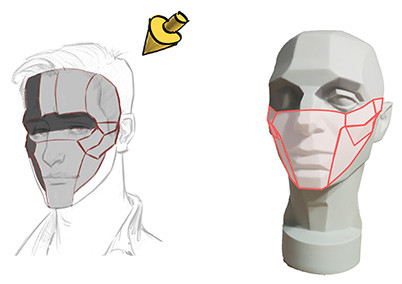
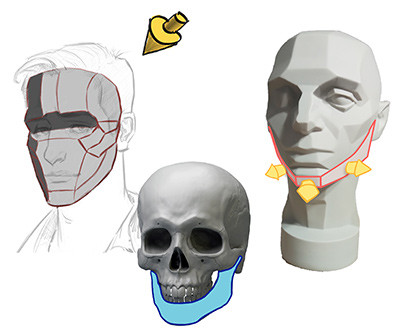
Alright. At this point, we have the basis of our head fully constructed. Now we can add in the top of the box, where the hair sits. We could add the hair but for now lets ignore that and stay focused on head construction.
The features
The facial features become a lot easier to place if your basic structure is correct. That's why I saved them for last. Want to know a cool trick? The features all have a basic box-like construction, very similar to the head itself. I like to start with a simple three-plane arrangement to build up each feature.
You can think of the mouth as a muzzle form. The upper mouth planes have a gradual taper to them and they all point upward. The lower mouth area is also built out of three planes and it's kind of a squished version of the upper mouth. These planes are oriented slightly downward. Overall, the plane changes for the mouth are fairly narrow, though there is definitive form there.
The form of the eye is somewhere in between the nose and mouth, and we'll need two sets of three planes to describe the upper and lower eyelids. The planes describe a spherical form, due to the spherical eyeball that nests right in there.
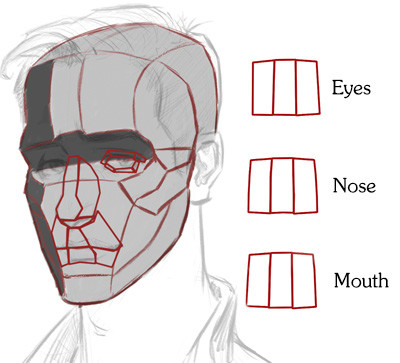
Okay, to further refine, we need to add lips to the mouth area, of course. You can think of these as two shelves; a shelf angled inward for the upper lip and a shelf angled outward for the lower lip.
Okay, that's great. Now to apply our light and shadow values across all the features. This is surprisingly simple actually. Here are the light and shadow values filled in based on this light source, and the ear. Okay, so, remember in our original box demo, we had that cast shadow, we now have to apply cast shadows to our head construction here.
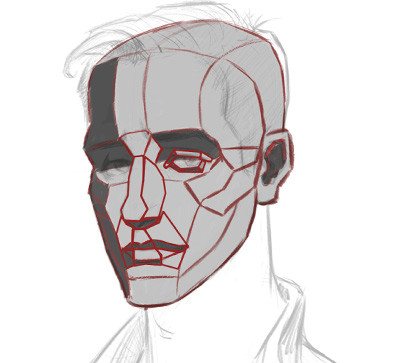
We'll start with the nose. The direction of light causes it to cast a large shadow over the left side of the face. Think of cast shadows as a projection of the silhouette shape. So, the cast shadow from the nose has a nose-like shape... And note that where two shadows collide, they just combine into one shadow.
And if you think of the neck as a basic cylindrical form, it will also receive a shadow from the entire head raking across its form.
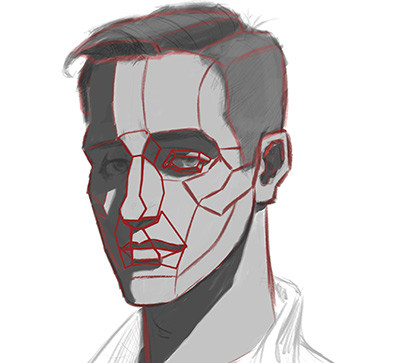
Okay, at this point the hair is really starting to look out of place because we haven't dealt with it yet. So, I’ll start by massing in a dark local value for the entire thing and then we can break it down into overall planes, something very simple to understand its construction and dimensionality. Then we can apply a similar system of light and shadow values to it, shifting these values a little darker overall due to the hair's darker local value.
And this is where I recommend putting all the stuff we've covered so far to practice. I think you'll find the knowledge of planes and value application will allow you to both understand what you're looking at when you're doing work from reference and it'll eventually unlock the freedom for you to create heads from your imagination. I approached all these paintings slightly differently in terms of the art process, but in all cases, I chose a light direction first and then found my planes and assigned them their values. You don't have to be as systematic with your studies as I was with this presentation either. As you can see here, I’m constantly jumping all over the head between light, shadow, cast shadow, adjusting shapes... It's a fluid process in the end. The nice thing about planes is they're reliable. You can look for these arrangements on every face you see and integrate them into every character you design or portrait you paint. Just like we all have the same muscles that make up our body, we've all got the same planes that make up our head.

More values
Oh, but we're not finished yet. As you can probably see, there are a few more values happening here, and I want to show you just two more value groups you can use to further describe the form. One is in the light family and one is in the shadow family.
Half tones
If the average light and shadow values we've looked at so far describe big plane changes, half tones describe much smaller differences. Halftones exist in the light family and they describe planes that are beginning to turn away from the light but are not all the way in shadow yet. Let me show you the mechanics of half tones.
But, if I took this one and started changing its direction, its value gets progressively darker as it turns more and more away from the light. But it's important to note here that at all of these angles, the light is still hitting this plane.
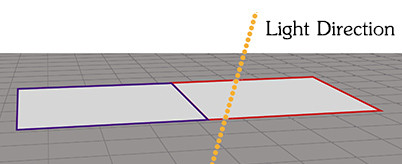
Now, watch this... Past this point here, the plane turns away from the light enough to make it plunge into shadow. You can practically see the values jump from one family to the other. So, because halftones are in the light family, it's good practice to keep your values close to the light family. That way you maintain enough separation for your shadow values.

This way, we keep our forms clearly readable. Going further with the family analogy, like brothers and sisters, halftones want to stay close together. Do not let your halftones get too dark because then you'll jump families and that's bad. Your form will get compromised which can seriously confuse the viewer. As I add half tones to our painting here, one thing I do to help manage them is further limit the amount of halftones I use. Using just two or three values for halftone is enough to describe subtle form changes. And as I work these value changes, I can also think about softening the edge between each plane as well. This is how we get away from the overly hard edged Asaro head look and closer to reality. And now we're arriving at something that's looking clean, believable and professional.

Oh, and just a quick side note: If you can't freehand draw these planes yourself just yet, go ahead and trace the Asaro head and practice applying these value sets to the planes. This way you can isolate your lighting practice from your drawing practice and then just bring them together when you're ready.
Highlights
So, here's a model of a head. The highlights currently are here. As I move the light around, the highlights change as the angles in relation to the view change. And this shouldn't be too much of a surprise. I mean, light and shadow planes will also change when you move the light around.
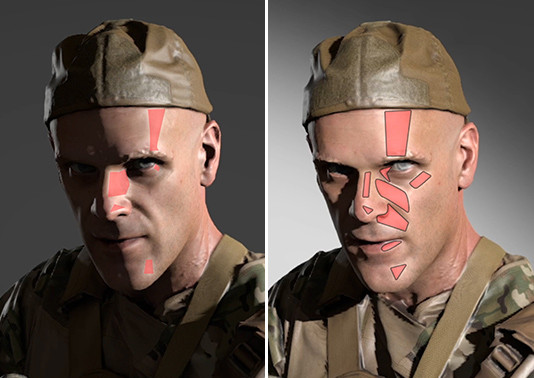

So, much like I considered the planes turning away from the light when I added half tones, when I add highlights, I’m considering the angles of plane that will facilitate that direct reflection. Highlights can have either hard or soft edges depending on how lean the subject is, their bone structure et cetera. With enough practice, you'll just memorize the patterns of highlights on the human head in multiple lighting positions. Again, knowing the angles of planes is the key to unlock this.
One more thing about highlights, sometimes they can run along the edge of two planes. Like see that classic crest light running down the bridge of the nose? That's where two planes, the front and side plane of the nose are meeting. At the ball of the nose where more than two planes meet, you can get that classic tight circular highlight.

I should mention at this point that this lesson does not actually cover every single plane of the head. There's more to discover here, and I do have some premium content for that, which I’ll mention a little later on.
Bounce light
This is the final value group I want to tell you about. So far we've defined the light, but our shadows have been left kind of flat. While this works great to show the basic form, in real life, light bounces around and illuminates the shadow. It's called, wait for it, bounce light or reflected light, both mean the same thing.
I recommend looking for planes that are most exposed to the environment. Those will likely get the most reflected rays and you can start by lightening the values on them.
Conversely, the areas that you think would not be exposed to much bounce light, that's called "ambient occlusion". And it's kind of like the inverse of reflected light. So, we should keep those areas of shadow quite dark.
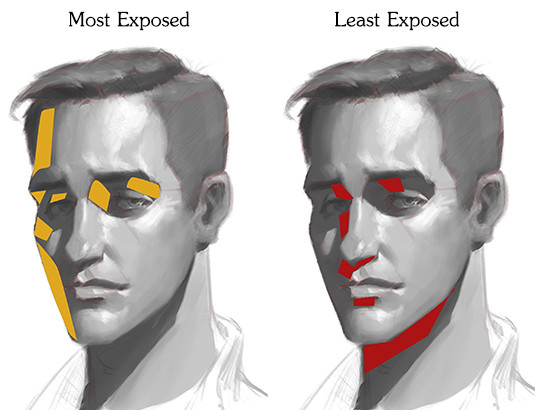
As I paint this in now, I’m thinking that these groups of planes along the cheek, the brow and some of the eye socket are good candidates to give reflected light to. And remember, we have to keep these values grouped in the shadow family. Do not let your reflected light values become confused with your half tone values. That's another common painting mistake that will totally compromise your 3D form. Also, just like halftones, I recommend using soft edges here to get a more lifelike effect. And that's about it. These are tools that revolutionized my painting and helped bring me to a professional level. With enough practice, I’m sure it'll have the same impact on your work as well.

Anyway, I just want to thank Stan and his team for having me here. Proko does great work. I’ve personally learned a lot from his anatomy videos. I do have some premium content over at my website, including a seven hour intensive lesson on drawing and painting the human head, which would be a great companion piece to this lesson. Or if you want more free content, please come visit my YouTube channel.
If you enjoyed this lesson, make sure to check out part 2 of this lesson. I'll show you how to use this painting to paint skin tones and how light affects color!

