


In this lesson we will be talking all about cross hatching. We'll start with some simple line technique and move into some theory about how and where to place your lines and then we'll bring it all together in a finished rendered figure drawing.
I’m David Finch... I’ve been a comic book artist for over 25 years for Marvel Comics, DC Comics and many others. Over the years I’ve drawn just about every character you can possibly imagine.
Understanding The Line
So, with cross hatching, before we get into how to use it, where to use it, and the different effects that we can get from it I wanted to talk about just the simple line itself. The way that I approach my pencil cross hatching is I’ll just create a bit of a ball and then ease my pencil out from there. If you were to use a pen you can actually just add a little bit of pressure and then draw your line up from there.
Notice that I’m using the same basic line length, the same slight curvature to the line and the same distance between my lines. If I wanted to go a little tighter with it, that's fine but it's something I need to keep consistent as I go along. When you do any cross hatching on your picture, it'll be far more effective if you can be as consistent with your line as possible. So, I can curve and start to go in a different direction, I can start to go longer and all those sorts of different things work but it needs to be a consistent line all the way through. It's very easy to just start throwing lines kind of willy-nilly and end up with a bit of a mess, so make sure to always keep it as consistant as possible.

Hand Direction
Another thing that's very important to bear in mind is the direction of your hand. For me, I tend to have the easiest time drawing outward with my hand, along the path of my arm. If I try and go inward, I’m really fighting against my natural arm movement. I can actually use my wrist that way but I’m not using my arm at all.
I personally can't use my wrist horizonally from certain angles but I can actually come from under and use my wrist. You'll find that there are easier ways and there are more difficult ways for you to draw your lines. When you're drawing I would recommend that if you've got lines coming up at a difficult angle, you should just curve your page and then work in a way that's more natural for your hand. This is something you really need to experiment with.
I’m a left-handed artist so my natural hand movement will probably be different from yours if you're right-handed or maybe even different from yours if you're left-handed. Whatever it is that you're more comfortable with, that's the way that you should really work and it's something I think the best way to figure that out is just to experiment with the line, experiment with your wrist and see what works for you.
Generally speaking though, I find that most artists have the best line control and easiest time working just going outward with the hand at about a 45 degree angle. So I would consider that to be a good default.
Rendering on Forms
All right, so now we're going to get into how to start using our rendering on actual forms and the way to make it work the most effectively. For the first example that I’m going to show, I’ve got my lighting coming from the left and downward toward a simple plane. I’ve got a shadow away from the light at the top plane change and a shorter shadow away from the light at the bottom plane change.
I’ve got a much softer curve for the top plane change and a much harder curve for the bottom. For the softer curve, I’m going to use much longer rendering. I have a tendency to go back and forth between calling my cross hatching "cross hatching" or "rendering".
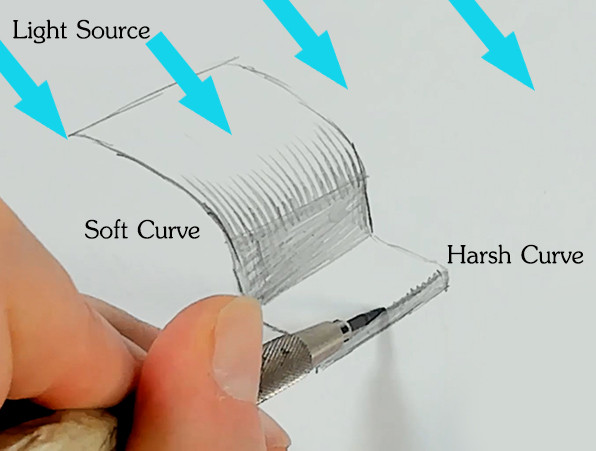
It's very important that I make sure if I want to create this effect that I go all the way through with my cross hatching. If I stop at any one place, it would break the effect and make it look like I’ve got a harder plane and a softer plane and you really need to control your plane changes with your rendering.
So, now I’m going to go in with a much harder plane change at the bottom, as a result, my rendering is much, much shorter and it's a very, very abrupt change from dark to light. If I wanted something to be completely abrupt, I wouldn't add any cross hatching at all. This is a good way to soften your form just slightly but without blowing it out.
If I went really long with my rendering, I’m really destroying that effect right away and I’m actually creating something that looks much more like a texture than like a transition from dark to light. That's why I see this quite a bit in cross hatching on figures, things can start to look a little textured and odd and it's because very long cross hatching lines are going deep into the light from very hard forms.
The Different Types of Lines


Example 1
And now in this first example, I’ve got a light source coming from above to the left here. I always use essentially an omnidirectional light. So, I’m not using a pin light where I’ve got light radiating out from one point. It just makes things much, much easier to keep things consistent across an entire image if my light goes in the same direction over the entire image.
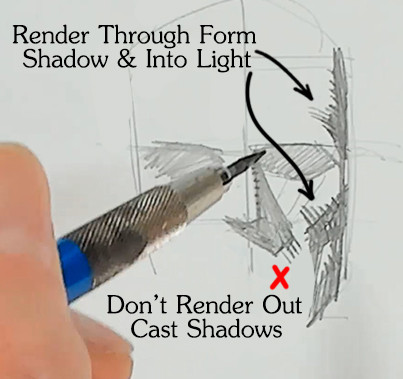
I’m going to use a sphere for the next example and I will light it away from my light source. I’m not using any bounce light for this, we're keeping this as simple as possible and I highly recommend when you're learning how to draw, to avoid things like bounce light and just use a single directional light and just hard shadows. Now because my light source is coming from here, it's very easy for me to figure out on the sphere below where my shadow is going to fall. This isn't rendering, this is a bit of a shadow theory but the reason I’m showing this example is becasue rendering out of cast shadows is a very common problem.
I’m rendering from my form shadow on the sphere toward the light and making sure to be consistent with it all the way around. Now my cast shadow is going to be entirely hard because the sphere is obscuring the light there completely. If I was to render out of my cast shadow, and this is something I see people do quite a bit, I’m actually rendering into where the light would be hitting. And so, it actually really destroys the illusion and something you really need to be aware of.

So, for instance on a face, I’m going to draw my nose in here and I’m going to cast a shadow over my cheek. The nose is actually shadowing the surface that would be my cheek.
Because this is a form shadow here and it rounds up toward the light, I can render through into the light and that works, but if I was to actually render out of the cast shadow, I’m rendering directly into where the light source hits. That's why you can see even here it just looks very, very odd. So it's something to really be aware of. Never ever make that mistake, always keep your rendering limited to form shadows and direct them toward the light from the form shadow.
Example 2
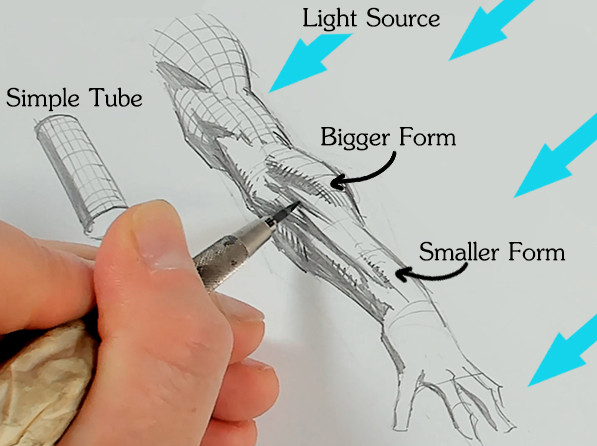
Next we're going to talk about line direction. For this example, I’ve got my light coming from the right side and I’ve essentially got a tube; an arm is just a slightly more complex tube. Just the same as the tube, my shadow for my arm is all along the side.
Using that simple tube, you can see that it represents the contour of my tube on either end. My framework essentially along the tube curves in the same way that both ends curve. So, you're just following the form and I can also follow the parallel form as well. Using an arm, I’m going to do the same thing. I’m going to draw lines that represent the curvature of my forms along the form.
This is a pretty simple thing. It's almost like drawing Spider Man. When you draw Spider Man's webbing, you have to contour the lines around the form and knowing that my arm is going in the same direction as this simple tube is really the key to that.
I can also go along the form the opposite way. That's really all you need to know to be able to start drawing rendering that follows your form and actually helps describe the direction of your form in space. I’m going to do the same thing here. For this higher muscle, I know that my overall arm has that same kind of curvature, so this muscle has its own rounding basically going the same way. And so, I’m going to render along that using that as a guide.
When I actually draw on a day-to-day basis, I don't draw these guides in. It's something that you really should be able to see just in your own head very easily just from practice. Now, I’m going much shorter with this rendering just like I showed in the previous example for this lower part because this is a much shorter transition. It's a much more shallow shape that I have and so my rounding transition is much shorter, so I’m following it with a shorter line.
I could have a similar kind of a shadow with a much broader form and then I would go longer with the rendering. But because I know that this is a pretty small form, I want to keep my rendering very small or it would be a possibility just to not have any rendering at all.
Example 3
Before we move on to something a little bit more fun, I have one more example that I want to show. This is basically a very, very simple deltoid shape, which would be your shoulder. I’ve also drawn in just a simple grid to show you the direction of my form both crossways and vertically. I have a couple of different options that I can use when I decide how I want to soften my shadow up towards the light.


Applying What We Have Learned
All right, so, now that we've covered a bunch of theory and some of the reasoning behind the choices that we make we're going to take a figure that I’ve drawn and apply what we have learned. I’ve got my lighting defined in from the left, slightly to the front and I went ahead and just drew in all of my shadows.
It's really important to note that the only way that rendering is really effective or cross hatching is really effective on a figure is if your underlying structure and your lighting is well established. It's possible to render or cross hatch without any lighting - without any shadowing at all. But my preference is to cross hatch out from shadowing toward light to create a transition from dark to light and so that's what we're gonna do here.
I’m gonna start with his chest which is a nice broad form, so I can go fairly long with my rendering. I don't want to get too carried away and I’m just following the overall form of my underlying shape toward the light. I can break up my line just to give it a little bit more character and now I’m going to do the same thing on the other pectoral. On the other side I want to round up toward the light and I’m actually rounding along my form as opposed to toward the light which I will do later in the lesson.
I’m using my cross hatching to soften toward light but also to define the angles of my forms and it's rounding along the overall form of the chest.
Now I’m going to go nice and soft again here over his shoulder. It's a very soft transition from light to dark here and this is a bit of a harder transition here and it goes toward being a little bit softer as it rounds down. So, I’m going to start fairly short with my lines and just get a little bit longer as I go along.

I have a choice with the lower stomach here; I could go directly upwards or I could round it toward the light. I think I’m gonna go for this example directly upwards. And this is a choice and there's really no right way or wrong way to do this, you can choose either way you want and because I rounded out this way with the previous lines, I’m going to start to match it with the rest just so I can create a bit more of an overall pattern just like that.
Now I’m gonna follow the same basic shape that I did before. It's important if you go with a bit of a patterning you want to carry it across your overall form and not start to deviate too much or things can start to look disjointed.

Now for the rib cage on the right side, I’m gonna follow along the form the same way as before. I actually went upwards last time, so to start, I’ll actually do the same on the other side. These are much shorter lines because although they are not terribly hard shapes, they're much smaller shapes. You can see I came much longer up here because I’m going for more of a hard ridge and just softening it as I go up. Longer lines always soften forms, shorter - tighter lines always keep your forms harder and smaller.
So now for my lats again, I’m going to come along this way and use a bit of cross hatching just to mirror along, follow my form up and then bring it down and under just by continuing my lines in this basic direction along the form.
I’m going to do a little bit of cross hatching on the lower stomach just to soften this just a little bit further. And again on the other side, breaking up my line. I want to keep these lines long but I don't want to overpower with too much line so I just break it up.
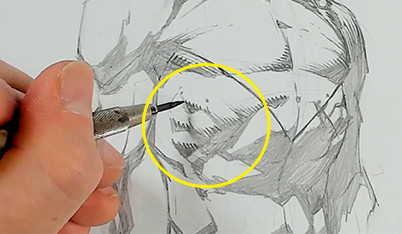
For his bicep, I want to keep my lines coming along the form. I’ve given him a bit of a vein detail and this is something I should probably erase. He's got a costume on, that's really not something that he would have so let's get rid of that. But I do actually want to extend my lines because I’ve got a real transition. The arm curves upward and then has a bit of a hard transition and comes back down. And so, just using that as a bit of a landmark there kind of helpful for me.
I’m going to come up along the inside of the bicep to soften it a bit. Be very careful when you're cross hatching to not get too carried away. It's very easy to get over rendered and start to hurt the look of your picture. Now, for his tricep, I actually want to curve upward toward my light just because it nicely follows the form. These are going to be much tighter and shorter lines through here and I’ll soften it as it goes down. And as long as you bear in mind where your form rounds and how large your shape is and how hard your transition is, it keeps it very, very easy to keep your rendering in check and make it work, especially this whole process is much, much easier when you really have your underlying shadow defined properly.

Because this is fairly tight, I’m gonna go much larger this way and I can kind of define my form that way without overpowering because I’m just changing up my sizing. I want this whole area in here to be not dark but fairly shallow and so, I’m just gonna use my rendering just to push that little shape in there, back.
My overall neck form is wrapping around to the left, and so I’m gonna follow it. These are gonna be much shorter lines because this is a bit of a harder transition. Very small little lines there just to define that and just soften it slightly but not too much.
And so, for the face I want to soften underneath the mouth down across the cheek and I also want to define my jawline here up around the side of the head. He's got a mask detail on his chin, I’m just gonna angle that whole piece away from the light just using some relatively flat line work. There are certain parts of the cheeks that I want to be softer, so I’m just gonna render that in. I can render along his nose but it's small enough that I think that might be a bit of a mistake. When you have a really hard transition at a small size, you're probably better off to just leave it alone rather than try to render out of it. I’m gonna soften some of his frown detail. Be very careful to keep this pretty light here. At a face this size, too much rendering can really overpower very quickly.
And there you can see, once the actual shadowing is in on a figure, you really don't need a lot of cross hatching to get something that looks very detailed. It is very easy to overdo this process. And you can see, I think for a figure just about this size, I’ve got about all of the rendering and all of the cross hatching that I would want to put on this before it would start to really just close in. It's a bit of a push and pull process to learn exactly where that point is for you, where you'll have cross hatching that will add to your picture and where continuing to add it will start to take it away.
I do hope you see just how important your underlying lighting is to making this sort of cross hatching work and how this is really used to show its volume in space and also to soften and add believability to your forms.
Alright, that wraps it up! Thank you so much for watching. If you guys enjoyed this, go check out my YouTube Channel appropriately called David Finch, where I've got tons more videos like this. You can find more of my art on Instagram or on my website. You can also find his work in a bunch of Marvel DC and Image Comics. See y'all next time!


