


Head to Squarespace to save 10% off your first purchase of a website or domain using code PROKO
Hi there. My name is Irshad, but some of you may already know me as Uncomfortable, the goblin behind Drawabox.com, and the evil taskmaster who makes thousands of students draw countless boxes (among other things) in the name of teaching the core fundamentals of drawing.

I’ve been working as a concept artist and an illustrator, as well as sharing what I know about drawing for the last five years or so, but there’s something you might not yet know about me: I have aphantasia.
APHANTASIA

In the last decade however, it’s started to become more and more apparent that we don’t all see the world contained in our imagination the same way. There is in fact a spectrum - from people who can read a book and have its scenes play out vividly in their heads like a movie, to those who have no mental imagery whatsoever.
Some of you are probably thinking right now, “big whoop - I don’t see anything in my head either, the mind’s eye is just a metaphor,” and not too long ago, I’d have agreed with you. In the last decade however, it’s started to become more and more apparent that we don’t all see the world contained in our imagination the same way. There is in fact a spectrum - from people who can read a book and have its scenes play out vividly in their heads like a movie, to those who have no mental imagery whatsoever.

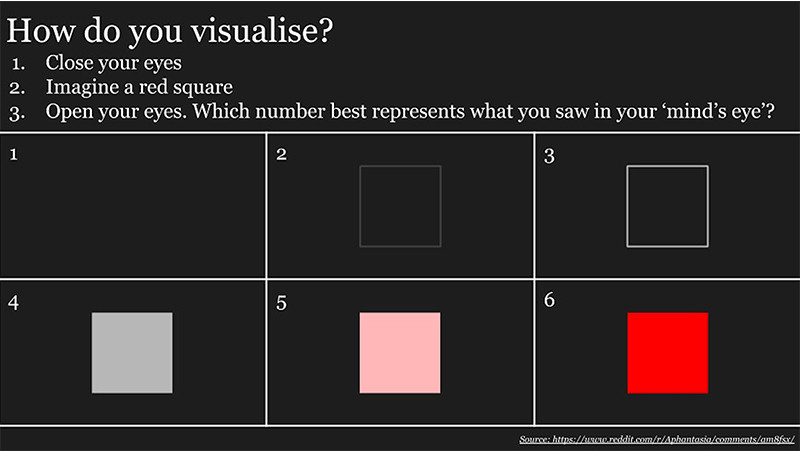
Most of us exist somewhere in that range, though it’s tricky to pin down. After all, it’s hard to fully grasp how literally someone may be describing how they imagine, especially since the only touchstone we have to relate to these descriptions are our own experiences. Hearing from more and more people as the concept of aphantasia has made its way across social media has however made it clear that we do not all experience this the same way. Across twitter, facebook, and reddit, people have posted “tests” - like visualize a red star, or an apple, and then tell us which of these images looks closest to what you see in your head. Countless people who see nothing (or close to nothing) have crawled out of the woodwork, shocked - “What do you mean people can see things this vividly?”
For those of us who aspire to bring our imaginations to life with illustrations, designs, and more, that leaves one big question: If I have aphantasia, does that make it impossible to draw from my imagination?
If you haven’t guessed it by my career for the last five years, the answer is a hard no, and instead of just leaving it at that hopeful statement, I’m going to explain precisely how I go about approaching my work despite not being able to visualize a damn thing. And this doesn’t just apply to those of us with aphantasia - it’s a workflow used by designers across the board, regardless of their capacity for literal visualization.
Like the idea of artistic talent, the ability to see the things you mean to draw in your head can be an advantage, but only at first. As we learn to hone particular areas of our skillset, any such predispositions become less relevant and give way to a more concrete, reliable understanding of how the things we draw exist in space.

If you know anything about me or the free lessons I’ve shared for years on Drawabox.com, you know that I am obsessed with spatial reasoning skills, and that’s precisely because they serve as the backbone of my skillset.
Understanding how the objects you’re drawing exist in 3D space, and how they relate to one another within that space provides a more solid, reliable foundation than anything else - and so my teaching centers around exercises that build up that specific ability.

Where my aphantasia started me off with a blank canvas, learning to draw (specifically through the Dynamic Sketching class I took under Peter Han at Concept Design Academy) helped me start to understand the objects I was imagining in an abstract way, focusing on their spatial relationships, their individual sense of weight, and the way that gravity applied to the scene as a whole.

While I may not see any of the pieces I play with in my head, I steadily developed the ability to understand how those pieces could fit together to create a variety of results. Furthermore, as I’ve taught this skill to others, I’ve found that even those with strong visualization skills have needed to close their mind’s eye and ignore the images they are used to conjuring, in favour of feeling the forms they want to manipulate.
This is most easily done when dealing with simple forms - and so our ‘constructional’ drawing exercises involve looking at a reference image, or at an object from life, and trying to break it down into an arrangement of these simple forms, before building it back up on the page. This kind of approach is incredibly powerful, because it gives us an understanding not of a specific photo of an object from a single point of view, but rather the whole object in three dimensions, something that can be rotated, stretched, modified, and combined with others as needed.

It also helps us explore the core of these objects, giving us more information to store in our visual libraries - the part of our minds where we retain information that can be used in our drawings later. Of course, in my case, this isn’t exactly visual per se...but it still exists.
Alongside my day job and my work with Drawabox, I also work on a webcomic called Orc and Gnome’s Mild Adventures, and it demands a great deal of effort to be put into world building. That basically means creating a lot of designs of creatures, characters, props and environments and fitting them together to create a cohesive universe. For the majority of my props and creatures, I’ll take existing objects - either from life, reference, or from things I’ve studied in the past and tucked away into my visual library - and I’ll change them or mash them together with others to create something fresh and new.

This all comes back to something I learned from John Park, who taught an Intro to Form Language course I once took. Design is a matter of taking 80% from the real world, and then combining it with 20% of something new. Over the years, I’ve come to understand this a little differently, though - a lot of that flavour and personality we bring to a design ourselves emerges in the novel and interesting ways in which we choose to combine things. Our imagination and creativity is the glue that binds the bits of reality we’ve chosen to reorganize to suit our purposes. This approach keeps our designs grounded and relatable, while making them intrigue our audiences, as they look at the familiar from a new angle.

Of course, in order to take a piece of reference and modify it without losing that sense of realism and believability, you need to first fully understand how it exists in the world, not as a two dimensional drawing, but as a three dimensional structure.
In one of the later Drawabox lessons, where we look at construction by studying animals, the very end of the homework includes a ‘hybrid’ drawing - basically mashing different animals together. It’s there as a sort of gauge of their progress - students who are able to combine those multiple animals together and still maintain a somewhat believable result are developing their grasp of 3D space and form nicely, whereas those who end up with drawings that feel flat and unconvincing still need some additional support.


While I’ve explained how we can work without relying on a ‘visual’ imagination, let’s look at how I actually approach it with a demonstration. The first thing I start with is a brief - a description of what exactly it is I’m supposed to be designing, so that means coming up with an idea. Generally speaking, you might be sitting there going, “I don’t have any ideas - that’s the problem!” but I refute that notion.
In my experience, people tend to have loads of ideas. Don’t get me wrong - most of them are awful, and we reject them out of hand, but the fact of the matter is that the ideas are there. The reason we feel like we don’t have any ideas is because we have trained ourselves to quickly assess just how likely a drawing is to come out looking good. If we think we can’t draw something well, that automatically makes it a bad idea, and therefore it evaporates before we can really consider it any further. This is because we’re not thinking about what we want to draw - we’re thinking about what is going to make us look good. But in truth, just because you can’t draw something well doesn’t make it a bad idea. Furthermore, just because you can’t draw something well right now also doesn’t mean you shouldn’t make the attempt regardless.
Demo
So, let’s start with an idea - some kind of brief or prompt. One thing I’ve always enjoyed is taking mythological creatures and reimagining how they could look. That’s more or less how the world of my web comic has been developed - taking traditional D&D or fantasy creatures like kobolds, imps, gnolls, and such - and turning them on their heads with different kinds of design influences. So let’s look at doing one together.

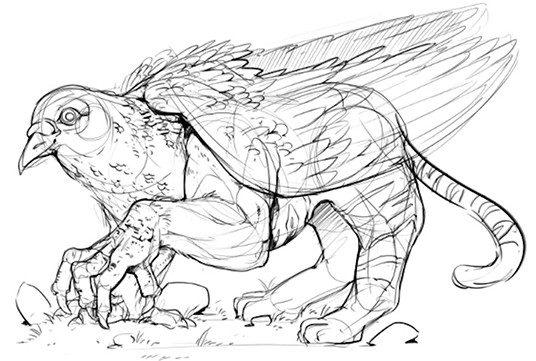
Let’s design a griffin. Griffins are at their essence a combination of two kinds of animals. Generally it’s an eagle and a lion, but we can simplify it down to being some sort of furry, quadrupedal animal and a bird. Now, I’m still interested in going the big cat route - something like a tiger could give us some interesting patterning and musculature, but when it comes to the bird, the world of my web comic has a lovely tradition of making things just a little stupider: so let’s mix our tiger with a common pigeon.
Finding Your Reference
Now that we’ve got our idea, the next step is not to just grab a new piece of paper or a blank canvas and start drawing griffins. First, we need to gather reference. For this I’d probably not pick on anything actually depicting a griffin- though that’s not a hard rule. For example, highly simplified medieval tapestry depictions of griffins could actually be quite useful here, but images that are very close to what you ultimately want to produce are likely to become hard to ignore.
So the obvious things we’ll look for - either on google, pinterest, or wherever else you prefer to look at images - are pictures of pigeons and tigers, though we’re not limited to the specific things we know we’ll be featuring in our design. After all, we don’t yet know what exactly this is going to look like. Go on a hunt, and grab whatever images catch your eye, and don’t be afraid to grab things that seem completely irrelevant. Meaningful influence can come from the strangest of places.
As a side note, the software I use when gathering reference is called PureRef. You can get it for free, but it’s such a phenomenally useful little tool that it’s well worth paying for. I use it to collect reference images in a single board, and it gives me the freedom to zoom in and out, flip and rotate, reorganize images, and even save off entire boards to a single file.
Studying Your Reference
Once you’ve got your reference, our next step is to actually study that reference. Having images to work from is one thing, but it doesn’t really tell us much about the tools with which we’ll be working. We need to really explore them and deconstruct them into their simplest components.
As I work through these studies, the main thing I try to focus on is striving to understand the forms that make up the object, and how they fit together to create the whole. A lot of students will get really caught up in replicating the photo they’re working from, but that kind of granularity is only valuable if we’re specifically recreating that image. Here we’re trying to distill it into major sweeps of information that we can leverage in our own design, so we need to be able to simplify it in a way that is useful to us.
When we look at either an object, or a photo of something, our brain’s going to perform a relatively simple, shallow assessment of it to help us understand what it is, but not necessarily how it exists in the world. By actually drawing it as we do in these studies, we force our brain to take a much deeper analysis. What we analyze depends on how we approach the study.

Alternatively we could try and swap out the dominant shape for something like triangles to create some kind of evil pigeon, but we’ll leave that for another day. Another important element to familiarize yourself with is proportion - how those forms relate to one another in scale. In our own design, we can stretch and squash and play with the proportions of our source material to our heart’s content, but in order to do this, we need to be familiar with what the original proportions actually are.
As you work on these studies, don’t be afraid to be a little loose and fluid with your marks. In Drawabox I push students to be hyper-aware of every mark they draw, planning and preparing before each confident execution, and having every mark reflect clear forethought and decision-making. This is to train our instincts, so that when we draw outside of the course, we can trust that our subconscious will continue to think even if only for a split second before every mark, so we can instead focus our attention on the important stuff. You may have noticed that since we’re dealing with living creatures, I try to break up my studies between poses that are both at rest and those that are in motion. Understanding how an animal’s going to be moving around can definitely help us understand more about how their bodies work, and the various ways in which those forms can be arranged.

Now that we’ve become more intimately acquainted with our reference images, and that information is more freshly available in our visual libraries, we can start actually generating some designs. We’re still encouraged to use our references to directly inform our decisions, but by having studied those elements as we did, we’ll be better equipped to play with those components freely, exploring combinations and modifications that may not have been as obvious to us before. It’s kind of like how when you’re only passingly able to speak a language, no one’s going to expect you to be writing poetry - but when you’re really fluent, you can explore much more complex language patterns and more uncommon ways to express your thoughts.
As you work through a design, note that iteration is your friend. While the first thing you draw might be the best option, there’s a good chance it won’t be - so prepare to come up with a lot of different ideas. Explore every possible thought, and when your brain does that filtering thing I described earlier, where it rejects ideas out of hand - take control, and force yourself to draw everything that crosses your mind. There is nothing to lose but time.
When sitting down to explore a design brief, the first thing I try to do is get the obvious out of the way. I know what a griffin looks like, I know the basic structure and how they’ve been depicted for centuries, and simply telling myself not to think about it doesn’t really work. Instead I make sure to get it out of my head by drawing the most traditionally griffin-like interpretations of the pieces I’m working with. Once that’s out of the way, it’s going to be a more up-hill climb to generate the less-obvious designs, but every idea is worth exploring, and so every thought I have should result in some kind of action on the page.
We’ve got a lot of reference to work from, but try not to focus too much on a single image. Keep in mind that we’re not letting the reference drive our design - instead, we decide what we’re going to draw, and we use the information in the reference images to help us get there. Make the big decisions yourself, and use the reference as a tool to achieve that end. I have a tendency to bounce between references, instead of clinging to just one.
Conversely, you’re going to have far less success if you’re only understanding the different pieces as though you’re pasting flat, two dimensional elements on top of one another.
This actually reminds me of a problem I ran into many years ago, when I was trying to draw a character with multiple sets of arms. It’s not an uncommon design trope, but have you ever considered just how, mechanically, you’d connect more than two arms to a human body? Do we introduce an additional set of shoulders? And if we do, where do those shoulders connect, and how are they going to interfere with the original arms’ range of motion? We encounter this same problem with wings - after all, wings are just a different kind of arm.
Thinking about the different components as simple forms can help us solve these kinds of problems in a believable fashion. For a concept artist, that sort of thing is our bread and butter - after all, if someone wants to make a 3D model of whatever it is you’re designing, you can’t just “vague” your way through difficult parts. You have to figure out in specific terms how everything’s going to physically work. A concept artist’s job is to be the bridge between ideas and their realization, so they can be used for something more than just a pretty picture.
These ‘problems’ are precisely where we get to leverage our creativity. Design itself is an exercise in problem solving, and it is in attempting to solve those problems that interesting and dynamic solutions arise. “Draw a griffin” isn’t really an obvious problem - it first needs to be broken down and explored, and through that exploration we can find all the little issues that need to be solved, like figuring out how the wings attach to the body.
As you work through this exploration, don’t be afraid to play with all the pieces that are available to you. We’re not just stitching a pigeon’s head to a tiger’s body and slapping on some wings. All the pieces are fair game, and you’re welcome to incorporate anything else to see how it can get you closer (or farther away) from a useful solution to the design prompt.

We’re exploring, brainstorming, and experimenting with any and all ideas we generate. The more the better. Don’t reject a single idea until you’ve had the chance to objectively prove to yourself, on the page, precisely why it doesn’t work. Don’t let yourself be satisfied with just one solution, either. Even if it might be the one you end up going with, we can only hold it up as the best choice if it is surrounded by all the ones it beat out.

Stepping back to the point I made about solving design problems, here’s an interesting one. Growling with an open mouth is a totally normal thing for a tiger to do, but what would it look like if we had a bird’s head with the same kind of expression?

The more questions you can ask yourself, the more what-ifs you have to contend with, the more fodder you have to help you generate new ideas, and that is precisely what exists at the core of design.
And there you have it! This systematic approach to design is pretty much how you can expect to really dig into creating fresh designs of your own. Of course not every artist will do this every time - sometimes when the biggest priority is speed and output, we may opt to rely on what we already have in our visual libraries to get us through, but this laborious process is part of what also develops that visual library for the future.
As a whole, this process does rely quite a bit on strong spatial reasoning skills. That is, understanding how to break things down into their simplest parts, how to manipulate and combine them in 3D space, and so on. That said, even if you don’t yet have those skills developed (which again, I teach at DrawABox.com), that doesn’t mean you shouldn’t be diving head first into this sort of thing. A big part of learning how to grow and improve is to accept that the things we draw don’t have to be impressive. Drawing things that look like garbage is an inevitable part of the process, and we all need to accept that, and get comfortable with it.
So, I want all of you to think about why exactly you’re learning to draw. Ask yourself why you’re going through the trouble in the first place - do you want to draw bustling scenes, beautiful characters, crazy creature or mech designs? Find whatever it is that drove you here, then try to apply these principles to drawing precisely that. Is it going to look amazing? No - but you’re going to start getting used to a workflow that will gradually help you grow in that direction.
Don’t wait for that sense that you are finally ready to draw the things you’re passionate about - that feeling will not fall into your lap. You have to go out and hunt it down yourself.

