


This lesson will cover more individual muscles than any lesson so far. Fortunately, there’s some patterns that can make the forearm a little bit easier.
"I'd read about the extensors and flexors of the forearms, but I'm confused about their visual hierarchy and how to make them concise, simple and manageable to draw. I hope your videos will address my worries."
Absolutely! This video will focus on the big patterns and major forms.
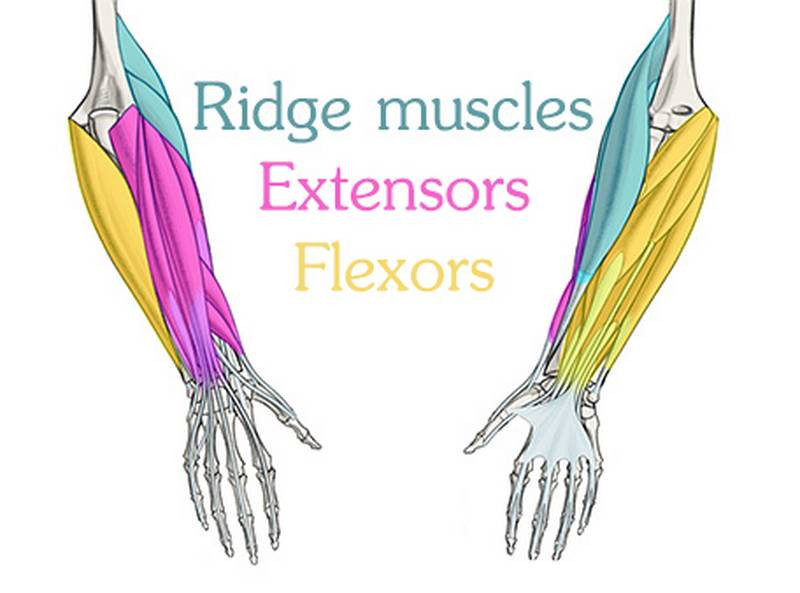
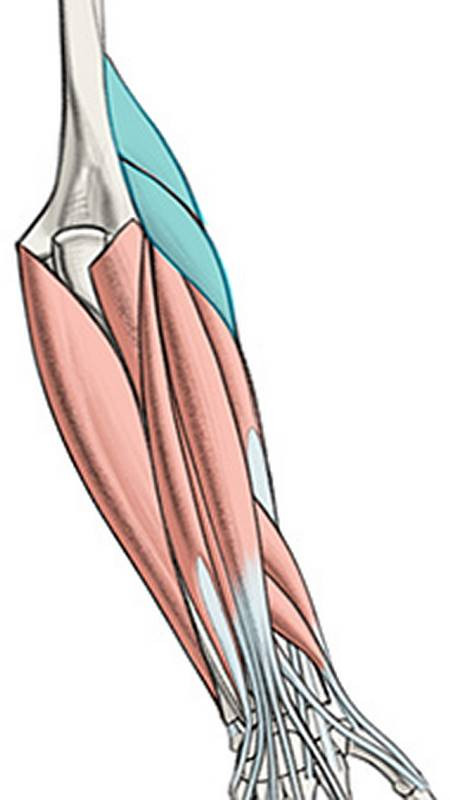
We’re gonna split the forearm muscle into 3 groups, the Flexors, Extensors and the Ridge muscles. This video will be a general overview of the forearm.
The Premium section will have 3 additional videos with more details about each group.
he elevated mass of the ridge muscles is the biggest thing contributing to the asymmetry in the forearms.

Here’s an example of a petite woman.
She doesn't have developed muscles, but you can still see the 3 groups clearly. Ridge muscles at the top. Extensor muscles on the back. And flexors on the front. Same on the other arm. Ridge. Extensors. Flexors. On her they’re very soft and skinny, but they are clearly visibly.
Let’s get the most complicated area out of the way and start with the extensors.
Extensors
But first, one similarity you’ll appreciate: All these muscles originate from the lateral epicondyle.
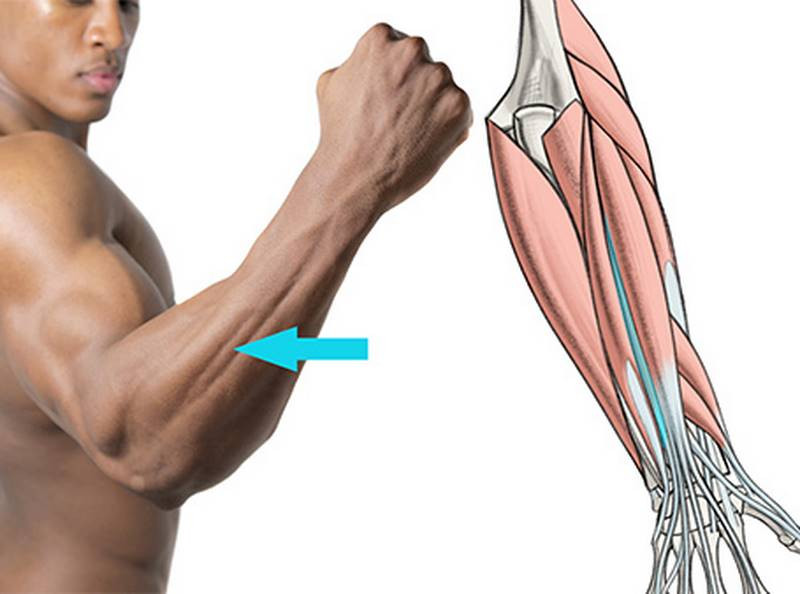
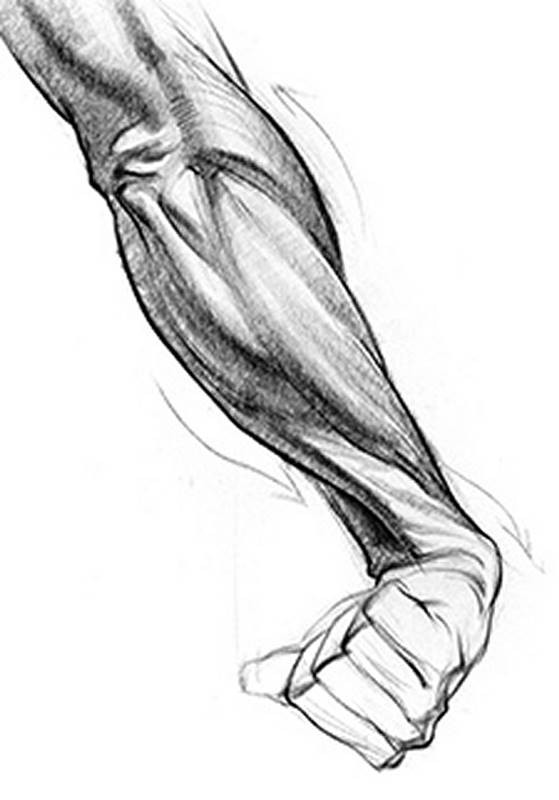
The extensors are neighbors with the ridge muscles on one side and the ulnar furrow on the other. Back here you can see a piece of the flexors peaking through from the front of the arm. The basic form of the extensors has this bullet shape with the tip at the dimple of the lateral epicondyle.

From the side, remember that the elbow and the bone at the pinky side of the wrist, is the same bone. It’s the Ulna. From some angles, the extensors will overlap the ulna, but you should draw through the form of the muscles to keep the two ends connected. The ulnar furrow is an extremely helpful boney landmark for tracking the forearm muscles. Make friends with it.
Ok, let’s divide this basic bullet shape into the individual muscles. Basically, in the middle you have a really wide one and a really skinny one next to it. On the sides, there’s two medium width muscles and two diagonal thumb muscles at the bottom there.
Let’s start with the one closest to the ridge group on the thumb side, the extensor carpi radialis brevis. This muscle straightens the wrist. It often appears as a floating muscle belly, because its long tendon distances it from its attachments on the wrist
You won’t see it reach the wrist because it’s overlapped by these two thumb muscles at the bottom.
The next one is the widest extensor muscle, the extensor digitorum.
It straightens your digits. The extensor digitorum splits into four tendinous branches and inserts into each of the four fingers.
We’ll talk more about these tendons during the hands lesson.
The next one over appears ⅓ of the way down the forearm, as a thin sliver. This tiny muscle straightens the pinky finger.
It’s called extensor digiti minimi. I’m serious. The muscle that straightens the pinky is called minimi!
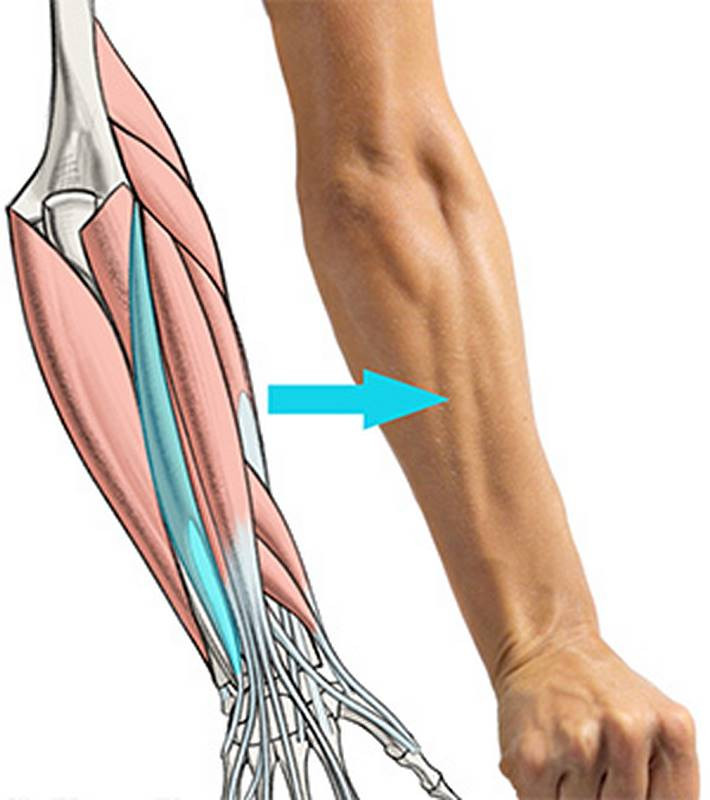
Unlike most of the forearm muscles, the extensor carpi ulnaris stays muscular almost its entire length. It’s long, narrow, and flat.
It sits on top of the ulnar furrow, which separates it from the flexors. Long muscle + long furrow = an obvious separation, especially in the middle third of the forearm where the ulnar furrow is most visible.
All that’s left in this region are the thumb muscles. None of their muscle fibers actually reach the thumb itself. Instead, they send their long tendons down the wrist

You can see the thumb tendons at the wrist, starting from the corner of the radius. Two of the tendons combine visually so the end result looks like two thick tendons, with a long hollow between them.
Back when sniffing tobacco was cool, people would put it in this hollow, so it’s called the snuffbox. You can find it on yourself by extending your thumb backward.
Flexors
The flexors are located here on the palm side of the forearm. When flexed, they bend the wrist and finger joints. They originate from the medial epicondyle and insert into the palm side of the hand. The flexor muscles usually blend together into one large, round form. Compared to the extensors, there’s not a lot of striation going on.
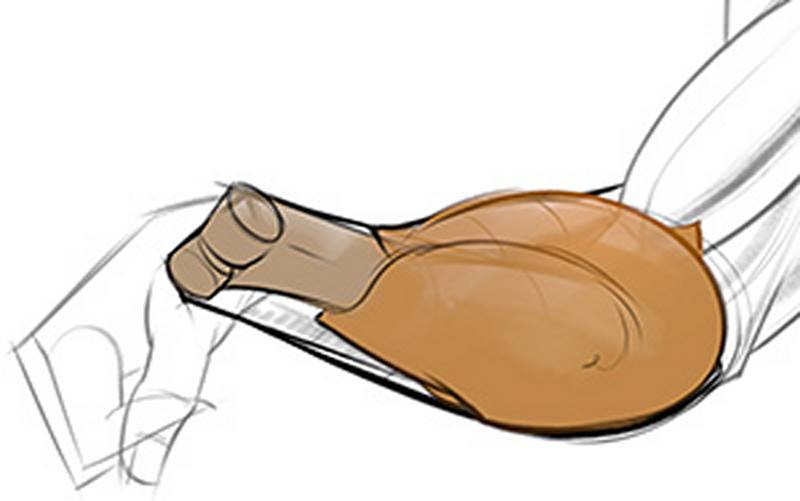
If you can draw a chicken drumstick, you can kinda draw the basic form of the flexors.
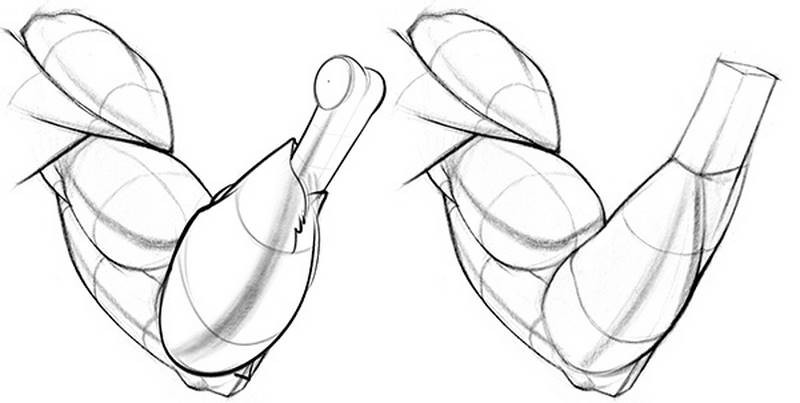
In the spirit of winter, I want to say: we hate snowmen! That’s what I call this kind of bubbly, symmetrical hanky-panky. It’s not believable, it’s not interesting and to me, it’s unacceptable.
The form of the flexors is also visible in the back of the arm as it curves around the ulna and flows down along the ulnar furrow. At the bottom, it curves around to attach to the front. This part of the ulna pokes out.
In a lot of poses, you’ll see this swooping curve of the flexors that seems to go all the way to the wrist. I’ve noticed it mostly in pronated arms with a flexed wrist.
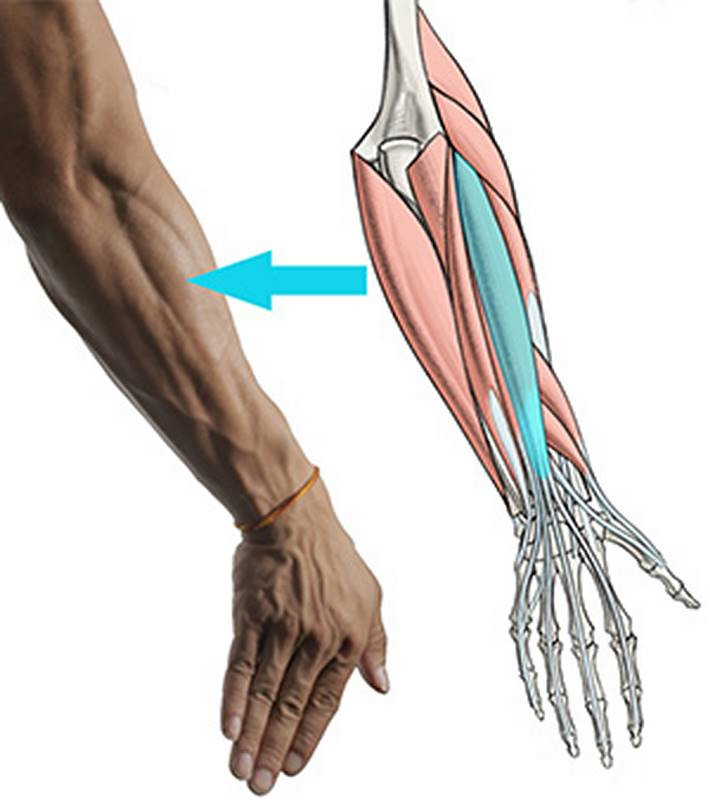
Since the flexors usually blend together, I won’t focus on the individual flexor muscles in this video. Instead, let’s learn their tendons, since the flexor tendons are easily seen at the wrist.
The Premium lesson will fully explain the flexors if you want more.
We’ll commonly see two thick tendons and one thinner one. The two big ones are off-center, aimed at the pinky and the index finger.
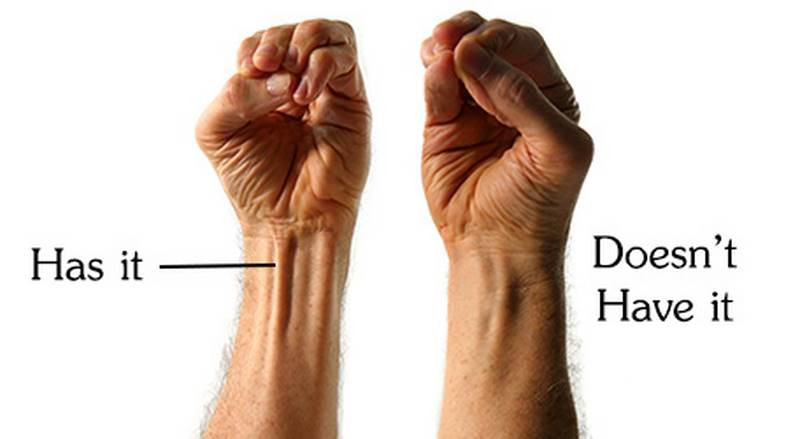
Up to about 25% of people don’t have this muscle at all.

If you’re drawing a youthful person, keep these little details light-handed.
Ridge Muscles
There’s just two muscles left, but they’re big ones - the brachioradialis (not to be confused with the brachialis) and the extensor carpi radialis longus.
The forms of these two are very separate from the rest of the forearm muscles and they’re collectively called “the ridge muscles.” They come down from the upper arm, swing across the top of the lateral epicondyle, and trail off towards the thumb. As they wrap around the arm they can create a convenient cross-contour line, especially in a foreshortened pronated position. As an artist you should always be looking for ways to explain form, and cross-contour lines are one of the best.
One way of adding depth, is with overlapping lines. The connection of the ridge muscles to the flexors is a great area to show overlap. There’s usually a clear plane change along the contour and an overlap which separates the two groups.
The ridge muscles usually blend together as a large, tapering tube form. They emerge from in between the brachialis and the triceps, and contribute to the “chain” design of the arm
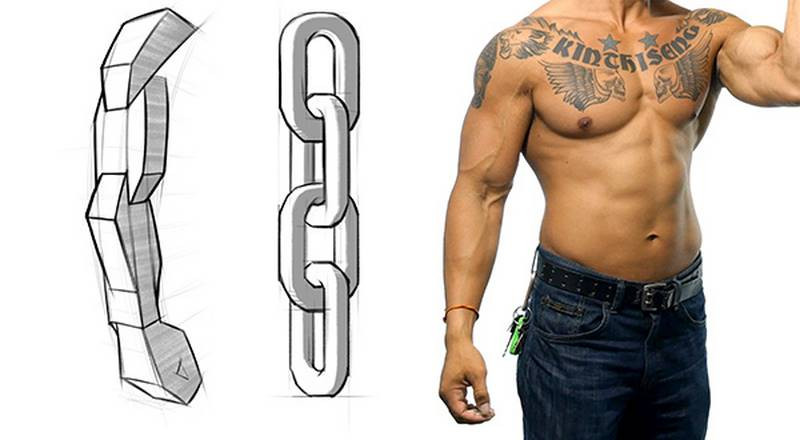
So, the chain design… That’s this thing, where the deltoid is wide side-to-side, the upper arm is deep front-to-back, and the top of the forearm is wide side-to-side. In a natural hand position when the wrist is half pronated, the wrist and hand add another chain front to back. This chain design is a helpful shortcut in general when you’re sketching the arm and you want to go a step past the basic cylinders.
When the elbow bends all the way, the ridge muscle bulge out around the back and the skin creases at the pinched side.
Towards the wrist, the ridge muscles blend in with the rest of the extensors. Remember that these muscles stay on the radial side from the lateral epicondyle to the thumb. Because of that, they’ll be straight during supination and an oblique S curve during pronation.

Pronation. We haven't talked about motion yet. In the comments, a lot of you guys asked about it.
"I'd like to know how the muscles are shaped and how they change due to the movement of the radius." -Al Harris
So, the forearm’s range of motion is actually very limited. It twists. That’s it. It sounds simple, but when we’re talking about nearly 20 muscles twisting, it can be a little tricky. Step one is learning their origins and insertions. If you know where they start and end, at least you’ll know which way they flow and you can figure out the gesture. The flexors start at the medial epicondyle and flow to the front of the hand. The extensors start at the lateral epicondyle and flow to the back of the hand. The ridge muscles start on the outside of the humerus and flow toward the thumb.
But, as some of you pointed out, knowing the origins and insertions is NOT enough. You have to study the forms. You have to completely understand the forms to know how they deform.
We talked a lot about the forms in this episode. That was the main focus here. But, you’ll probably need to rewatch it a few times and study a lot of photo reference.
That means draw them, not just look at them. When you do the assignment, focus on the forms. And if the arm is pronated, focus on how the forms are twisting.
Assignment
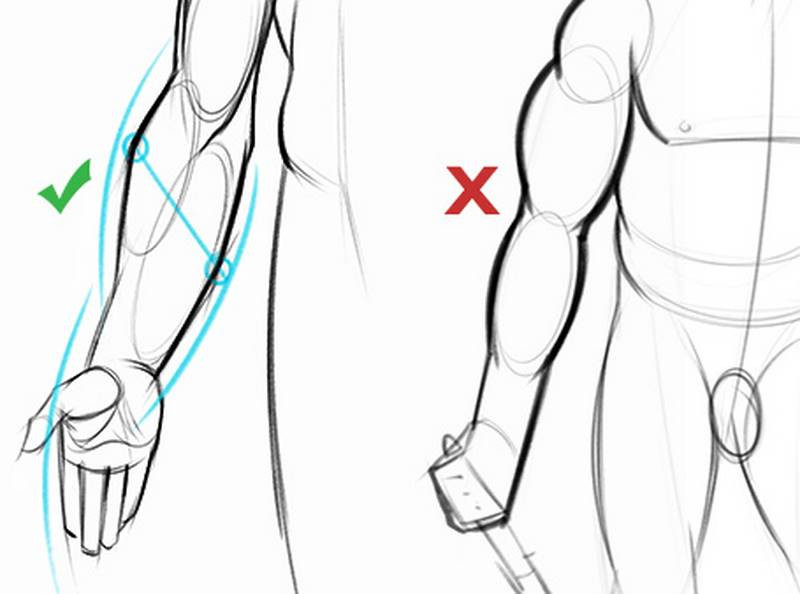
When drawing the Forearm, start with the chicken drumstick. You want to start simple and establish all the big proportions and simple forms first. Find the block of the wrist and use it to establish the perspective of the arm. You should know in your head whether the arm is supinated or pronated, and where the ulna and radius are. Then you can draw the individual muscle groups. Get the rhythm of the ridge muscles as they wrap around the arm, from lateral epicondyle to thumb. Split up your chicken drumstick into the individual muscles if they’re visible, and add the tendons at the palm side of the wrist. As you add the individual muscles, try not to lose the large mass of the 3 muscle groups. There’s a hierarchy. Primary forms first, then secondary forms.


