
I've taught drawing and painting for 10 years now. I've seen a lot of portfolios. I've critiqued thousands of assignments. And the problems I saw in student work back when I first started teaching are the same one's I'm still seeing now. These are fundamental issues that don't change with the latest version of photoshop or even what century you live in.
Before we jump in, I want to quickly mention that I'm working on a drawing basics course. It's meant to be a new artist's first course, to get you started doing the right things and hit the ground running. If you don't want to miss it when it comes out, get on the newsletter.
So, here are 5 shading mistakes you're probably making, and how to fix them.
#5 - Icing Before Cake
I meet artists all the time who are just starting out, and they're practicing techniques and anatomy and shading details and all this really cool stuff... But it's not making their drawings better. Why is that?
While they're focused on all the fancy fun stuff, they're making huge proportion mistakes, their perspective is off, and their gesture is stiff. That's not even icing before cake, that's icing without cake. You've got to build your pictures and your skills with the fundamentals first.
This is a drawing I did a few years into my studies. If you think it's really good, you've fallen for my tricks. At this point in my development I got good at shading. But it's filled with structural errors. I didn't really understand form. I just learned some effective tricks to make the drawing appear 3d. An exaggerated core shadow, some reflected light, and a bright highlight as a cherry on top. Wow, it's so easy! But it's all just a cheap distraction from the uninformed construction.
The icing might be the part that makes it look pretty or makes it stand out, but icing by itself is gross... It's empty calories. Remember this every time you want to draw eyelashes before the eye socket.

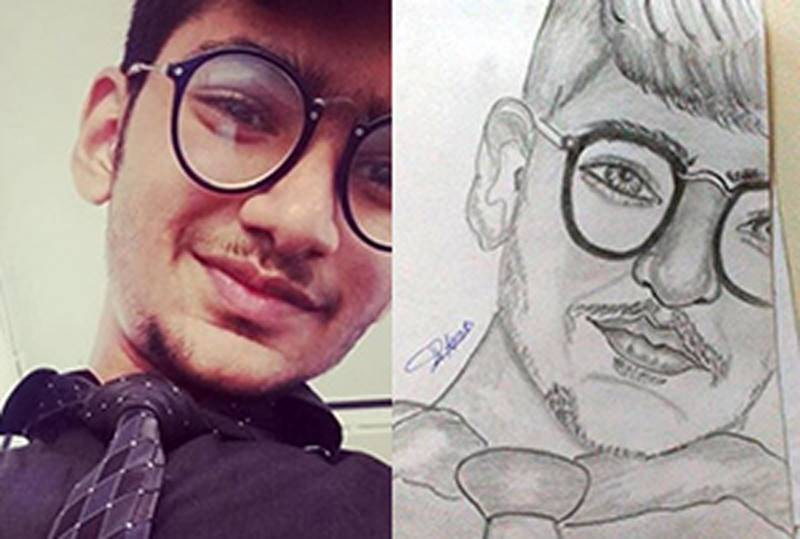
#4 - Bad reference
Whoa, hold up guys, I just got tagged and I've got to take a selfie... let's see... First, camera up high, very slimming. Kinda dark in here, turn flash on... Click... Alright, now I've got to choose a nice filter... Hmm... Tweak that a little bit... Perfect.
A photo like that is distorted and edited. It might be flattering or maybe even a good photo, but photography and drawing are two different fields. Something that makes a good photo won't necessarily make good reference for drawing.


Drawing from bad photos is super common, and super easy to fix. I wrote a blog post about it ages ago, so you can go there for a more detailed lesson on what makes good photo reference. But to paraphrase...

Don't use overexposed...

...or underexposed photos.

Don't use flat-lit...

...or flash-lit photos

Don't use blurry photos.

Don't use photo with extreme lens distortion.

Don't use tiny photos.
Make sure the resolution is high enough so you can at least see the forms of the nostrils and eyelids

And Don't use photoshopped photos from magazines.
When looking for reference, look for photos with good lighting and clear shadows, like this. This will translate into a dimensional drawing. Drawing from a flash photo with no shadows makes it much harder to define the forms in your drawing. It's possible, I've done it, but it takes a trained eye and ability to use subtle halftones to define the forms. Beginners usually end up with flat, muddy looking patches of tone. If you're just getting started, I recommend sticking to photos with lighting that clearly defines the forms.
You can find photo packs made specifically for artists that have good lighting and minimal touch-ups. I've got some here. In the long run, the best thing to do is learn how to take your own reference photos. And if you can draw from life instead, that's better than any photo.

#3 - Outlines
There's always a silver lining, but there's also not, because the real world doesn't have outlines. Yet as beginners, we all start by drawing thick, dark outlines around everything. Now, there's nothing wrong with linear drawing or cartoons if that's your intention. But if you're trying to draw realistically, you need to be thoughtful about your outlines. It's ok to use them. It's a mistake to overuse them, or use them as a crutch.

Stop thinking of 2D shapes and start thinking of 3D planes. Knowing the structure of the nose - that means the planes of the nose, which are based off of anatomy, will help you place patches of tone that make it look like a convincing nose. No need for outlines. You can draw a whole picture without any outlines, since that's how we actually see things.
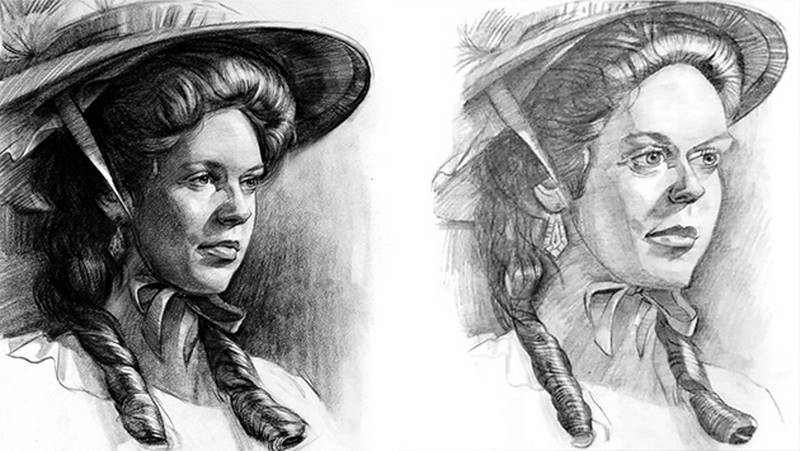
Masters like John Singer Sargent, know how to use both. In the face of this drawing, he's not using outlines, just tone. It's the center of interest, so he makes it more realistic.
In all these secondary elements, he uses outlines. The outlines are deliberate. The tonal face and the outlined parts have a nice contrast. And the outlines don't look boring. They have a variety to their weight. The jaw and neck are outlined. But the ear isn't. The edge is lost into the background. He used the outline sparingly only in areas where he wanted the forms to pop. The left side of the figure is separated from the background with a value difference.
The jaw, neck, shirt, bowtie, and jacket are all very similar in value. To separate them with tone, would require very subtle shading. In a quick drawing like this, too much detail in secondary elements could look overworked. A well placed outline is clean and simple. It does the job.

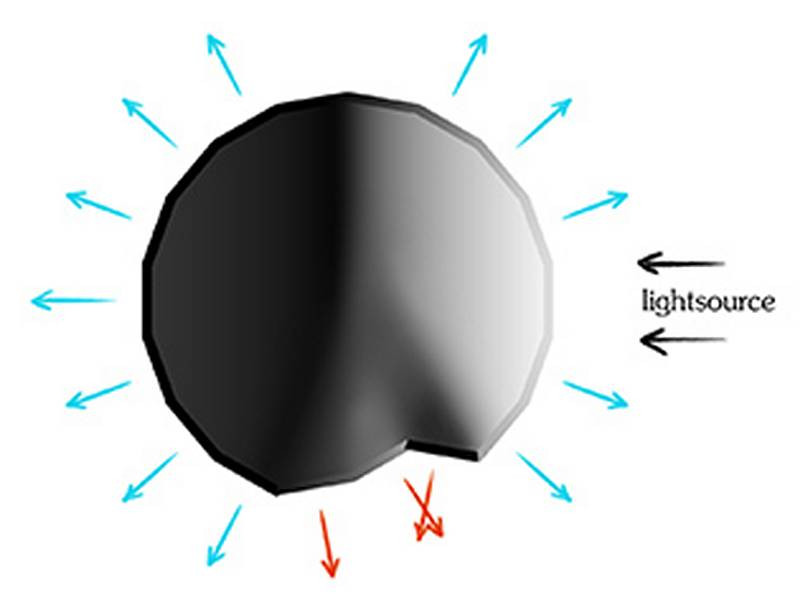
#2 - Afraid of the Dark
By removing the shadows, you remove the mood that the lighting created. And you're losing the 3-dimensionality of the forms. If you didn't like the lighting in the photo, why did you use the photo? Retake it! Don't make it that hard on yourself. Inventing a new light setup on a face is really hard. If you're advanced you can do whatever. You can draw a pretty girl while looking at a beaver! But if you're a beginner, don't.
So, to avoid muddy or cartoony drawings, learn how to see values correctly. When you're drawing, make sure you separate the light family from the shadow family. Remember the rule: the lightest dark is darker than the darkest light. If you're not sure what that means, this next mistake is for you.

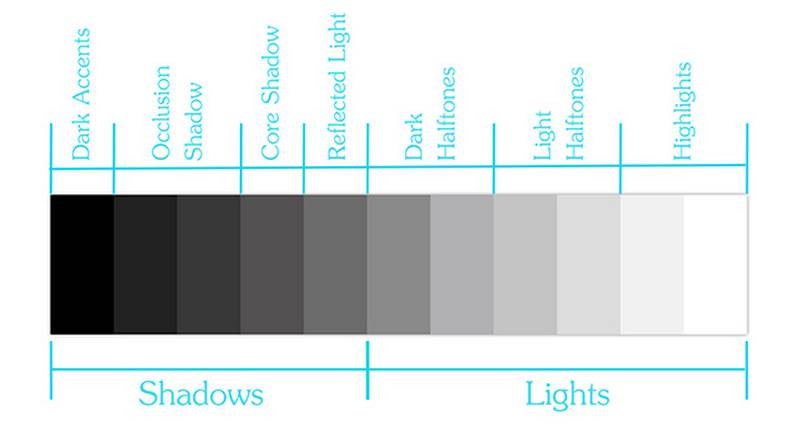
#1 - Sloppy Values

The most common shading mistake I see is not organizing your values correctly. Not making your shadows dark enough like I mentioned in the last mistake is one way, but making your halftones too dark is just as bad. So, general sloppiness with your value control is the bigger issue.

The first thing that is important to understand is that the value on any particular point on the surface is mostly determined by the angle of the surface in relation to the light source. Unless you're dealing with highly reflective surfaces, then they act more like a mirror to the environment. For now, let's stick to surfaces like skin, which are slightly reflective.
I did a lesson on "How to Shade a Drawing" a while ago. I highly recommend you watch that next. But generally, the part of the surface that points directly toward the light is called the center light.

It will be the brightest spot, excluding any reflected highlights.
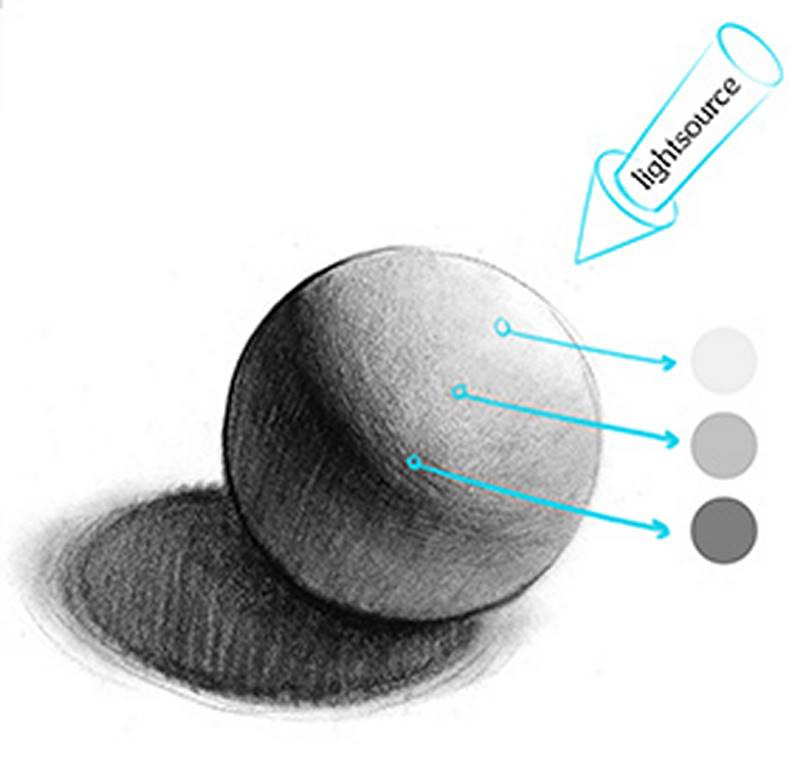
As the surface turns away from the light source, those planes will get progressively darker.
These are known as halftones. The more they face away the darker they are.
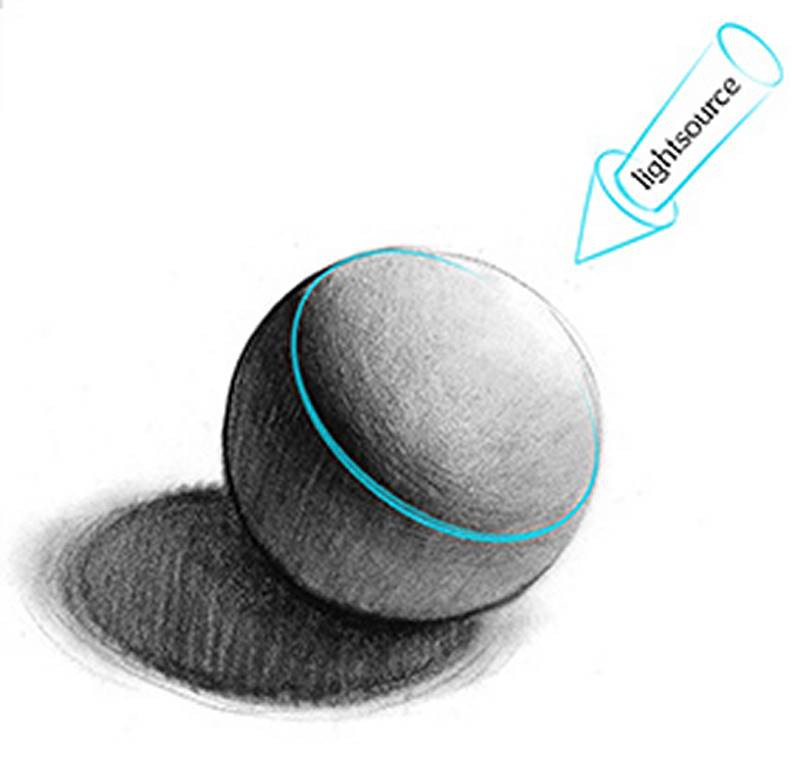
After we pass what's called the "terminator" the planes don't receive any direct light from the light source, since they are facing away from the light.
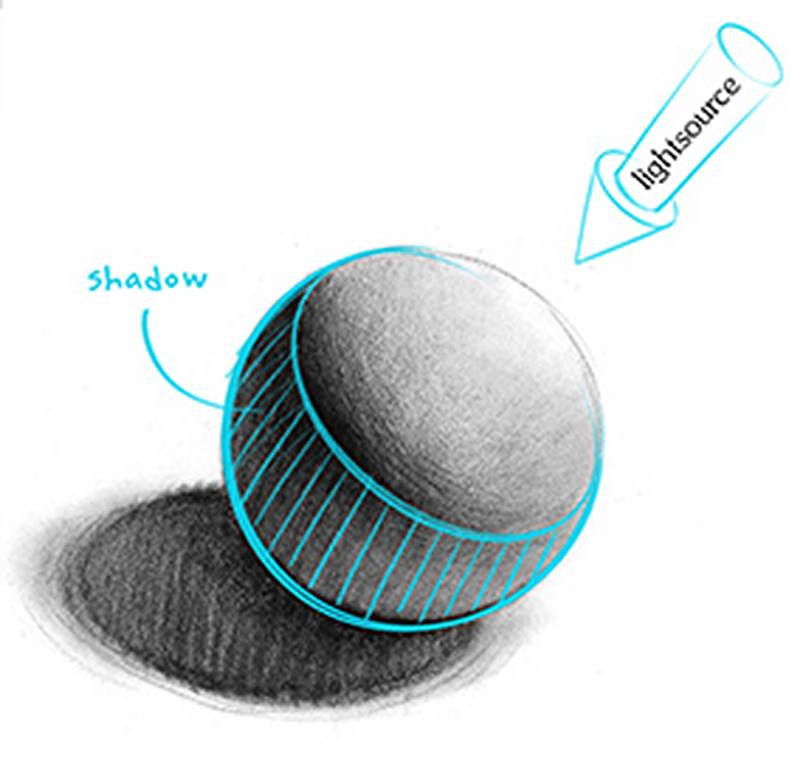
Everything in there is shadow. Unless you're in space, shadows won't be pure black.
Light will bounce off other things in the environment. So, within the shadows you'll have bounce light, or reflected light. But those are still darker than the halftones in the lit side. That's the general concept. There's also occlusion shadows, cast shadows, core shadows and highlights, but you can go watch the other lesson for the full explanation.
Ok, now that you understand form and how light reveals form, it's important to stay consistent throughout your drawing. Light reveals the 3 dimensional forms because the value of a plane tells the viewer the angle of that plane. If you make your halftones as dark as your shadows, then you're not communicating the correct plane angles and that breaks the illusion of form.
That brings us back to that rule: the lightest dark is darker than the darkest light. Let me rephrase that a little. The lightest shadow is darker than the darkest halftone. Make a little more sense?

You might think that the reflected light under the jaw would be lighter than the halftone on the side of his check, but you'd be wrong. Just sample the colors and extend them out to see.
So, if it's in the shadow family, it should be darker than anything in the light family. Organize your values and use them correctly in your drawing.
And I don't mean that you have to organize your values exactly like that.

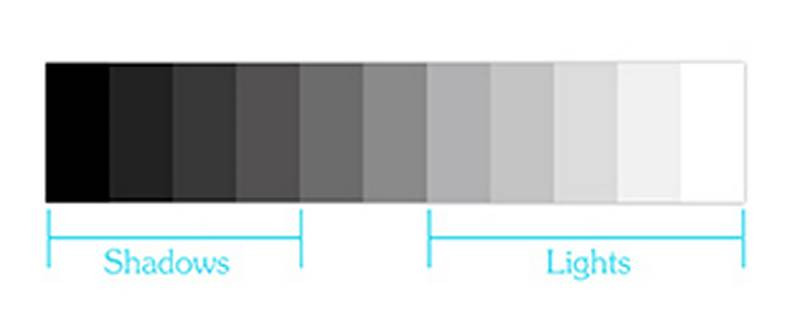

And the key is to stay consistent with that throughout your drawing. If you break that, it should be intentional.
There's also incomplete shadows: scratchy shading that has all these little holes of light in the shadow.

When the shadows are consistent and clean like the image below, it has a much more realistic and 3-dimensional feeling. The goal is to clearly communicate what is light and what is shadow. That makes clear 3D form.
Check out Stephen Bauman's patreon and instagram.

Here's another example of a master breaking the rules. Harry Carmean doesn't always fill in his shadows with clean tone. But, he's still clearly communicating what is shadow and what is light.
He uses the dark pencil only in the shadows. He uses the white pencil only in the lights. This clearly distinguishes the two. His mess is extremely well controlled. It's full of energy and fun to look at. It's skillfully designed, the anatomy is accurate and dynamic. It all holds together.

Again, if you want to participate in the Drawing Basics course, make sure you're subscribed.
And if you have a few seconds, do me favor. If you have any friends or classmates that make some of these mistakes, save them! Tell them about this video.


