


Josh Fiddler
Montreal
Burgeoning graphic artist and comics creator. Recovering mathematician, computer scientist, and pro chef.

Josh Fiddler
added comment inDemo - Depth and Form Line Weight
27d
Pierre Noire is charcoal? hurr Of course it is Josh. 😬
I also appreciate how Stan chose some funky shoes so a lot of y'all drew the same shoes or found your own shoes!
But I have to say, you are not solving your own problems! (I know! It's kinda scary!) You are learning to solve problems the way Stan solves them. But what about you? what are YOUR decisions? Your choices? That's what matters. Sure copying masters is a great practice, but you need to develop your own sensibilities and your own way to solve these problems.
Watch the demo to understand. Draw along, But then do your own subjects! Make it fun for yourself! Hate shoes? Like elves? Draw an elf instead! Love fashion design? Sketch an outfit! But do you!
Sanctimonious, unsolicited advice done.
28d
My line weight exercises. Level one Hierarchy of Importance. I should be doing level 2 as well, but this week is jammed with stuff. I will work on something later.
28d
Here's a post that attempts to TLDW what Stan himself says might be confusing:
Key Concepts:
Line Weight: Value, edge, thickness
Contrast: The (visual) tension Interplay between parts within the whole, in particular the between:
1) the subject and parts of itself, for example the contrast of the light and dark right at the edge of the rhino's jaw, or
2) between the subject and the background, mid ground, and foreground it is situated in. eg. The high contrast between the horn in shadow and the horn on the light side and the sky. On the shadow side there is much more contrast along the edge, while on the light side, there is very little contrast between the value of the horn and the value of the sky
NB: Because we aren't necessarily going to draw the environment here, we can kind of assume the whole page is like the sky and there is no dark midground full of bushes, and so decide how we will present those lines that are in shadow, like the screen left side of the nose would be high contrast, and those that are in light such as very back end of the rhino along the horizon line.
As Stan works his way around the reference, you'll notice he isn't focusing on say the contour and finishing that. Each area is being treated relative to the ones nearby and to the completed parts of the whole, going in and thickening or lightening lines as needed.
What may be confusing: contrasting whatnow?
Contrast is working on multiple levels. Contrast of edge, value, thickness relative to the subject, AND relative to the environment the rhino is in. So you're going to need to keep shifting perspectives from light to shadow, and thinking in terms of contrast to design your rhino.
Making Decisions: Talk to yourself like you're explaining it to a child
This part is exhausting as Stan demonstrates and he is the teacher so don't feel like you're not getting it. It's difficult and takes effort, as do all worthwhile things. But listen to how he interrogates the reference:
"This area is dark but is in the light, and there is less contrast here than here so we're going to use this kind of line." He does this again and again and gives a nice slow introduction with the horn, in particular. But he does this again and again, explaining his decisions and choices, trying to keep them consistent throughout.
Take Away:
- Talk to yourself about decisions you are making: ask questions and don't be afraid of making a mistake, you can always erase or do it again but don't be precious about it.
- Remember this is about creating depth and all the parts of line will help with this when thinking about them in terms of light and shadow.
- It's up to you how you what you want to emphasize and all parts of line and contrast will support your decisions but just be consistent!
Hope this helps.
29d
I think this is the single most important exercise I never did until now.

1mo
This looks promising i might take this to help mix up my practice, is there an estimated time for completion ?
Josh Fiddler
1mo
I think the length of material is near 18h but how long to do it is probably a few weeks if you’re slow like me.
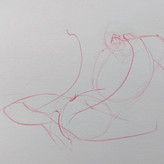
Here's my squirrel studies and my final guy.
Drawing from imagination is just drawing from memories, but memories that have been combined into something new... there is so much to unpack from that statement as it applies to algorithmically generated images and art. Oh man.
Most important take away for me? At 35:45, "If you thought about this line instead of the body underneath..." well poop. Yeah. I did.
It's these kinds of insights that I love about this course.
2mo
My Major Take-Aways:
Thoughts on Boxes
- Boxes are inevitable. Learn to love boxes. (I have. Thank you drawabox)
- let go of 'perfection' seeking, it will hold you back. (Fact)
- practicing these fundamentals slows you way way down now so that later, you can go way way faster at the things you’ve practiced and understood (uncomfortable fact for most people)
- ghost a few lines before applying pressure: you are practicing the motions and building muscle memory. Rotate the page if you need to but get comfortable pulling/pushing/throwing a line at a comfortable angle
Remember to critique your practice afterwards. For example:
- There is wobble in that one, move a bit faster to correct;
- you have a tendency to hook the lines at the end. Draw from the shoulder and draw through when you remove the pen from the page;
- Practice boxes in 1 and 2 pt before trying 3 point: with fewer VPs, can focus on practicing gauging the angles to one
Thoughts on Cylinders - Ellipses with straights:
- Start with ellipse and make sure width is fixed.
- Copy forward visible edge to the bottom visible edge to keep the form convincing
- Toothpaste tub-ification: Don’t foreshorten too much without ensuring that bottom forward edge of the base isn’t just a little “C” curve. Otherwise you end up with tapered toothpaste tube, and not a cylinder. and not a figure either.
- To show depth, when rotating forward, widen the minor-axis of the top face, and mirror this edge shape to the bottom, but scaled down. This curvature is essential to keeping volume
NB: The minor axis, when an ellipse is drawn correctly, gives the direction of the perpendicular to the face of the ellipse
My sketchbook is full of pages where I fill in the spaces around other exercises with ellipses and circles practicing size, degree, and control. Often around other drawings that weren’t successful as a drawing.
I highly recommend DRAWABOX for anyone who wants a hardcore bootcamp on everything this 20 minute video talks about, but over 7 lessons and several challenges that will indeed challenge everything you know about line and drawing, especially boxes, construction, and form intersections
Show all replies (1)
Hey, I'm just a fellow student, but I want to respond to all the folks feeling discouraged or bummed about the results. Draw lots, and eventually the 'pretty' drawings come. Or so I've been told.
I feel you! But don't get discouraged. It's not an easy thing! Remember that! This is hard! Look at mine! I've been at this for three years and I'm still learning and still sucking at times!
I want to give a few tips that might be helpful, as they helped me.
A good exercise is to warm up by just putting your pencil tip on the page lightly and skate it around, pressing harder or lighter. The goal isn't to make pretty thing (you can but not the focus). Instead, the goal is to feel how the pencil flows around the paper you are working on. Get a feel for how much the pencil grips the page or doesn't, or how your arm feels. Make big swooping lines and tight turns that are darker or lighter. Really push into the page or back right off. It's fun, and develops sensitivity. And make them Mario Shrooms!
Stan doesn't talk about the drawing posture much yet, but it's really important to be seated comfortably (or standing) with lots of room around and behind your drawing arm so that you can move primarily from the shoulder. Think you're stirring an enormous pot and you need to be able to get your elbow to move fully back as you bring your hand towards you, while drawing. The other thing is aim for something near 90 degrees of forearm to table/page. Less than 90 and the table will interfere with the arm's movement. More than 90 is okay but you don't want to be reaching out too far. Find something comfortable. You will be taking this posture often.
Always do a warm up before. The goal is to be loose, relaxed, and having fun! If you're tight and anxious and scared, there's no fun to be had, something I remind myself of every drawing!
I struggled with getting lost in details. Strategy for breaking that habit? As soon as you notice, stop drawing. Get up. walk around. Remind yourself. Start again. Physically break yourself away.
Show all replies (1)
3mo
Preordered and stoked for the release!


3mo
Asked for help
It was quite difficult to draw with only straight lines, hard edges and limited values, but a great exercise. I think I needed more dramatic shadows on my pear as I caught myself getting lost in the nuances of value and overthinking that part. It also needs to be a bit skinnier at the top, more pear shaped (ha!) Lots of issues I see with both, especially that ear in the portrait (lordy! :)). Still, I enjoyed myself. It's all about the process, right? Any suggestions are welcome.
3mo
You did really well! Choosing reference is challenging at first. I certainly haven't mastered it, but the pears included in the project had really clear shadow areas and lit areas. Your pear is a lovely pear, but the getting lost makes sense. Did you watch the critiques? He gives the best advice there: Design your values. Choose what is going to be light or shadow before. Use the halftones to indicate subtle plane changes. If you don't have enough lights to give the nuance you want with just two plus the paper, then take a value from the shadow family and use it as a light value, putting everything in shadow as the full dark value. The same idea can be true of a heavily shadowed scene, and you want to use the page as the only light value. You can use all the shadows to make more room to show things within those areas.
Are the outlines meant to be used as part of the darks? If you make all your values darker by a bit, and avoid outlining shapes, you might avoid getting lost. Values with lots of contrast right next to one another tend to exaggerate one or the other, making darks look darker or lights look lighter. If you didn't, try blocking in your shapes, one value at a time, shading the edges of the shapes all to the same value, one value at at time, and drawing very lightly so as not to exceed the value the shape will be. I did my lightest shadow first then my darkest light, followed by darkest dark, and then my half tones, leaving the highlights for last, fixing the spots with an eraser because they got shaded in. ;-)
But if you haven't watched the critiques, you should definitely. And then keep this exercise in your tool box. Super useful!
Show all replies (1)
Show 2 more replies

Before and after. Placement and proportions definitely need work, but basically happy with the shading. Not bad for first week of drawing. Also need to avoid smudging.
3mo
I use a sheet of scrap printer paper or the like to rest under my hand. This helps with the smudging a lot.


Does this look about right?
3mo
They look lovely. In my experience, you're going to have some harder edges where the graphite more rapidly changes angle from the drawing edge to the edge of the pencil shaft itself. If you look at what Stan has, there is a much softer, longer transition from the drawing tip to the shaft to avoid this.
That said, you may want to have a hard edge like that but that's a question of edge control you may develop later.
EDIT: I added a screen cap from the video from 8:54
Marshall's most salient contribution: Drawing awesome stuff in your sketchbook might impress your friends but it will slow down your growth!
Just look at all the social posts that start "Let's look at my sketchbook!" and it's just immaculate drawings and sketches.
These are all seasoned and practiced artists! What you are seeing is the result of years of bad drawings and they aren't showing you that sketchbook!
Remember socials lean to presentation and not practice. hmmm... gives me an idea...
Show all replies (1)
3mo
Hey Gang! Just joined to polish my fundamentals! It's something I kinda rushed past out of sheer enthusiasm and lack of focus or mentorship or community! So, I'm keen to start or join a group of like-minded enthusiasts! You can find me here or on instagram or the drawingFORCE Discord server @the.y.method. I'm always good for a critique if you need one or are stuck, or some encouragement and reinforcement if you're feeling down!
Have fun drawing and making art!


5mo
For tip #5: Rotating the paper, is rotating the paper a valid long term strategy? Or would it be better in the long run to practice the "awkward angles" so that they're as good as my normal angles?
3mo
There will come a day where you cannot rotate the "paper" because it might be a wall or a canvas or other object not given to easy rotation. But no need to go nuts. Rotate the page now, and once your quality and speed is up to snuff, the technique is right, then practice the odd angles but still don't go crazy. You'll be able to rotate the paper for a while yet, and iPads, and drawing tablets all do touch now so there's still a good reason to rotate the page. I say wait to practice it because killing bad habits is way harder than learning good ones right away.
A bonus of rotating the paper is that it kinda divorces you from the subject so you get used to seeing it from different points of view, which can help reveal imbalances and flat or stiff work.
Show all replies (1)
Show 1 more replies
Show all replies (1)